
Cookware User Manual


4
INSTRUCTIONS FOR USE
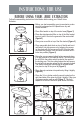
BEFORE USING YOUR JUICE EXTRACTOR
Follow the assembling instructions listed below before using your Oster® Juice
Extractor:
• Before you start assembling your juice extractor, make
sure it is unplugged and it is placed on a dry and
leveled surface
• Place filter basket on top of the motor base (Figure 1)
• Place the stainless steel filter on top of the filter basket
turning it until it fits into the grooves of the motor shaft
(Figure 2)
•
Place juicer cover/lid on top of the filter basket (Figure 3)
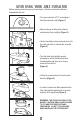
• Place removable food chute on top of the lid and turn it
until tabs fit into tab grooves or by aligning the arrows
on the chute with the arrows on the lid. Once the tabs
are inside the grooves, turn the chute clockwise until it
locks into position
(Figure 4)
• Raise the one movement safety locking arm and place
it on the grooves on the sides of the lid. The food chute
fin will fit into the safety switch located in the center of
the locking arm. This is a safety feature that will ensure
the unit will not operate unless the lid is properly locked.
The safety locking arm should now be up and locked
into place on top of the juicer lid
(Figure 5)
• Place the pulp container into position by tilting it slightly
(Figure 6)
• Place the 34 oz. pitcher under the spout located on the
right hand side of the juicer by tilting it slightly. Other jars
or glasses can be used as well
(Figure 7). The froth
separator will allow to serve the juice without the foam
Figure 1
Figure 2
Figure 3 Figure 4
Figure 6
Figure 7
Figure 5