
User's Manual


Wireless Office Keyboard And Mouse
21
2. WIRELESS ERGO OPTICAL MOUSE FUNCTIONS
An Optical Mouse Function icon will be shown in system tray
after Magic Function has been installed. Appears "
ERGO Optical
Mouse
" as the Hint when mouse comes over it.
A Pop-up Menu will appear with a mouse right-clicking of Ergo
Optical Mouse icon in system tray.
The Pop-up Menu contains:
Option: To bring up the options dialog box for you to program
Mouse AP.
Show/Hide Ergo Optical Mouse Icon: Show/Hide Ergo Optical
Mouse Icon and the default setting is "Show"
Help: Launch Help file of Magic function.
About: Information about the driver
Exit: Exit “Magic function” program
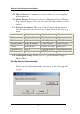
Magic Function Configuration:
The Magic Function configuration tool will be located in the
"Mouse Properties" from the MS "Control Panel"
3. SETTING WIRELESS ERGO OPTICAL MOUSE AND
PROGRAM
Setting Wireless Ergo Optical Mouse:
A. Make sure the receiver cable (purple) is plugged into the PS/2
keyboard port and the other cable (green) is plugged into the PS/2
mouse port.
B. Establish communication between the receiver and keyboard. The
bottom of the receiver has a channel switch. The bottom of the
keyboard also has a channel switch. When the receiver’s switch
setting on CH1, then the keyboard and mouse’s channel switch
should be setting on CH1. If the keyboard and mouse setting
different channel with receiver, then they won’t work normally.
See the photograph in next page.
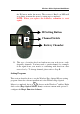
C. The bottom of the receiver and mouse both has an ID setting button.
Press the ID button on the receiver first; then the receiver’s Batt
Low LED will glitter (about 0.5 second glitter one time). Then press