
Installation & Assembly

Important: Always disconnect the power before installing or replacing bulbs and before cleaning or other maintenance.
This light should be installed by a licensed electrician
CARE INSTRUCTIONS
Dusting – Use a clean, dry cloth.
Cleaning – To protect the finish,
avoid any harsh abrasives or chemicals.
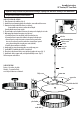
outlet box
canopy
universal mounting plate
metal shade
outlet box screw
glass
Philips screw
canopy nut
E12 Candelabra base bulb
support tube
Fig. 2
Fig. 1
glass bracket
screw
bottom stem
hang straight
Assembly Instructions
23" Pendant, 23‰ Semi-Flush
LAMP INSTALLATION AND ASSEMBLY
1. Shut off power to the outlet box. (fig. A)
2. Attach the universal mounting plate to the outlet box, secure with outlet box screws.
3. Determine the height at which the fixture is to be hung.
Screw together stem sections to achieve desired length.
Screw the bottom stem to hang straight.
4. The cord lengths can be shortened if necessary by cutting cord to length plus six inches.
5. Make appropriate electrical connections using wire nuts:
a. Connect the fixture’s live wire (black) to the live outlet box wire.
b. Connect the fixture’s neutral wire (white) to the neutral outlet box wire.
c. Connect fixture’s ground wire (green or uncoated) to the ground outlet
box wire. If no ground is present in outlet box, connect fixture’s ground
wire to the mounting plate using the green screw (included).
d. Carefully place connections in outlet box.
6. Attach canopy to universal mounting plate, secure with canopy nuts.
7. Install 60W E12 Candelabra base bulbs. (not included)
8. Place glass inside the metal shade, secure with glass brackets and screws. (Fig. 1)
9. Attach metal shade to support tubes, and tighten with Philips screws. (Fig. 2).
10. Restore power to the fixture.
stem