
Installation & Assembly


Page 4 of 5
Turn right (clockwise) to tighten
Turn right (clockwise) to tighten
#B x 2 pcs
#G x 2 pcs
#H x 2 pcs
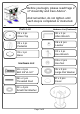
I. Align the base (#3) with
the pre-drilled holes of the
pedestal (#3).
II. Prepare 4 bolt assemblies
by inserting the small lock
washer (#C) onto the bolt
(#A).
III. Insert the bolt assemblies
through the pre-drilled
holes on the base (#3) and
secure those bolts using
the Allen wrench (#D) to
lock them with the
pedestal (#3).
IV. Align the threaded end of
the 6 levelers (#E) with the
pre-drilled holes on the
base (#3) and tighten by
hand until secured.
#A x 4 pcs
#C x 4 pcs
#E x 6 pcs
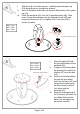
I. With the help of another person, carefully place the glass top
(#1) facing down on a protective surface.
II. Insert 2 threaded studs (#B) into the pre-drilled holes of the glass
top (#1).
III. Place the pedestal (#2) over the 2 threaded studs (#B). Then
insert 2 large flat washers onto the threaded studs (#B) and
using the hex wrench (#F) to tighten the 2 hex nuts (#H) to
secure the parts.