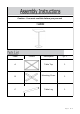
Caution : You must read this before you proceed Table Label A B C Picture Description QTY Table Top 1 Mounting Cross Table Leg 1 1 Page 1 OF 6
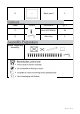
D Base panel 1 Description QTY ① Bolt (M6*35MM) 16 ② Allen Key 1 Label Picture Before Beginning Assembly: Page 2 OF 6
Overview FRONT FACING This Table has multiple parts and may require up to 15 minutes to assemble. To give you an overview of the Table parts, the above picture is to help you put the various parts into perspective. Please read through the instructions below to familiarise yourself with the parts and steps before assembly. Step 1 Open the carton and place all the parts onto a clean, non-marring surface.
Step 2 Attach the Table Top (A) to the Mounting Cross (B) and Table Leg (C) using Hardware (①) with Allen Key (②) as shown in Picture. Fully tighten at this stage. Step 3 Attach the Base panel (D) between the Table Leg (C) using Hardware (①) with Allen Key (②) as shown in Picture.
Step 4 Stand the Table up,then your Table is ready for use. This Table can only be used on the flat and level surface.
Do not put hot items directly on furniture surface Do not clean furniture with harsh cleansers or polish. To obtain the longest lifespan of your outdoor prodcts, minimizing exposure to direct sunlight is recommended. Children should not climb or jump on the furniture. Do not write on furniture without a padded barrier to protect the surface. To obtain the longest lifespan of your outdoor products, avoid extended and lengthy exposure to rain, snow, and direct sunshine.