
Installation Guide

Installation Guide
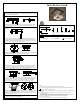
STEP 6
STEP 2
STEP 5
STEP 1
Turn off the power at the breaker box. Test that the power is off at the ceiling
junction box with a circuit tester.
Mark the position of the hanger's holes on your ceiling. Next, thread a screw
(6) through one of the mounting holes for the canopy from the inside of the
hanger as shown.
STEP 3
Drill the ceiling holes for the plastic anchors (2). Install the provided plastic
anchors into the holes you've just drilled. Mount the hanger with the 4 screws
provided. The 3/4" screws (3) are screwed into your junction box. The 1 1/8"
screws (4) are screwed into your plastic anchors.
All support lines should be at the same height. Push the lock nuts up to release
the lines and pull through accordingly. Release once your height is set and
tighten the hex screw with the allen key on the inside of the canopy to lock the
nut and keep the lines in place.
2x +
1 extra
1 1/8"
2 3 4 5
2x +
1 extra
3/4"
4x +
1 extra
1 1/8"
2x +
1 extra
6
4x
1/2"
1
33
2
4
2
4
! IMPORTANT SAFETY INSTRUCTIONS
When installing or using the lighting system, basic safety precautions should always be followed including
the following:
1. It is highly recommended this installation should only be performed by a licensed electrician.
2. Read all instructions.
3. Before turning the power back on, make sure that the light system is clear of all material which could
cause a direct short and check all electrical connections to make sure they are right.
4. Caution - hot surface. Keep away from curtains and other combustible materials.
5. Do not touch hot lamp lens.
6. Do not touch lamp at any time. Use a soft cloth. Oil from skin may damage lamp.
Parts component list
1x
1
Allen key 1.5mm
L = Line/Hot/Black
Connect the power and neutral wires using the provided wire caps. Connect
the white wire from the fixture to the neutral wire in your ceiling junction box.
Connect the black wire to the power wire in your ceiling junction box. Connect
the bare copper ground wire to the green screw on the hanger.
Mount the fixture ceiling canopy to the hanger using the provided 1/2" screws
(6). First, slide the canopy over the screw (6) that was already installed from
the inside during step 2 and secure it with the decorative nut (7) as shown.
Next, mount the remaining three screws from the outside (6) as shown.
STEP 8
Turn your power back on at the breaker box.
STEP 7
5
5
6
NOTES
1. Do not cut the lines, this will damage your light and void your warranty.
2. See instructions for WIFI integration (where applicable) and remote integration (where applicable).
STEP 4
Clip the light fixture to the mounting hanger (1) as shown. This will support the
weight of the light fixture for you to continue to the next step.
1
6
FIRST
SECOND
6
1
7
7
1x
Legend
N = Neutral/White = Ground/Green