
User`s manual


Table Of Contents
- Copyright and Trademark Notice
- About This Manual
- Limited Warranty
- Safety Warnings
- Table of Contents
- Chapter 1: Introduction
- Chapter 2: Hardware Installation
- Chapter 3: First Time Setup
- Chapter 4: System Administration
- Overview
- Web Administration Interface
- Language Selection
- System Information
- System Management
- System Network
- FTP
- Media Server
- HTTP/ Web Disk
- UPnP
- Nsync Target
- Bonjour Setting
- Storage Management
- User and Group Authentication
- Application Server
- iTunes® Server
- Module Management
- Module Installation
- System Module
- User Module
- Backup
- Chapter 5: Using the N7700SAS
- Chapter 6: Tips and Tricks
- Chapter 7: Troubleshooting
- Chapter 8: Revision updated (FW 3.00.03 to 3.00.04)
- Chapter 9: Revision updated up to FW 3.00.08
- Chapter 10: Version 3.01.00 Firmware Updates
- Appendix A: Product Specifications
- Appendix B: Customer Support
- Appendix C: RAID Basics
- Appendix D: Active Directory Basics
- Appendix E: Licensing Information
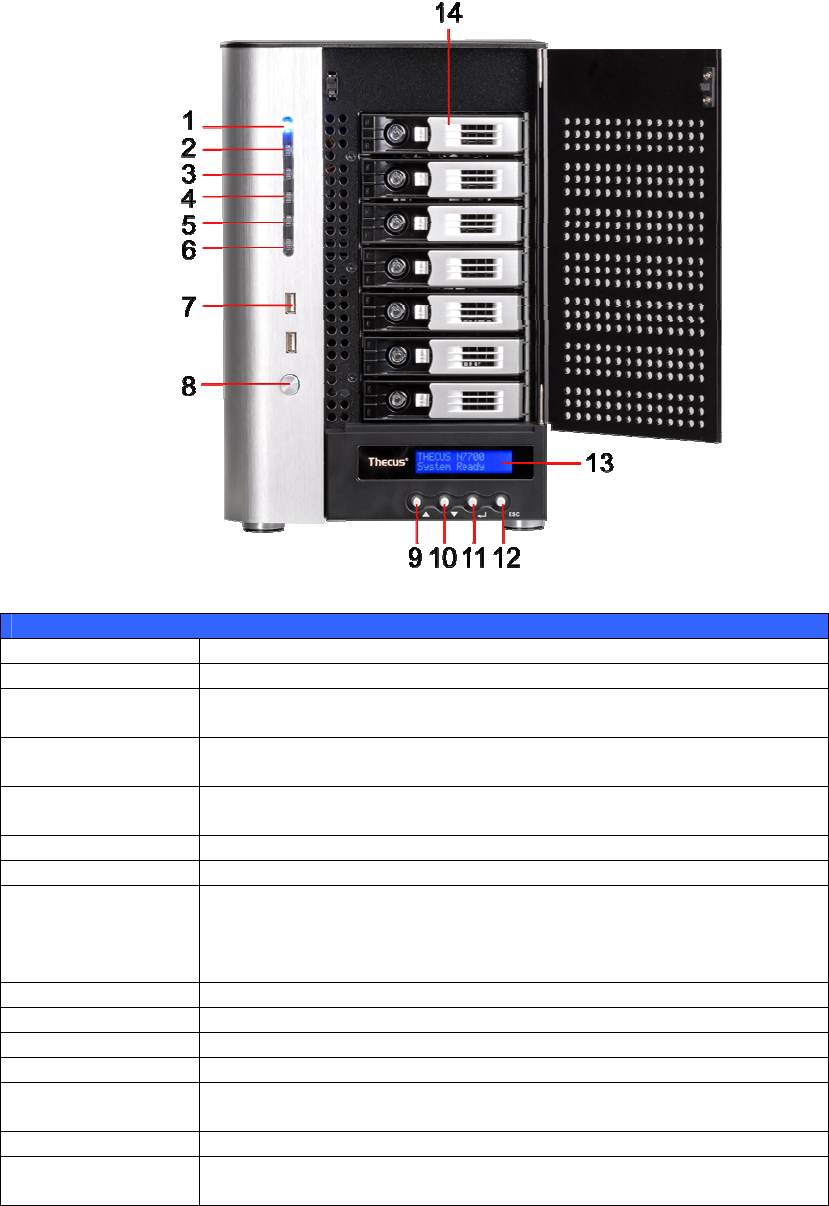
Front Panel
The Thecus N7700SAS’s front panel has the device’s controls, indicators, and hard
disk trays:
Front Panel
Item Description
1.Power LED • Solid blue: System is power on.
2.System LED • Solid orange: system is being upgraded or system startup; data
currently inaccessible
3.WAN LED
• Solid green: network link
• Blinking green: network activity
4.LAN LED
• Solid green: network link
• Blinking green: network activity
5.USB Copy LED • Solid blue: files are being copied from a USB storage device
6.eSATA link LED • Solid blue: external eSATA device has connected
7.USB Port
• USB 2.0 port for compatible USB devices, such as USB disks, USB
printers, and USB wireless dongles*
Note: For supported USB wireless dongles, please contact
http://esupport.thecus.com/support
8.Power Button • Power on/off N7700SAS
9.Up Button ▲ • Push to scroll up when using the LCD display
10.Down Button ▼ • Push to enter USB copy operation screen
11.Enter Button ↵ • Push to enter LCD operate password for basic system setting
12.Escape Button
ESC
• Push to leave the current LCD menu
13.LCD Display • Displays current system status and warning messages
14.HDD Trays • Seven 3.5” SATA/SAS HDD trays
• Locks are provided for added security
12