Amplified speaker Phone TP110 User guide keep for future reference
1 General Information and Warnings • The telephone is designed for indoor use only. Do not install the telephone in areas where there is the risk of an explosion, excessive exposure to smoke, dust, vibrations, chemicals, moisture and heat. • Do not use your telephone during an electrical thunderstorm as it is possible to get an electric shock. Refer to information contained in Telstra White pages directory. • The earpiece of the handset may attract small metal objects such as staples and pins.
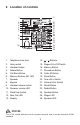
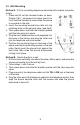
2 Location of controls 1 11 2 3 4 5 6 7 12 13 14 15 16 17 18 19 20 21 22 23 CALL BACK M1 DELETE M2 8 9 3 4 5 RECALL REDIAL 10 1. 2. 3. 4. 5. 6. 7. 8. 9. 10. 11. 12. 13. Telephone Line Jack Hook switch Handset Holder Delete Button Call Back Button Memory Buttons (M1, M2) Speaker Keypad Handset volume control Receiver volume LED Flash time Switch New Call LED Display SPEAKER 14. 15. 16. 17. 18. 19. 20. 21. 22. 23. 24. 25. 26.
3 Installation 3.1 Installing batteries (supplied) in the phone You must install 4 AA Alkaline batteries (supplied) in the phone base, or the display and Caller ID will not work. Warnings Before opening the battery compartment, make sure the telephone is disconnected from the telephone line and the mains power supply. 1. Use a flat-blade screwdriver or tip of a pen to lift and remove the battery compartment door. 2. Insert four AA batteries into the compartment as indicated by the polarity symbols. 3.
3.3 Wall Mounting Method A. To fit to an existing telephone wall plate with modular connector simply, 1. Press and lift out the handset holder on base. Rotate it 180° , and snap it into place (see A) so it will hold the handset in place when the phone is mounted on the wall. 2. Insert the mounting bracket’s two tabs into the fig A matching slots on the phone’s base. (see fig B) 3. Then press down and slide the bracket upward until the tabs snap into place. 4.
4 Basic settings 1. After installing the batteries, the display should flash the word ENGLISH”. If not press and hold for approximately 4 seconds. 2. Select the desired language using or . Press DELETE button. 3. Select the desired contrast setting (2=Default) using or . Press DELETE button. 4. Set the hour (00-23) using or . Press DELETE button. 5. Set the minute using or . Press DELETE button. 6. Set the day using or . Press DELETE button. 7. Set the month using or . Press DELETE button. 4.
5.1 Making a call 1. Pick up the handset or press SPEAKER button (the speaker LED will light) and wait for a dial tone. 2. Dial the number you wish to call. The display will show the number that you are dialling. If you dial a number over 14 digits long, it will show the last 14 digits only. 3. When you have completed your call, hang up the handset or press SPEAKER button again to release the telephone line.
5.6 How To Turn on Telstra call waiting (Australia) You can use the RECALL button to answer a second call while you are on the phone. However this service will need to be turned on. For example to turn on Telstra’s Call Waiting service: 1. Lift the handset and wait for dial tone then Press *43#. 2. You will hear the service message and then hang up. Take two different calls at the same time During a call, you will hear two loud beeps periodically to notify you of another incoming call.
6.0 Receiver Tone Volume Control You can use the TONE slide switch to adjust high frequency sounds. Words are clearer and easier to understand. Note: The tone adjustment function will not work if the receiver volume is set to the minimum level. 6.1 Hearing Aid Compatibility This unit is compatible with most inductively coupled hearing aids on the market. However due to the wide range of hearing aids available we cannot guarantee that the TP110 will function error free with every model. 6.
6.2.2 Dialling from the Phone Book 1. Press . 2. Scroll to the required memory location using or . To quick-search in the Phone Book press the corresponding number button one or more times for the first letter (refer to the table on the previous page). 3. Press CALL BACK or SPEAKER to dial the displayed number. If you do nothing the phone will return to standby mode. 6.2.3 Changing phone numbers/names 1. Press . 2. Scroll to the required memory location using or . 3.
7.3 Storing numbers in Memory locations 0-9 1. Press STORE button. 2. Enter the telephone number to be stored (up to 22 digits). Press STORE button. 3. Enter the name (up to 16 characters) . Press the corresponding number button one or more times for the first letter (see the above table). Press STORE button. 4. Press either 0-9 to store the number. 7.4 Dialling numbers in Memory locations 0-9 1. Lift the handset or press SPEAKER button and wait for a dialling tone. 2. Press MEM button. 3.
8.2 CID Call Types Besides showing telephone numbers, the display can show a number of messages: OUT OF AREA It is an International call or a call from a PBX (no information received). PRIVATE Information on the number is blocked. The call could also be from a PBX. NEW Number not previously seen. Several calls have been received from the same caller. 8.3 Deleting Numbers 1. Scroll to the telephone number you wish to erase using or . 2.
9.2 Warranty Information (a) Warranty Oricom warrants that the product is free from defects in materials and workmanship for a period of 12 months effective from the date of purchase. This warranty in no way affects your statutory warranty under the Trade Practices Act 1974 or any other similar legislation.
9.3 Cleaning and care The surface of the case can be cleaned with a dry, soft, lint-free cloth. Never use cleaning agents, particularly aggressive solvents. Apart from occasional cleaning of the case, no other care is necessary. The rubber feet of the base station are not resistant to all cleaning agents. The telephone feet do not normally leave any marks on the surface.