Oricom eco5200 Series Cordless phone with integrated answering system USER GUIDE Keep this user guide for future reference. ! WARNING DO NOT USE STANDARD/ALKALINE BATTERIES IN THIS PRODUCT, AS THERE IS A RISK OF EXPLOSION AND/OR INJURY. USE ONLY Ni-MH RECHARGEABLE BATTERIES AS SPECIFIED IN THIS USER GUIDE. CONTACT ORICOM FOR REPLACEMENT BATTERIES.
CONTENTS CONTENTS WARNINGS AND SAFETY INFORMATION ………………………………… 1 Important ……………………………… 1 Getting Started ………………………………………………………………… 2 Installation and Charger ……………… 2 Understanding the cordless handset Warning ………………………………… 3 display ………………………………… 6 Pack contents …………………………… 4 Your eco5200 base unit ………………… 7 Purchasing additional handsets ……… 4 Bottom …………………………………… 8 Your cordless handset ………………… 5 Basic Operation ………………………………………………………………… 9 During standby ………………………… 9 Cordless handset's LCD
CONTENTS Caller ID Operation …………………………………………………………… 14 Review Caller ID records …………… 14 Delete one or all CID record(s) …… 15 Store a CID number ………………… 14 LNR Function (Last Number Redial) ………………………………………… 16 Redial the last number ……………… 16 Delete last number dialled ………… 17 Store the last number dialled ……… 17 Phonebook ……………………………………………………………………… 18 Add new records ……………………… 18 Delete one record …………………… 19 Review / Edit / Dial stored Phonebook records ……………………………… 18 Cordless Handset Operat
CONTENTS Answering Machine Operation ……………………………………………… 26 Answering machine On / Off ……… 26 Record ICM ………………………… 30 Day/Time setting ……………………… 26 Play ICM ……………………………… 30 Answering machine Ring delay Setting 27 Memo …………………………………… 31 Answering machine PIN number Setting 27 Record memo ……………………… 31 OGM (Outgoing Messages) ………… 28 Play memo …………………………… 31 OGM setting ………………………… 28 Delete messages ……………………… 31 Record OGM ………………………… 28 Delete one message………………… 31 Play OGM …………………………… 29 Dele
WARNINGS AND SAFETY INFORMATION WARNINGS AND SAFETY INFORMATION Avoid exposure of this telephone to moisture or liquid. To prevent electric shock, do not open the handset or base cabinet. Do not use the handset in an explosive hazard area such as where there is gas leaking. Do not use your telephone during an electrical thunderstorm as it is possible to get an electric shock. Refer to information contained in the White Pages Directory.
GETTING STARTED Getting Started Installation and Charger 1. Connect the mains adaptor (supplied) to the socket on the back of the base unit and to the wall mains supply. 2. Connect the telephone cord to the phone socket on the back of the base unit and into the wall phone socket. Important: DO YOU HAVE BOADBAND/ADSL? If you do, you must connect an in line filter (not supplied) between the telephone socket and your eco5200 base to ensure that your broadband and eco5200 will work properly.
GETTING STARTED WARNING RISK OF EXPLOSION IF BATTERY IS REPLACED BY AN INCORRECT TYPE. Never use non-rechargeable batteries. Use recommended type supplied with this product. Never use alkaline or lithium batteries. Do not dispose of the batteries in a fire, as they can explode. Do not open or mutilate the battery. Released electrolyte is corrosive and can cause damage to the eyes or skin. It can be toxic if swallowed. Avoid contact with metal objects when handling the battery.
GETTING STARTED Pack contents Depending on the model you have purchased this pack should contain the following items: If any of these are missing, please contact Oricom directly. eco5200-1 eco5200-2 eco5200-3 Base units 1 1 1 Cordless handsets 1 2 3 Charging cradle and power adaptor 1 1 2 Power adaptor 1 1 2 Line cord 1 1 1 User guide 1 1 1 Handset Rechargeable AAA Ni-MH Batteries (1.
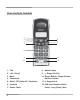
Your cordless handset 1 2 3 4 5 6 7 8 9 11 10 12 1. Talk 8. Numeric keys 2. Left / Recall 9. 3. Menu 10. Ringer Melody / Ringer Volume / 4. Phonebook / Ringer Off (On) Receiver Volume 5. Right / CID (Caller ID) / Handsfree 11. # / Keypad lock 6. Intercom 12. LNR (Last Number Redial) / 7.
Understanding the cordless handset display Left Arrow / Phonebook records Connected to telephone line.
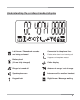
Your eco5200 base unit 1 2 3 4 16 FULL R ANS MEMO P 15 X 5 6 7 8 9 10 11 12 13 14 1. Battery charge/Call Light 2. Message Full Light 3. Play/Pause Play MEMO/ICM Message; Pause playback. 4. Message/Power Light 5. Rewind/OGM(ANS) operation mode 8. Delete 9. Forward/MEMO Recording MEMO, Skip to next Message 10. Page Base page handset and call transfer Recording/Play OGM, Repeat Message, 11. Speaker Volume Down Press twice for Skip to previous Message 12. Recall 6.
GETTING STARTED Bottom 2-9/GS (Answering Machine Rings) CODE (Answering Machine PIN) 8
BASIC OPERATION Basic Operation During standby Note: If the power is not connected to the base unit. The cordless handset CANNOT operate. Cordless handset's LCD display HANDSET 1 : Handset number HANDSET : Current battery level : A constant signal icon indicates the cordless handset is linked to the base unit. When signal icon is flashing the handset needs to be re-registered (see page 23).
BASIC OPERATION Making an external call With cordless handset Normal dialling 1. 2. 3. Press key. Enter a telephone number. If you enter more than 14 digits, you only see the last 14 digits on the display. Press key to end the call. Pre-dialling 1. 2. 3. 4. Enter a telephone number. When necessary, press to erase the digit individually. Press key to dial. Press key to end the call. With base unit 1. 2. 3. Press key. Enter a telephone number. Press key to end the call.
BASIC OPERATION Recall feature Recall feature can be used when you are using some services provided by your network operators such as “call waiting”, etc. A subscription may apply for these services, contact your network operator for more information. While you are talking on the phone, press R key on the base unit or the cordless handset to send a Recall. key on Call waiting (Australia only) You can use the recall function to answer a second call while you are on the phone.
BASIC OPERATION Recall function when connected to a PABX If you have connected your telephone to a PABX, you can use all the facilities such as call transfer, automatic recall, etc. The R key provides access to these facilities. Pause feature when using on a PABX Note: The pause function described in this section is only necessary when the eco5200 is used on older PABX’s. With some PABX's, there is a short pause between the code for the outside line (usually 0 or 9) and obtaining dial tone.
BASIC OPERATION Volume adjustment (with base unit) Speaker volume control During speakerphone mode, 1. Press or Step 8 (hightest). 2. The unit automatically returns to the previous talking mode 2 seconds after pressing the last key. key to adjust the Speaker volume level: Step 1(lowest) to Ringer volume control During incoming call, 1. 2. Press or to adjust the ringer volume level: 5 steps. The unit automatically returns to the previous mode 2 seconds after pressing the last key.
CALLER ID OPERATION Caller ID Operation If you subscribe to your telephone operators service (charges may apply), numbers of the incoming calls will be displayed on the screen and stored in the call log (please consult your telephone service provider for details). The eco5200 series can store the last 30 calls including: the record number, date/ time, and phone number (up to 23 digits for the cordless handset).
CALLER ID OPERATION 4. 5. Press the numeric keys to edit the Phone number. Press key to confirm. The record is now saved into the phonebook. Then it goes back to the call log. Delete one or all CID record(s) Delete one CID record While you are viewing the CID record that you wish to delete, 1. 2. Press Press key. key to confirm. The display shows previous CID record. Delete all viewed CID records While you are viewing any CID record, 1. 2. Press and hold Press key. key to confirm.
LNR FUNCTION LNR Function (Last Number Redial) This function in only available for handset. Redial the last number Your cordless handset stores the last 3 external numbers dialled, up to 25 digits per number. If the number exceeds 25 digits, the first 25 digits will be stored to memory. During standby mode, 1. 2. 3. Press /P key. When necessary, press number. Press key to dial. Press key. /P key again until you have selected your desired Or 1. 2. Press /P key to redial the last number.
LNR FUNCTION Store the last number dialled While you are viewing a previously dialled number that you wish to save, 1. Press shown. 2. Press the numeric keys to enter the Name. If you made a mistake, press key to edit it. 3. 4. 5. Press key. The display on the right is NAME ? key to complete editing the Name and proceed to edit the Number. Press the numeric keys to edit the Phone number when necessary. Press key to confirm. The record is now saved into the phonebook.
PHONEBOOK Phonebook This function is only available on the handset. Add new records You can store up to 50 phonebook records in each handset. Each record can contain up to 25 digits per number and 14 characters per name. During standby mode, NAME ? 1. Press and hold right is shown. 2. Press the numeric keys to enter the Name. If you made a mistake, press X key to edit it. Press and hold key to delete the entire name. 3. 4. Press 5. Press key.
PHONEBOOK While you are viewing the record that you wish to edit, 1. Press and hold right is shown. 2. Press key to erase the last character, or press and hold key to erase the entire characters. 3. 4. Press 5. key. The display on the John_ key to complete editing the Name and proceed to edit the Number. Press key to erase the last digit, or press and hold entire digits. Press key to erase the key to confirm. Then it goes back to standby mode.
CORDLESS HANDSET OPERATION Cordless Handset Operation Handset ringer adjustment Handset ringer melody During standby mode, 1. Press and hold key. MELODY 3 flashes and the current melody option appears. 2. 3. Press Press or key to select the melody option (1 to 9 for adjustment). key to confirm. Handset ringer volume During standby mode, 1. Press key. Display shows the current volume level. 2. Press or VOLUME 3 key to select the volume level.
CORDLESS HANDSET OPERATION Multi-handset Operation Your eco5200 series phone can have up to 4 handsets registered to the base unit. Each handset has its own number HS-1, HS-2, HS-3 and HS-4 shown on the left-hand side of the display.
CORDLESS HANDSET OPERATION Call transfer between cordless handsets When there is an incoming external call, 1. 2. 3. Press INT key. The display on the right is shown. Key the handset number (1, 2, 3, or 4) you wish to transfer. Press key to exit Intercom mode and return to standby mode. Transfer a speakerphone call from the base unit to the cordless handset If there is an incoming external call, 1. 2. 3. Press key on the base unit. Press on the cordless handset to pick up the call.
CORDLESS HANDSET OPERATION Cordless handset keypad lock During standby mode, 1. 2. Press and hold key to lock the keypad. HANDSET 1 To release keypad lock, press and hold key for 3 seconds. Note: When the keypad is locked, key and INT key can be used to answer an external or intercom call. Registration Register new handsets on the eco5200 base The handsets which come in the same pack are already registered to the base. If you buy new handsets. You need to register them before use. 1.
CORDLESS HANDSET OPERATION 8. 9. Press key to confirm and return to standby mode. LCD screen will display HS 1,2,3 or 4 and antenna icon will not flash. Note: If the base is full and cannot add any more handsets, you will hear a tone. See the next section to remove a handset. Remove handsets During standby mode, 1. 2. Press key. Press or HS” from the display. REMOVE HS key to select “REMOVE 3. Press key to confirm. The display on the right is shown. 4. 5. Enter the default value 0000.
CORDLESS HANDSET OPERATION Handset name During standby mode, 1. 2. 3. 4. 5. 6. Press key. Press or from the display. Press key to select “NAME” NAME key to enter the mode. Press and hold key to erase the existing handset name. Press the numeric keys to enter the new handset name. Press key to confirm. Reset During standby mode, 1. 2. Press key. Press or from the display. key to select “RESET” 3. Press key to enter the mode. The display on the right is shown. 4. 5.
ANSWERING MACHINE OPERATION Answering Machine Operation Answering machine On / Off During standby mode, 1. Press and hold key to switch the answering machine off. “Answering off” will be heard followed by two short beeps. Note: During Off mode, the answering machine is set to Announcement Two mode automatically. It will answer the call after 12 rings, and then switch to remote control mode. This feature can not be turned off. During Off mode, 1. Press and hold key to switch the answering machine on.
ANSWERING MACHINE OPERATION Answering machine Ring delay Setting This setting is used to set the ring times. Default number of ring -3 1. Press and hold 2-9/GS key (bottom of base) for 2 seconds. “Set rings” will be heard followed by a short beep, after a pause then prompt current rings. 2. Press or key to select item. Voice prompt at each selection will be heard. There are 2-9 and TS mode (Toll saver) for you to select. 3. Press 2-9/GS key to confirm setting and go back to standby or off mode.
ANSWERING MACHINE OPERATION OGM (Outgoing Messages) eco5200 has two OGM message modes: OGM1 (Announcement One) mode: Callers can hear a pre-recorded message “Please leave a message after the beep” and the unit records the caller's message. OGM2 (Announcement Two) mode: Callers can hear the other pre-recorded message “Please call later”. Under this mode, the caller will NOT have the opportunity to leave a message. You can also record your own personalized greeting (from 3 seconds to 120 seconds).
ANSWERING MACHINE OPERATION Play OGM During standby mode, 1. 2. Press ANS Press key to play the OGM. key to stop playing and return to standby mode. OGM play to line If an incoming call ring exceeds the number of rings set (Refer to “Answering machine Ring delay Setting” on P27), the answering machine will pick up the call and play the OGM message.
ANSWERING MACHINE OPERATION ICM (Incoming Messages) Record ICM During OGM 1 mode, the machine can record callers’ messages. During recording mode, the light will flash. The machine will stop automatically after recording 2 minutes. Or you can stop recording by pressing key. Note: The CID number is displayed if you have subscribed to that service. The Message recording time is from 3 seconds to 120 seconds. Play ICM Incoming messages are played back in the sequence they were recorded.
ANSWERING MACHINE OPERATION Memo Record memo You can record memos for other users of the unit to hear. The maximum recording time is 2 minutes. During standby mode, 1. 2. 3. MEMO Press and hold key until you hear a long beep. Speak into the microphone after the beep. Press key to stop recording or recording will stop after 2 minutes. The recorded memo will playback automatically for review. Play memo The memo is played back together with the incoming messages (ICM). 1. Press 2.
ANSWERING MACHINE OPERATION Delete all messages While the unit is in standby mode, you can delete all the old messages but not new messages. Press and hold X key until you hear a long beep, and then “All message erased” will be heard. It means that the old messages will be deleted, but the new messages will not be deleted. Remember to delete messages! To avoid exceeding the memory storage capacity, always delete messages after listening.
ADVANCED ANSWERING SYSTEM Advanced Answering System Remote control You can access your answering machine when you are away by using any touch tone phone. You have to enter the Security PIN to access the answering machine. The default PIN is 321 (Refer to “Answering machine PIN Number Setting” on P27). Access the answering machine remotely 1. Place a call to your answering machine. When the answering machine answers the call, it will play the OGM. 2. 3. 4. To skip the OGM, press key.
ADVANCED ANSWERING SYSTEM Remote operation keys Keys on remote phone keypad Operation 1 Replay the current message 1 press twice Skip back to the previous message 2 Play new messages /Pause during playing messages 3 Skip forward to the next message 4 Playback OGM 5 Record a new OGM 6 Stop playback or recording 7 Delete the current message 8 Switch the machine off 9 Switch the machine on / Switch between OGM1 or OGM2 0 Delete all old messages * Skip announcement during playback #
ADVANCED ANSWERING SYSTEM Toll saver Toll saver option is useful when using the remote access feature. You can see whether there are new messages or not in your answering machine from a remote location. If your answering machine rings 5 times before answering your call, it means there are NO new messages. If your answering machine rings 2 times before answering your call, it means there are new messages. You can set the number of times the answering machine would ring before it answers the call.
APPENDIX CUSTOMER SUPPORT Customer Support If you feel this product is not working correctly please consult the user guide and ensure that you are using the product in accordance with the instructions. Remove all extra telephone equipment and connect only this telephone directly to the telephone socket. If the fault is still present, connect another telephone (if available) to the telephone socket. The results will show you whether the fault lies with this unit or with the telephone line.
APPENDIX Appendix Troubleshooting Problem Possible cause(s) Solution(s) No dial tone on the cordless handset. 1. The base unit is not properly connected. 2. Too far from the base unit. 3. Battery charge is low. 4. Incorrect battery polarity. 5. Re-register handset (see Page 23). 1. Check CONNECTION to power and telephone line. 2. Move handset CLOSER to base unit. 3. CHARGE battery. 4. RE-INSERT batteries and check + and . 5. Handset not registered. Antenna symbol is flashing. 1.
APPENDIX Problem Possible cause(s) Solution(s) Phone does not ring when a call comes in. 1. The ringer is off. 2. Too many phones are sharing the same phone line. 3. Base unit not plugged in. 1. Turn ON the ringer. 2. REMOVE some of the phones from the phone line. 3. Check base unit CONNECTIONS. Keypad does not work. Keypad may be locked. UNLOCK the keypad. Busy tone + in use light on. 1. Other handset may still be connected. 2. Check power supply connection. 1.
APPENDIX Product Specifications Phone – Oricom eco5200 Specifications Frequency range 1.88-1.897 GHz (bandwidth=20MHz) Channel bandwidth 1.
APPENDIX Warranty Information (a) Warranty (Australia). Oricom warrants that the product is free from defects in materials and workmanship for a period of 12 months effective from the date of purchase. This warranty in no way affects your statutory warranty under the Trade Practices Act 1974 or any other similar legislation.
APPENDIX Notes for operation in New Zealand The grant of a Telepermit for any item of terminal equipment indicates only that Telecom has accepted that the item complies with the minimum conditions for connection to its network. It indicates no endorsement of the product by Telecom, nor does it provide any sort of warranty.
Customer Support Australia New Zealand Oricom International Pty Ltd Locked Bag 658, South Windsor NSW 2756, Australia Email: support@oricom.com.au Atlas Gentech (NZ) Limited Private Bag 14927, Panmure, Auckland Email: support@atlasgentech.co.nz Web: www.oricom.com.au Web: www.atlasgentech.co.nz Fax: (02) 4574 8898 Fax: (09) 574 2722 Ph: 1300 889 785 Ph: 0900 50 025 (Toll Call) To view the full Oricom range, please visit the Oricom website: www.oricom.com.