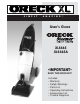
S I M P L Y A M A Z I N G ™ USER’S GUIDE XLS465 XLS465A •IMPORTANT• SAVE THIS BOOKLET! Includes: • Warranty • Safety Warnings • Parts List • Operating Instructions • Accessories List • Trouble Diagnosis
IMPORTANT SAFETY INSTRUCTIONS BEFORE OPERATING CLEANER, READ ALL INSTRUCTIONS IN THIS MANUAL CAREFULLY. When using an electrical appliance, basic precautions should always be followed, including the following: READ ALL INSTRUCTIONS BEFORE USING THIS VACUUM CLEANER WARNING Table of Contents Maintenance and Customer Service, Important Safety Instructions . . . . . . . . . Warranty, Troubleshooting Guide . . . . . . . . . . . . . Parts Check List, Features . . . . . . . . . . . To Assemble Cleaner . . . .
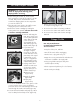
Warranty Troubleshooting Guide ORECK MANUFACTURING COMPANY: (ORECK gives you the following limited warranty for this product only if it was originally purchased for use, not resale, from ORECK or an ORECK Authorized Retail Dealer.) WARNING: Unplug cord from electrical outlet before servicing. PROBLEM Water and cleaning solution is not dispensing onto carpet or upholstery.
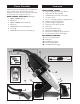
Parts Checklist Features Read all instructions thoroughly before assembly/use. Please unpack carton, removing all parts and packages. Check that all parts required for assembly are present by referencing the list below. ORECK STEEMER® MODELS 4. Large nonmarring, easy-to-steer Wheels 5. Easy Lock-in Cleaner Cartridge 7. Hand-held Nozzle and Hose Assembly 8. 25’ Power Cord 9. A.L.C.I. – Safety Plug with Reset and Test Buttons 10. Shampoo/Cleaner Spray Button 11. Translucent Upper Supply Tank 12.
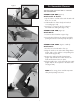
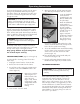
Figure 1 A Slide Handle forward To Assemble Cleaner THE ONLY TOOL YOU WILL NEED IS A PHILLIPSTYPE SCREWDRIVER! B ASSEMBLY STEP ONE (Figure1): Attach Handle to Cleaner 1. Lay the cleaner on a flat surface with the tank side down or to its side. 2. Slide handle into cleaner body until interlock is secured (Figure 1-A). 3. Insert four 5⁄8” screws into the four cavities in the handle base and tighten (Figure 1-B). ASSEMBLY STEP TWO (Figure 2): Attach Wheels 1. Locate two wheels and two support legs.
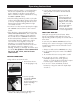
Servicing of Double-Insulated Appliances To Set-Up Cleaner The ORECK STEEMER cleaner is designed for fast and easy set-up: A double-insulated appliance is marked with one or more of the following: The words “Double Insulation” or “Double Insulated” or the double-insulation symbol ( ). In a double-insulated appliance, two systems of insulation are provided instead of grounding. No grounding means is provided on a double-insulated appliance, nor should a means for grounding be added to the appliance.
To Set-Up Cleaner 9 10 Reset Switch Test Button Operating Instructions STEP 5: Unscrew the cleaner cartridge cap from a STEEMER Full Release™ Carpet Cleaner cartridge. Insert the cleaner cartridge into the docking bay (Figure 9) on the side of the cleaner. The directions on the cleaner cartridge must be facing you. Rotate the white locking lever on the cartridge from left to right to lock and seal the cartridge in the cleaner. TO CLEAN CARPET (Figures 11 and 12) 11 12 STEP 6: Plug in the power cord.
Operating Instructions To shorten the drying time, go back over the carpet pulling slowly backwards without depressing the gray button (Figure 14). Repeat this procedure until you do not see water being pulled from the carpet through the nozzle. 6. Open gray tank cap. Fill with warm tap water, close tank cap and replace tank onto cleaner. 16 Dispensing Trigger CAUTION: Do not allow the lower recovery tank to overfill. Damage to the unit can result.
Operating Instructions • Cleaning upholstery which is covered with fabrics that are not compatible with wet cleaning may result in damage to the fabric. Know what the fabric is and how it may be cleaned before using the ORECK STEEMER cleaner. 5. Lock the gray cleaner button by pressing and sliding the button forward on the main handle (Figure 14). 20 Dispensing Trigger • Check the stuffing material if possible. Look inside cushions and underneath the furniture.
To Store Cleaner To Clean Carpet Cleaner WARNING: To reduce the risk of electric shock or injury from moving parts, unplug before servicing. 24 1. Before turning the cleaner off, tilt the cleaner back, raising the nozzle off the carpet for 15-20 seconds. This prevents extracted water in the nozzle from dripping back onto the carpet after you turn the cleaner off. 1. Pull the wheel assembly forward toward nozzle for compact storage (Figure 24). 2. Place the red power switch in the ”Off“ position.
Accessories To Replace Belt Call your authorized ORECK Home Care Center, your authorized ORECK dealer, or call the Home Care Hotline toll free at 1-888-742-6769. STEEMER Full Release™ Professional Spot & Stain PreCleaner (Item FRSS131) WARNING: To reduce the risk of electric shock or injury from moving parts, unplug before servicing. 1. Replacement belts (Part No. OR114) for ORECK STEEMERS are available from ORECK. Call Toll-Free 1-888-742-6769. 2.