
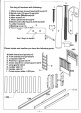
Installation & Assembly
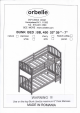

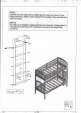

First
assemble
the
bouombed'using
2
head
bord
(A)
and
2
ofthe
rong
bed
rails
(c).
attach
the
long
bed
rails
1c)
tJtn.
";epl;;;J
rlfri'r"rg
Arien
borts
(3)
and
8
barel
nuts
(2).
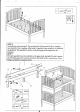
STEP
2
Align
the
strait
slots
in
the
heads
of
the
barrel
nuts
(2)
horinzontaly,
so the
threads
in
the
boltwillperfectly
fit
in
the
barrel
nut
(2),
t";ffi.4iust
theposition
of
the
ba*el
nut (!)
with
aflathead
screwdrive;
i;,G;i,;o.;dffi;X,i#i"i<rl
through
the
end
paner
(A;and_into
flr.
r"rg
6.J.i',iir
lstun,r,.
ttrreads
by
hand
to
be
surq
you
don,t
strip
the
thre-ads.
fiehlenlali
[illi;
iit
*i:,
the
supllied
Ailen
w_rench
(4).
STEP
3
Place
(8)
of
the
full.cross
support
slats
(l)
over
the
wood
brackets
attached
to
the
long
bedrails (c).I\{ari:.;f;y.,
r'*irri'l,rrrrlji".;;;iri,*srtsrats
(r)
from
the
top
with
the'
t8
screws
(r)
(supplred).
us. ;'ifi;ilfi
r;r*i.1"..
The
ur
cross
support
stats
MUsr
be
attachea
t"
flr.i""g
;4
i;i#-h
il
,"r.*u
(r).
secure
by
y-iflsgrew
(1)
the
wood
tock (8)
ne*ti",rrr
"an#rtut
ofthe.matt.suport.
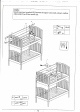
STEP
4
Place
4
wood
pins (5)
in
the
hores
on
the
top
of
each
larger
and
paner
(A).
STEP
5
*-:.f.:9,:_t:
ytn.r
bunk
as
in
step_
1,2
and,3
above.
Then
place
the
entire
y::llt
aslemblr
on the
lowerbunk
*ukid;;ii;;#ifi".t"roi
fiI,*
itrg
pleces
contacy
each
other.
\-_.-\
W
M
W
ffi
W
Don't
forget
to
install
!