
User Manual (EU Version)
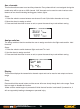

Reset Switch – Turn the Roller Button to reset the switch 1 to 8 or None to position up, mid or
down
Press and hold the Roller button to save an exit
or press the cancel key to exit without saving
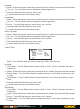
Down and up Mode:
Timer State – Turn the Roller button to select “Stop” or “Run”. If “Run” is selected, the timer is
counted up
Reset - Press and hold the cancel key to reset the timer if needed, then press the Roller button
Set up – Turn the Roller button to set the time in min. and sec.
Enable Switch – Turn the Roller Button to enable the switch 1 to 8 or None to position up, mid
or down
Reset Switch – Turn the Roller Button to reset the switch 1 to 8 or None to position up, mid or
down
Press and hold the Roller button to save an exit
or press the cancel key to exit without saving
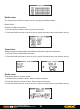
a. Use the wheel to change the status of the switch then press the wheel.
b. Use the wheel to change the reset switch then press the wheel.
c. Use the wheel to change the status of the switch then press the wheel.
d. Press and hold the wheel to save an exit, or press the cancel key to exit without saving.
15
6 CHANNEL TRANSMITTER
DIGITAL PROPORTIONAL RADIO
CONTROL SYSTEMPROGRAMABLE SYSTEM
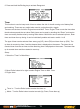
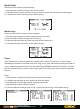
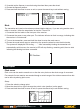
Mode - Turn the Roller button to select a mode (Up, Down, Down then up)
Up Mode:
Timer State – Turn the Roller button to select “Stop” or “Run”. If “Run” is selected, the timer is
counted up
Reset - Press and hold the cancel key to reset the timer if needed, then press the Roller button
Enable Switch – Turn the Roller Button to enable the switch 1 to 8 or None to position up, mid
or down
Reset Switch – Turn the Roller Button to reset the switch 1 to 8 or None to position up, mid or
down
Press and hold the Roller button to save an exit
or press the cancel key to exit without saving
Down Mode:
Timer State – Turn the Roller button to select “Stop” or “Run”. If “Run” is selected, the timer is
counted up
Reset - Press and hold the cancel key to reset the timer if needed, then press the Roller button
Set up – Turn the Roller button to set the time in min. and sec.
Enable Switch – Turn the Roller Button to enable the switch 1 to 8 or None to position up, mid
or down
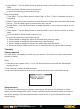
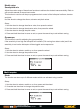
Aux. channels
This function allows users to set auxiliary channels. Every channel that is not assigned during the
model setup will be set as an AUX channel. AUX channels can be used to control various extra
features on an aircraft including landing gear, brakes, lights.
Setup:
1. Press the wheel to source between aux channel 5 and 6.(And after channels not in use)
2. Move the wheel to assign a switch.
3. Press and hold the wheel to save an exit, or press the cancel key to exit without saving.
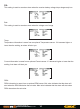
Assign switches
The assign switches function enables the user to assign a switch to the flight mode and thr. hold
functions.
Setup:
1. Press the wheel to switch between flight mode and Thr. hold.
2. Use the wheel to assign a switch.
3. Press and hold the wheel to save an exit, or press the cancel key to exit without saving.
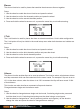
Display
This function displays the transmitter’s channel output and can be used to test output and servo
range.
Setup:
Press and hold the cancel button and the servos will move slowly though their entire range. Press
the icon again to disable the function.
*Make sure the model engine is powered off while the test function is activated! If powered on, it
will rev-up possibly leading to damages or personal injury.