
User Manual

EXTRA: INSTRUÇÕES PARA SINCRONIZAÇÃO DE TX / RX ORANGE
Guia do Usuário do Receptor HobbyKing OrangeRX DSM2 2.4 Ghz
Tente este link para receptores Orange - http://www.youtube.com/watch?v=KioknwbY1pg
EXTRA: ORANGE TX/RX BINDING INSTRUCTION
Try this link for Orange Receivers - http://www.youtube.com/watch?v=KioknwbY1pg
Hobby King OrangeRX DSM2 2.4 Ghz Receiver User Guide
The HobbyKing Orange Receiver features DSM2™ technology and is compatible with all Spektrum™ and
JR® aircraft transmitters that support DSM2 technology, like the 12X, X9303, DX7, DX6i, DX5e and Module
Systems. Note: The OrangeRX receivers are not compatible with the DX6 park flyer radio system.
Compatible with all Spektrum DSM2 Air transmitters.
Portas de satélites incluídas. (Maior redundância e força de conexão)
Dois chips CYP usados. Tornando-se um verdadeiro sistema receptor externo.
Satellite port included. (Increased redundancy and link strength)
Two CYP chips used. Making it a true outdoor receiver system.
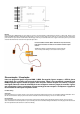
Sincronização / Vinculação
O receptor OrangeRX deve estar sincronizado ao transmissor antes de operar. Sincronização é o
processo de ensinar ao receptor o código específico do transmissor, de modo que ele só se
conecte a esse transmissor específico.
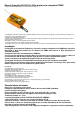
1. Para ligar um OrangeRX a um transmissor DSM2, insira o plugue de ligação na porta BATT /
BIND no receptor.
Nota: Para ligar uma aeronave com um controlador eletrônico de velocidade (ESC) que aciona o
receptor através do canal de aceleração (ESC / BEC), insira o plugue de ligação na porta BATT /
BIND no receptor e o acelerador na porta do acelerador (THRO). Prossiga para o passo # 2.
2. Ligue o receptor. Observe que o LED no receptor deve estar piscando, indicando que o receptor
está no modo de ligação e pronto para ser sincronizado ao transmissor.
3. Mova as alavancas e os interruptores no transmissor para as posições à prova de falhas
desejadas (posições de controle de aceleração baixa e neutra).
4. Siga os procedimentos do seu transmissor específico para entrar no modo de sincronização
(Bind), o sistema conectará em poucos segundos. Uma vez conectado, o LED no receptor ficará
aceso, indicando que o sistema está conectado.
5. Remova o plugue de ligação da porta BATT / BIND no receptor antes de desligar o transmissor.
6. Depois de configurar seu modelo, é importante religar o sistema para que as posições de baixa
aceleração e superfície de controle neutro sejam definidas.
IMPORTANTE: Remova o plugue de conexão para impedir que o sistema entre no modo de
conexão na próxima vez que a energia for ligada.
Binding
The OrangeRX receiver must be bound to the transmitter before it will operate. Binding is the process of teaching the receiver the specific code of
the transmitter so it will only connect to that specific transmitter.
1. To bind an OrangeRX to a DSM2 transmitter, insert the bind plug in the BATT/BIND port on the receiver.
Note: To bind an aircraft with an electronic speed controller that powers the receiver through the throttle channel (ESC/BEC), insert the bind plug
into the BATT/BIND port in the receiver and the throttle lead into the throttle (THRO) port. Proceed to Step #2.
2. Power the receiver. Note that the LED on the receiver should be flashing, indicating that the receiver is in bind mode and ready to be bound to
the transmitter.
3. Move the sticks and switches on the transmitter to the desired failsafe positions (low throttle and neutral control positions).
4. Follow the procedures of your specific transmitter to enter Bind Mode, the system will connect within a few seconds. Once connected, the LED on
the receiver will go solid indicating the system is connected.
5. Remove the bind plug from the BATT/BIND port on the receiver before you power off the transmitter.
6. After you’ve set up your model, it’s important to rebind the system so the true low throttle and neutral control surface positions are set.
IMPORTANT: Remove the bind plug to prevent the system from entering bind mode the next time the power is turned on.