
Instructions for use


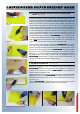
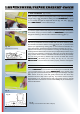

Fig. 13
Fig. 14
Fig. 15
32
7. SEAL THE EDGES (Fig. 10a,10b)
When you have completed covering the bottom of the wing and sealed the
®
wing tip using a high temperature setting, trim the ORACOVER to about
a ½ cm overlap and seal the edges with the iron (fig. 10a, 10b) - DO NOT
®
shrink ORACOVER over the framework yet.
8. WING UPPER SURFACE
To cover the upper surface of the wing use the same procedure as that used
®
for the lower, except you must cut a little more ORACOVER (required at the
wing tip for stretching). Note: Be sure to reduce the heat to low (90 °C).
9. COMPLETING THE COVERING (Fig. 13, 14)
After the top and bottom have been tacked down, it is time to uniformly shrink
the material to the surface. Set the iron to high range (150 °C). Use the same
method you applied during tacking (Step 4). This reheats the adhesive to a
higher temperature, providing a superior bond to the wood (see fig. 13, 14).
Experience shows that once you shrink the covering, some areas may not be
securely attached. We therefore recommend you repeat this procedure. If you
use a heat gun instead of a covering iron make sure you press the covering
firmly onto the airframe surface. This allows the adhesive to set permanently.
You can use a soft cloth (or kitchen roll) to do this or better still: use the
®
ORACOVER - felt blade (ref. no. 0915), see fig. 9a, 14, 15. If the
®
ORACOVER is not bonded to the surface properly, wrinkles could appear.
10. COVERING THE FUSELAGE (Fig. 16)
®
Cut the ORACOVER to the outline of the surface to be covered with about
®
1 cm of overlap (see Fig. 16). Lay the ORACOVER on the surface. Using
low range (90 °C) tack a centre strip down the length of the fuselage. Using the
entire surface of the iron, work with gentle pressure from the centre strip
outward as shown in Step 4 and 5 (see Fig. 16). Trim the excess overlap to
approximately ½ cm. Increase the iron heat to high range (150 °C). Seal all
edges at this time. Pass the iron over the entire fuselage as you did in Step 8 to
eliminate all wrinkles.
Fig. 16
Fuselage - first do bottom then sides, finally top
Fig. 12a
For Inside corners, first slit 45°.
Fig. 12b
Fold and bond covering.
Fig. 16