
Instructions for use


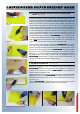
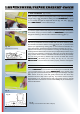

Fig. 9a
31
5a. COVERING SHEETED SURFACES WITH STYRENE FOAM
CORES
(Fig. 9a, 9b)
Superheated steam is used in the production of polystyrene foam cores; so
many foam wings often contain relatively high levels of residual moisture. At
ordinary room temperature a stable microclimate stabilizes inside the core
retaining the moisture. That is the reason why moisture even after long
periods hardly evaporates from foam cores. The heat applied during the
covering process draws moisture from the cores and can produce bubbles in
the film. Sometimes during bubbling, the covering can be ripped from the
wooden surface leaving wood fibres attached to the covering. As a result you
may get "permanent wrinkles" where it becomes impossible to iron the
covering back onto the surface of the wood. To avoid this problem we
®
recommend you apply a thin layer of ORACOVER - iron-on adhesive (ref.
no. 0960) as a moisture barrier and let it dry overnight. Note: it is important to
apply a thin layer so that the solvent in the adhesive does not damage the
foam core. Once this barrier has cured, you can cover the model.
®
Set your covering iron to low (90 °C) tacking the ORACOVER from centre,
as we did in Fig. 6 and 13. Tack the entire surface with low heat; then again
repeat the same procedure with medium heat (120 -130 °C) as in step 8. Keep
®
your iron flat on the surface so all of the ORACOVER is tightly bonded to
the surface. For the second and final shrinkage you can also use a paint-
stripping gun, see step 9. In doing so the covering must be firmly pressed onto
the surface with a soft cloth (or kitchen roll), or better still, with the
®
ORACOVER -felt blade (ref. no. 0915). Do not use too excessive heat, as
you may cause damage to the foam core (fig. 9a, 9b).
6. COVERING THE WING TIP (Fig. 11a, b, c, d)
Set the iron to high (150 - 200 °C) for difficult curves. Pull and stretch the
®
ORACOVER around the wing tip while heating it with the iron, tacking the
®
material in place. (see Fig. 8). As the ORACOVER cools, maintain the
tension to allow the adhesive to grip.
DO NOT attempt to eliminate all wrinkles at
un
(fig. 11a, b, c, d).
®
Note that ORACOVER can be ironed onto the structure and then heated
and removed without damage to the material as often as needed.
this stage. If there are deep folds
®
along the tip, then heat the ORACOVER and release the folds, and re-
stretch until reasonably smooth. You can easily do these jobs with a heat g
Fig. 11a-d Covering of the wing tip
Fig. 10a Trim off surplus
Fig. 10b Complete bonding
Fig. 9b Final shrinking
Fig. 9 / 9a Gradually work around
curves