
Instructions for use


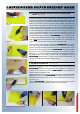
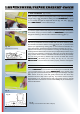
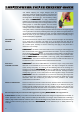

Fig. 5b
Fig. 5a
Fig. 5c
30
does not melt when the iron only slides over it, the iron has a temperature of
90 - 95 °C. Depending on the type of foam the melting point is between 95 °C
and 105 °C.
Note: For especially difficult curves, you can increase the iron temperature
®
from 150 to 200 °C. At 180 °C you can stretch ORACOVER . Bear in mind
®
that ORACOVER starts to melt at approximately 250 °C!
4. APPLICATION OVER OPEN FRAMEWORKS: WING
(Fig. 4, 5, 7)
®
Cut a piece of ORACOVER at least 2 cm oversize (Fig. 5a) all around for
the under surface of the wing, and 15 cm oversize around the wing tip. Discard
®
the backing paper if you are using opaque ORACOVER or the clear
®®
protective film if you are using transparent ORACOVER or ORALIGHT .
We recommend sticking a strip of adhesive tape to both an upper and lower
edge of the covering - let the strips of tape overlap. When you then pull off the
overlapping ends of the tape, you can easily separate the covering from the
paper backing or the protective film respectively (Fig. 5b). When discarding
the film, always put the covering with the upside on a flat surface (table).
Always separate the backing from the covering and not the other way to avoid
®
kinks or wrinkles in the covering (Fig. 5c). Lay ORACOVER in position with
as few wrinkles as possible (Fig. 4). Note: Place it adhesive side (dull side)
down and double-check positioning. Set the sealing iron to a low temperature
®
(90 °C). Using the tip of the iron, tack the ORACOVER to the root-rib and
®
then to the main spar (see Fig. 6). Slightly tension the ORACOVER at the
wing tip to make sure it lies flat on the surface. Move the sealing iron along the
main spar (or wing high point) applying gentle pressure.
®
For the next step (see Fig. 7) bond ORACOVER onto the surface of the
wing between the main spar and the leading edge. Hold the shoe of the iron
parallel to the wing's leading edge. Press the full surface of the iron against the
already tacked strip and move the iron in the direction of the leading edge,
starting from the wing root and moving in the direction of the wing tip. DO NOT
®
tack the ORACOVER around the leading edge yet.
The tacking method is then applied to the rear two-thirds of the wing.
Remember to hold your iron parallel to the main spar and move the iron in the
direction of the trailing edge as you did in Fig. 7. Always try to run your iron
over 2 ribs at a time for best results.
®
DO NOT seal the ORACOVER around the trailing edge yet.
5. COVERING SHEETED SURFACES - OPEN FRAMEWORK
STRUCTURES
(Fig. 9a, 9b)
Repeat the procedure described for wings above but with one exception:
®
Set your covering iron to low (90 °C) tacking the ORACOVER from centre,
as we did in Fig. 5 and 13. Tack the entire surface with low heat, then again
repeat the same procedure with middle range (130 °C) as in Step 8. Keep your
®
iron flat to the surface so all of the ORACOVER is tightly bonded to the
surface. For the second and final shrinkage you can also use a paint-stripping
gun, see step 9. In doing so the covering must be firmly pressed onto the
surface with a soft cloth (or kitchen roll), or better still, with the
®
ORACOVER -felt blade (ref. no. 0915), see fig. 9a and 9b.
Fig. 8
Fig. 7
Fig. 6
Fig. 4 Wing - do bottom first
Pull
Tacked
Directions of Iron’s Movement
Pull