Oracle® Application Server Adapter for IMS/TM User’s Guide 10g Release 3 (10.1.3.1.
Oracle Application Server Adapter for IMS/TM User’s Guide, 10g Release 3 (10.1.3.1.0) B31003-01 Copyright © 2006, 2007, Oracle. All rights reserved.
Contents Preface ................................................................................................................................................................ vii Audience...................................................................................................................................................... vii Documentation Accessibility ....................................................................................................................
Integrating OracleAS Adapters for IMS/TM with Oracle BPEL Process Manager Overview of Integrating OracleAS Adapters for IMS/TM with Oracle BPEL Process Manager ..... 4-1 Configuring Oracle BPEL Process Manager to interact with the OracleAS Adapter for IMS/TM .. 4-2 Setting up the Connection to the Oracle Connect Server ............................................................. 4-2 Checking Metadata Availability Using Oracle JDeveloper .........................................................
Starting the Daemon................................................................................................................ Setting Up Oracle Connect to Work Under IMS/TM......................................................... Setting Up Oracle Connect for Reentrancy .......................................................................... Updating an Existing Oracle Connect Installation with IMS/TM............................................... Installing Oracle Studio............................
vi
Preface This guide is the primary source of user and reference information on OracleAS Adapters for IMS/TM, which enables client applications to access transactions running under IMS/TM through the Sun J2EE Connector Architecture (J2CA) API. This document describes the features of OracleAS Adapters for IMS/TM that apply to the UNIX, Windows 2000, Windows XP, and Windows Server 2003 operating systems.
http://www.oracle.com/accessibility/ Accessibility of Code Examples in Documentation Screen readers may not always correctly read the code examples in this document. The conventions for writing code require that closing braces should appear on an otherwise empty line; however, some screen readers may not always read a line of text that consists solely of a bracket or brace.
1 Introduction Oracle Application Server Adapter for IMS/TM (OracleAS Adapter for IMS/TM) enables you to connect Oracle Application Server to an Information Management System-Transaction Management (IMS/TM) system. This section provides an overview of the features and architecture of OracleAS Adapter for IMS/TM.
OracleAS Adapter for IMS/TM Architecture OracleAS Adapter for IMS/TM Architecture OracleAS adapter includes the following components: ■ ■ ■ J2CA 1.5 IMS/TM adapter: The J2CA IMS/TM adapter is a standard resource adapter that is compliant with J2EE Connector Architecture, providing J2EE components connectivity. Oracle Connect: Oracale Connect runs on the legacy system and handles requests from the J2CA 1.5 IMS/TM adapter, that runs within Oracle Application Server Containers for J2EE (OC4J).
2 Integrating OracleAS Adapter for IMS/TM with OC4J To deploy and integrate OracleAS Adapter for IMS/TM with Oracle Application Server Containers for J2EE (OC4J), you need to configure the J2CA 1.5 IMS/TM adapter. This section includes the following topics: ■ Integrating OracleAS Adapter for IMS/TM with OC4J ■ Configuring the J2CA 1.
Configuring the J2CA 1.5 IMS/TM Adapter The lifecycle contract provides the mechanism for the application server to manage the lifecycle of the resource adapter instance. Work management contracts enable the resource adapter to carry out its logic by using threads dispatched by an application server, rather than creating threads on its own. The handshake is done through a Work instance submission.
Using the CCI API to Develop Applications Table 2–1 (Cont.) OC4J Connection Properties Property Description serverName Sets the TCP/IP address or host name where the Oracle Connect daemon is running. The daemon runs on the computer specified at the beginning of "Setting Up the IBM OS/390 or z/OS Platform in Oracle Studio" on page 6-14. See Also: Appendix C, "Advanced Tuning of the Daemon" for details about the daemon. workspace Specifies the name of an Oracle Connect server workspace to use.
Configuring Multiple Adapters 2. Create a Connection object using the selected ConnectionFactory. A Connection is a handle to the underlying network connection to the EIS, which is identified in the oc4j-ra.xml file by the serverName property. 3. Create a Connection object using the selected ConnectionFactory. Specify the interaction properties using an AttuInteractionSpec object. The AttuInteractionSpec object has the following format: AttuInteractionSpec(java.lang.
3 Troubleshooting OracleAS Adapter for IMS/TM Troubleshooting Oracle AS Adapter for IMS/TM involves checking various definitions and properties in Oracle Connect, including daemon status, workspace options, server parameters, and various system logs.
Troubleshooting the Daemon Task: Starting the Daemon Activate INSTROOT.USERLIB(ATTDAEMN) as a started task to invoke the daemon. For example, in the SDSF screen enter the following: '/s ATTDAEMN' WhereINSTROOT is the high-level qualifier where Oracle Connect is installed. "Starting the Daemon" on page 6-10 for details about the ATTDAEMN JCL. See Also: Shutting Down the Daemon To shut down the daemon, use Oracle Studio, as follows: 1. From the Start menu, select Programs, Oracle, and then select Studio.
Troubleshooting the Daemon Table 3–1 (Cont.) Daemon Options Option Description View Log Displays the daemon log. For details see "Daemon Logs" on page 3-4. View Events Displays the daemon events log. Daemon Properties Displays information about the computer where the daemon is running, such as the physical address and any username and password needed to access the computer. Shutdown Daemon Shuts down the daemon on the computer.
Troubleshooting the Daemon Server Options Right-click a server to display the options available for the server, including the ability to display the server log. The following table lists the available options: Table 3–3 Server Options Option Description Status Checks the status of the server. The information about the server includes the server mode and the number of active client sessions for the server. View Log Displays the server log. For details see "Daemon Logs" on page 3-4.
Resolving Communication Errors The Daemon Log Monitor The daemon log displays activity between clients and the daemon, including clients logging in and logging out from the daemon. You can change the level of logging by clicking Properties. The following levels of logging are available: ■ ■ ■ none: The log displays who has logged in and out from the daemon. error: The log displays who has logged in and out from the daemon and any errors that have been generated.
Resolving Specific Errors Table 3–4 Scenarios When a Client Is Disconnected Idle (Not Processing a Client Request) Scenario Processing a Client Request Explicit Disconnect The server is immediately notified of the disconnect and either becomes (client explicitly available for use by another client or closes connection terminates (if it is not reusable). or client program terminates) The server does not know that the client has disconnected and continues processing.
Resolving Specific Errors C009: IRPCD process has been terminated by user request. Cause: This message is informational only. The daemon successfully shut down. Action: No action required. C00A: Application %s not found. Cause: The requested workspace does not exist. Action: Check that the workspace defined in the oc4j-ra.xml file is also defined in the daemon configuration on the IBM OS/390 or z/OS platform. Use the Status option in the Runtime Manager perspective. C00B: Invalid IRPCD client context.
Resolving Specific Errors C010: Anonymous server logins are not allowed. Cause: Internal error. Action: Contact Oracle Support Services. C011: Client has already timed out. Cause: A server process was started on behalf of a client and the client has timed out before the server completed its startup. Action: Increase the Connect timeout value for the server workspace in the WS Info. section of the daemon configuration. See Also: "WS Info." on page C-7. C012: Invalid username/password.
Resolving Specific Errors To set impersonation: APF authorize all the steplibs in the server script on OS/390 computer. In the WS Security tab of the Navigator workspace under the daemon node in the Configuration Explorer, check the Use specific workspace account and clear the Workspace account field of all values. C016: Unexpected server state. Cause: Internal error. Action: Contact Oracle Support Services. C017: Active daemon clients exist. Shutdown canceled.
Resolving Specific Errors Action: Check the TCP/IP subsystem on the computer by trying to ping it or run FTP or Telnet to or from it. C021: Required variable %s not found Cause: An environment variable required by the Oracle Connect server was not defined when the server started up. Action: Check whether the startup script makes any changes to the environment variables used by Oracle Connect. Action: Check whether the system-defined environment size is sufficiently large for Oracle Connect.
Resolving Specific Errors Action: Check whether you have sufficient system privileges. C027: Cannot create TCP service for %s Cause: An error occurred within the TCP/IP subsystem Action: Check the TCP/IP subsystem on the computer by trying to ping it or run FTP or Telnet to or from it. C028: Unable to register (%s, %d, tcp) Cause: This error may happen when a portmapper is used (host:a) but the portmapper is not available. Action: Enable the portmapper.
Resolving Specific Errors C032: An IRPCD program is required Cause: Internal error. Action: Contact Oracle Support Services. C033: An IRPCD super-server is required for module events Cause: Internal error. Action: Contact Oracle Support Services. C034: An invalid super-server module ID was specified, %d Cause: Internal error. Action: Contact Oracle Support Services. C035: Out of memory Cause: Not enough memory to service a client request. Action: Increase process memory quota or add memory to the system.
Resolving Specific Errors Action: A system or process quota limit has been exceeded. Either increase the quota or lower the Clients per server limit field value in the WS Info. section of the daemon configuration. See Also: "WS Info." on page C-7. C047: %s out of memory Cause: Not enough memory was available to Oracle Connect to complete a requested operation. Action: Terminate unnecessary processes running on the server. Action: Add more memory to the system.
Resolving Specific Errors Action: The server startup script failed. Action: The username given is not allowed to use the requested server. Use an authorized username. Action: A limit on concurrent clients for a server has been reached. Try again later. Action: If you use impersonation, then check the user profile on the client. Also see C015. C06A: Failed to connect to server Cause: The server assigned to the client did not accept the client connection.
Resolving Specific Errors Action: Grant administrative privileges to the user/account using the Administrator parameter of the Daemon Security or WS Security sections in the daemon configuration. See Also: "Daemon Security" on page C-5 or "WS Security" on page C-16. C075: Failed to register daemon in the TCP/IP service table Cause: Registration of the daemon in the TCP/IP services file has failed. Action: Check that the account running the daemon has the permissions to update the TCP/IP services file.
Resolving Specific Errors J0036: %s: %s Cause: One of the following errors was received from the server: 0 server.internalError, 1 - client.xmlError, 2 - client.requestError, 3 client.noActiveConnection, 4 - server.resourceLimit, 5 - server.redirect, 6 client.noSuchResource, 7 - client.authenticationError, 8 - client.noSuchInteraction, 9 - client.noSuchConnection, 10 - server.notImplemented, 11 server.xaProtocolError, 12 - server.xaUnknownXID, 13 - server.xaDuplicateXID, 14 - server.
Resolving Specific Errors J0072: Value must be of type Object[] Cause: In a PUT operation, the value must be mapped record array. Action: Change the value used in the operation to a valid value. J0078: In nonpersistent connection and non keep alive encryption is not supported ignored Cause: Encryption is not supported for nonpersistent connections. Action: There is no action to take. This warning can be ignored. J0079: Invalid argument passed to %s - Argument: %s, Value: %s Cause: The value pass.
Resolving Specific Errors 3-18 Oracle Application Server Adapter for IMS/TM User’s Guide
4 Integrating OracleAS Adapters for IMS/TM with Oracle BPEL Process Manager To deploy and integrate OracleAS Adapters for IMS/TM with Oracle BPEL Process Manager, you need to configure BPEL Process Manager.
Configuring Oracle BPEL Process Manager to interact with the OracleAS Adapter for IMS/TM Configuring Oracle BPEL Process Manager to interact with the OracleAS Adapter for IMS/TM This section includes the following topics: ■ Setting up the Connection to the Oracle Connect Server ■ Checking Metadata Availability Using Oracle JDeveloper ■ Configuring the WSDL for Outbound Applications Setting up the Connection to the Oracle Connect Server Perform the following steps to set up the connection to the Oracl
Configuring Oracle BPEL Process Manager to interact with the OracleAS Adapter for IMS/TM connection factory with this name exists on the OC4J server. If it does not, you need to create it, or change the name of the connection factory to the name of a connection factory that exists. The following is an example of a WSDL for outbound applications: PAGE 36Configuring Oracle BPEL Process Manager to interact with the OracleAS Adapter for IMS/TM /definitions> 4-4 Oracle Application Server Adapter for IMS/TM User’s Guide
5 Advanced Features of OracleAS Adapter for IMS/TM Oracle Connect includes a number of tuning parameters that can improve performance. Specifically, the daemon can be configured to optimize communication between the IBM OS/390 or z/OS platform and a client. In addition, the binding environment can be tuned to optimize request handling.
Configuring the Daemon for High Availability Figure 5–1 The New Daemon Workspace screen 5. Specify a name for the new workspace and optionally provide a description. 6. Specify whether you want default settings or copy the properties of an existing workspace. To copy the properties of an existing workspace, click Ellipsis and select the workspace which properties you want to copy. 7. Click Next.
Configuring the Daemon for High Availability Perform the following steps to access these tabs: 1. From the Start menu, select Programs, Oracle, and then select Studio. 2. In the Configuration Explorer, expand the the computer defined in "Setting Up the IBM OS/390 or z/OS Platform in Oracle Studio" on page 6-14. 3. Expand the Daemons node. The daemon configurations available on this computer are listed. 4. Expand the IRPCD node. The daemon workspaces are listed. 5.
Configuring the Daemon for High Availability ■ The other modes can be set so that the server processes are reusable by setting the number of times a process can be reused with the Reuse limit value (the maximum number of times a particular server process can be reused or how many clients it can serve before it is retired). Reuse of servers enhances performance because it eliminates the need to repeat initializations. However, reuse runs a risk of higher memory leakage over time.
Configuring a Binding Environment removed from the pool and allocated to a client). The default for this parameter is 0, meaning that new servers are created only when there are no other available servers. ■ ■ Set maximum number of servers: The maximum number of available server processes pooled for this workspace. If the server is reusable, once a client disconnects from the server, the daemon returns the server to the pool of available servers.
Configuring a Binding Environment ■ miscellaneous Category ■ odbc Category ■ oledb Category ■ optimizer Category ■ queryProcessor Category ■ transactions Category ■ tuning Category comm Category The following table lists the parameters that define the communication buffers: Table 5–2 comm Category Parameters Parameter Description comCacheBufferSize Specifies the size of a memory buffer on a client, which is used by the Oracle Connect client/server to store read-ahead data.
Configuring a Binding Environment Table 5–3 (Cont.) debug Category Parameters Parameter Description queryWarnings This parameter is not applicable for use with OracleAS Adapter for IMS/TM. traceDir This parameter is not applicable for use with OracleAS Adapter for IMS/TM. miscellaneous Category The following parameters define miscellaneous operations, including globalization support and the directory where temporary files are written.
Configuring a Binding Environment Table 5–4 (Cont.) misc Category Parameters Parameter Description year2000Policy Determines the way 2-digit years are converted into 4-digit years. When the parameter year2000Policy is not set, or when it is set to a value outside the range of values defined for the policy, as described in the following paragraphs, a default value of 5 and the Sliding Base Year policy is used.
Migration Considerations Table 5–5 transactions Category Parameters Parameter Description convertAllToDistributed When set to true, converts all simple transactions into distributed transactions. convertAllToSimple When set to true, converts all distributed transactions into simple transactions. disable2PC Set to true to disable global-transaction capabilities. logFile The high-level qualifier and name of the log file that logs activity when using transactions.
Security Considerations Security Considerations Oracle Connect works within the confines of the platform security system. For example, on an OS/390 computer with RACF installed, and with the workspace server mode set to multi-tasking, a RACROUTE VERIFY is performed for each task in the address space, according to the client connection. In addition, Oracle Connect provides the following security: ■ ■ ■ ■ A binary XML encryption mechanism, which is activated as follows: 1.
Transaction Support ■ When the client request accesses the legacy platform through the daemon, either anonymous access is allowed or a valid user name and password must be provided for the computer in the user profile. The userName and password properties in the J2CA 1.5 IMS/TM adapter are used at this stage to access the daemon. The user name used to access the daemon must also be the name of a user profile used.
Transaction Support 5-12 Oracle Application Server Adapter for IMS/TM User’s Guide
6 Installing and Configuring OracleAS Adapter for IMS/TM This section describes how to install Oracle Connect and Oracle Studio from the CD-ROM and how to configure Oracle Connect using Oracle Studio. Note: In addition to the installation procedures described in this section, the J2CA 1.5 IMS/TM adapter must be installed with Oracle Application Server. Installing the J2CA 1.5 IMS/TM adapter is described in Oracle Application Server Adapter Installation Guide.
Preinstallation Tasks Table 6–1 Oracle Connect Hardware Requirements Hardware Component Requirements Processor An IBM S/390 computer Memory The minimum requirement is 4 MB for each connection. A connection is defined as a connection to a server process or daemon. The actual memory requirement depends on such things as the size of the database and the number of databases accessed.
Installing Oracle Connect on an IBM OS/390 or z/OS Series Platform Table 6–4 Oracle Studio Software Requirements Software Component Requirements Operating System Microsoft Windows 2000 with service pack 2 or higher, or Microsoft Windows XP, or Microsoft Windows 2003 Microsoft Network transport protocol software, TCP/IP, included with Microsoft Windows Installing Oracle Connect on an IBM OS/390 or z/OS Series Platform If you have an Oracle Connect back-end adapter already installed on the IBM OS/390
Installing Oracle Connect on an IBM OS/390 or z/OS Series Platform Table 6–5 (Cont.) Preinstallation Information Topic Required Information Default Comment - Unit 3390 SMS only: unit where SMS resides. - Output class A - - JCL job card - An optional card (up to 6 lines) to replace the prefix job (entered as it will appear in the job) - ISPF load library name ISP.
Installing Oracle Connect on an IBM OS/390 or z/OS Series Platform Optionally, ensure that you have permission to specify an output class for Oracle Connect output. Assigning a device that is set on HOLD prevents the loss of log information when Oracle Connect started tasks finish. Note: Oracle Connect for the IBM OS/390 or z/OS platform is contained in the following datasets: ■ OCL1012.TRANSMIT.KIT ■ OCL1012.TRANSMIT.
Installing Oracle Connect on an IBM OS/390 or z/OS Series Platform da('nnn.TRANSMIT.LIB') [UNIT(unit) VOLUME(volume)] This extracts the nnn.TRANSMIT.LIB library from the nnn.TRANSMIT.KIT kit to the specified unit and volume. If a unit and volume are not specified, then the library is extracted to the current unit and volume. 3. Run the PREPARE member of the nn.TRANSMIT.LIB library: ex PREPARE Follow the instructions in the Response column in Table 6–8 for each entry in the Screen column.
Installing Oracle Connect on an IBM OS/390 or z/OS Series Platform Table 6–9 Installation Prompts and Responses Screen Response DO YOU WANT TO USE SMS MANAGED STORAGE FOR THIS INSTALLATION Y/N [N]: If you want to manage the storage using SMS, then answer Y, otherwise answer N. THE SOFTWARE WILL BE INSTALLED UNDER THE HIGH LEVEL QUALIFIER THAT YOU WILL CHOOSE.
Installing Oracle Connect on an IBM OS/390 or z/OS Series Platform Table 6–10 IMS/TM Adapter-Specific Installation Prompts and Responses Screen Response ENTER THE ISPF LOAD LIBRARY NAME [ISP.SISPLOAD] : Enter the ISPF load library name only if you do not want the default PLEASE CONFIRM (YES/NO/QUIT) [YES] : Confirm the entered details ENTER THE OUTPUT CLASS FOR INSTALLATION OUTPUT [A] : Enter the output class for Oracle Connect output.
Installing Oracle Connect on an IBM OS/390 or z/OS Series Platform To define a DSN as APF-authorized, in the SDSF screen enter the following command: Note: "/setprog apf,add,dsn=INSTROOT.loadaut,volume=vol002" Where vol002 is the volume where you installed Oracle Connect and INSTROOT is the high-level qualifier where Oracle Connect is installed. If the site uses SMS, then when defining APF-authorization in the SDSF screen, enter the following command: "/setprog apf,add,dsn=INSTROOT.
Installing Oracle Connect on an IBM OS/390 or z/OS Series Platform ■ ■ ■ Access to an Open OS/390 segment (that defines access to TCP/IP OA sockets). ALTER authority on datasets under INSTROOT to access to read, write, allocate and delete datasets under INSTROOT. The installation includes a PS, INSTROOT.DEF.GBLPARMS, that contains global environment information. This PS is read at startup and the correct software version is used, based on the details provided in the startup task.
Installing Oracle Connect on an IBM OS/390 or z/OS Series Platform GRNAME for the XCF group name and OTMANM for the IMS member name in that XCF group, as in the following example: EDIT IMS.PROCLIB(DFSPBIV1) - 01.03 command ===> 000082 AOIS =, 000083 GRNAME=IMSATT01, 000084 OTMA=YES, 000085 MAXPST= 000086 OTMANM= 3. Start the OTMA Callable Interface (C/I). Add an entry in the program properties table (PPT) for the OTMA C/I initialization program as follows: a. Edit the SCHEDxx member of the SYS1.
Updating an Existing Oracle Connect Installation with IMS/TM Using the LPA reduces real storage usage, because everyone shares the LPA copy, and fetch time. If you intend using impersonation, so that you can run in a security context that is different than the context of the process that owns the server, then do the following: Note: ■ ■ Place the INSTROOT.LOAD(ATYSVCW) member in an APF-authorized library outside the LPA.
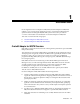
Installing Oracle Studio Table 6–13 (Cont.) IMS/TM Adapter Installation Prompts and Responses Screen Response DO YOU WANT ORACLE CONNECT FOR LEGACY ADAPTER TO WORK WITH IMS/DB UNDER CICS (YES/NO) [NO]: If you want to access IMS/DB data under CICS, using OracleAS Adapter for IMS/DB, then respond YES. ENTER THE CICS EXCI LOAD LIBRARY NAME If you responded YES to working with IMS/DB under CICS, [CICSTS13.CICS.SDFHEXCI]: then enter the CICS EXCI load library name only if you do not want the default.
Configuring Oracle Connect If Oracle Studio is already installed because you are also using another legacy adapter, then you do not need to reinstall it. Note: The other legacy adapters are: ■ OracleAS Adapter for Tuxedo ■ OracleAS Adapter for CICS ■ OracleAS Adapter for IMS/DB ■ OracleAS Adapter for VSAM Installing Oracle Studio from the CD-ROM Assuming that the CD-ROM drive is D:, the installation file is located in the D:\Oracle_Studio directory.
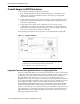
Configuring Oracle Connect 3. Enter the name of the computer you want to connect to, or click Browse to select the computer from the list of computers that is displayed and which use the default port (2552). 4. Specify the username and password of the user who was specified as the administrator when Oracle Connect was installed. Selecting Anonymous connection enables anyone having access to the computer to be an administrator.
Configuring Oracle Connect 1. From the Start menu, select Programs, Oracle and then select Studio. Oracle Studio opens. 2. Select Window from the menu bar and then select Preferences. The Preferences screen is displayed, as shown in the following figure: Figure 6–2 The Preferences screen 3. Select the Studio node. 4. Click Change master password. The Change Master Password screen is displayed, as shown in the following figure: Figure 6–3 The Change Master Password screen 5.
Configuring Oracle Connect Specifying Users with Administrative Rights By default, only the user who was specified during the installation as an administrator has the authorization to modify settings on that computer from Oracle Studio. This user can then authorize other users to make changes or to view the definitions for a selected computer. Adding a computer to Oracle Studio is described in "Setting Up the IBM OS/390 or z/OS Platform in Oracle Studio" on page 6-14.
Configuring Oracle Connect 3. Add users or groups of users by clicking Add User or Add Group for the relevant sections. The user or group that is added must be recognized as a valid user or group for the computer. Once a name has been added to a section, only the user or group who logs on with that user name has the relevant authorization. Setting Up Run-time User Access to the IBM OS/390 or z/OS Platform During run time, client access to Oracle Connect is provided by the user profile.
Configuring Oracle Connect 7. Enter the name and password used to access the computer and confirm the password. 8. Click OK. Modeling Interactions for OracleAS Adapter for IMS/TM Modeling interactions for OracleAS Adapter for IMS/TM involves defining an Oracle Connect back-end adapter using Oracle Studio. All the definitions specified in Oracle Studio are written to the IBM OS/390 or z/OS platform.
Configuring Oracle Connect Figure 6–7 The New Adapter screen 8. Select Events. 9. Click Finish. The back-end adapter is added to the list and the definition opens for editing. Note: Other adapters that are displayed in the Type list are not supported with the version of Oracle Connect installed at the site. 10. Select the Properties tab and change any of the properties for the adapter, as required.
Configuring Oracle Connect The Properties tab comprises fields, as listed in the following table: Table 6–14 Adapter Properties Property Description cachLastTpipe Cache the last transaction pipe used. cacheXcfConnection Cache the XCF connection information. maxSessions The maximum number of sessions allowed. The default value is 5. racfGroupId The RACF facility group identification. racfUserId The RACF facility user identification.
Configuring Oracle Connect 5. Select ImsTm Import Manager from the Import type list as shown in the following figure: Figure 6–9 The New Metadata Import screen 6. Click Finish. The Metadata Import wizard is displayed. 7. Click Add. The Add Resources screen is displayed, which provides the option to select files from the local computer or copy the files from another computer. 8. If the files are on another computer, then right-click My FTP Sites and select Add. Optionally, double-click Add FTP site.
Configuring Oracle Connect Figure 6–10 The Add Resources screen 10. Right-click the computer and select Set Transfer Type. Enter the transfer type (ASCII or BINARY) and click OK. 11. Expand the list of the added site until you find the necessary COBOL files. To change the high-level qualifier, right-click the computer and select Change Root Directory. Enter the new high-level qualifier enclosed in quotes, and click OK. 12. Select the required COBOL copybook file or files and click Finish.
Configuring Oracle Connect Figure 6–11 The Apply Filters screen 14. Apply filters to the copybooks, as needed. The following table lists the available filters: Table 6–15 Available Filters Filter Description COMP_6 switch The MicroFocus COMP-6 compiler directive. Specify either COMP-6’1’ to treat COMP-6 as a COMP data type or COMP-6’2’ to treat COMP-6 as a COMP-3 data type. Compiler source The compiler vendor. Storage mode The MicroFocus Integer Storage Mode.
Configuring Oracle Connect 15. In the import wizard, click Next. The Add Interactions screen is displayed, as shown in the following figure: Figure 6–12 The Add Interactions screen 16. Click Add to add an interaction for the IMS/TM adapter. Provide the information, as listed in the following table: Table 6–16 Interaction Parameters Parameter Description Name The name of the interaction. You can change the default name specified. Mode The interaction mode.
Configuring Oracle Connect Table 6–16 (Cont.) Interaction Parameters Parameter Description Description Free text describing the interaction. Interaction-Specific Parameters IMS/TM specific parameters: c: The interaction commit mode. maxSegmentSize: The maximum size of the segment. The default value is 32768 (bytes). transaction: The name of the transaction that is executed when the interaction is executed. You must specify a transaction name for each interaction.
Configuring Oracle Connect Figure 6–13 The Source tab Creating XML Schemas The XML schema describing the adapter interactions and the input and output records for these interactions are created automatically during the import procedure, as described in "Generating Outbound Interactions" on page 6-21.
Configuring Oracle Connect 6-28 Oracle Application Server Adapter for IMS/TM User’s Guide
A Advanced Tuning of the Metadata Oracle Studio enables you to define outbound adapter interactions. In addition, Oracle Studio defines input and output structures used for these interactions. The interactions and input and output structures are maintained as metadata in the Metadata tab of Oracle Studio. Metadata for the Back-end Adapter Using Oracle Studio, perform the following steps to maintain the metadata for OracleAS Adapter for IMS/TM. 1.
Metadata for the Back-end Adapter The General tab is shown in the following figure: Figure A–1 The General tab The General tab comprises fields, as listed in the following table: Table A–1 General tab Components Field Description Adapter definition name Specifies the name of the adapter definition. Description Specifies an identifying description of the adapter. Authentication mechanism Specifies the authentication method used to access the adapter.
Metadata for the Back-end Adapter Figure A–2 The Interactions tab The Interaction tab comprises fields, as listed in the following table: Table A–2 Interaction tab Components Field Description Interaction name Specifies the name of the interaction. Description Provides a descriptive identifier for the interaction. Mode Determines the interaction mode. The following interaction modes are available: ■ ■ ■ ■ sync-send-receive: The interaction sends a request and expects to receive a response.
Metadata for the Back-end Adapter The Schema General tab is shown in the following figure: Figure A–3 The Schema General tab The Schema General tab comprises fields, as listed in the following table: Table A–3 Schema General tab Components Field Description Schema name The name of the adapter. Version The schema version. Header A C header file to map between the data structure and the adapter.
Metadata for the Back-end Adapter Schema Record Tab Use the Schema Record tab to define the input and output record structures for the interaction. The Schema Record tab is shown in the following figure: Figure A–4 The Schema Record tab The Schema Record tab comprises fields, as listed in the following table: Use the Fields List area to define single data items within a record. Table A–4 Schema Record tab Components Field Description Name Specifies the name of the field.
Metadata for the Back-end Adapter Table A–4 (Cont.) Schema Record tab Components Field Description Type The data type of the field. The following are valid data types: ■ Binary ■ Boolean ■ Date ■ Double ■ Float ■ Int ■ Long ■ Numeric ■ Short ■ String ■ Time ■ Timestamp ■ XML See Also: Appendix B, "Back-end Adapter Data Type Support" for details about the mapping from COBOL data types to IMS/TM back-end adapter data types.
Metadata for the Back-end Adapter A-8 Oracle Application Server Adapter for IMS/TM User’s Guide
B Back-end Adapter Data Type Support OracleAS Adapters for IMS/TM supports a number of data types that are used when defining metadata in Oracle Studio. The data types are mapped from the COBOL data types during the import procedure. The mapping of data types between OracleAS Adapters for IMS/TM and Oracle Application Server is performed internally by Oracle Connect. Note: Data Type Mapping The COBOL data type COMP, in the table is an abbreviation for, and synonymous with, COMPUTATIONAL.
Data Type Mapping Table 6–17 (Cont.
C Advanced Tuning of the Daemon The daemon configuration is managed using Oracle Studio. Daemon configuration is divided into the following groups: ■ Daemon Control ■ Daemon Logging ■ Daemon Security ■ Workspaces Daemon Control Using the Daemon Control tab, you define various daemon control options. The Daemon Control tab is accessed as follows: 1. From the Start menu, select Programs, Oracle, and then select Studio. 2. Select the required computer from the Configuration Explorer. 3.
Daemon Control Figure 6–14 The Daemon Control tab The Daemon Control tab comprises fields, as listed in the following table: Table 6–18 Daemon Control tab Components Field Description Automatically recover from failure The daemon restarts automatically if it fails for any reason (any error that causes the daemon process to terminate, such as network process lost or the CPU running the daemon crashes and the backup daemon is defined on another CPU).
Daemon Logging Table 6–18 (Cont.) Daemon Control tab Components Field Description Connect timeout The time the client waits for a daemon server to start. If the daemon server does not start within this period, then the client is notified that the server did not respond. The value specified for this parameter serves as the default timeout for all the workspaces listed in the daemon configuration. The default value for this parameter is 60 seconds.
Daemon Logging Figure 6–15 The Daemon Logging tab The Daemon Logging tab comprises fields, as listed in the following table: Table 6–19 Daemon Logging tab Components Field Description Daemon log file location Specifies the daemon produces its log data. The full path must be specified. Logging options Specifies what tracing is performed.
Daemon Security Table 6–19 (Cont.) Daemon Logging tab Components Field Description System trace Generates system-specific tracing of various operations. Timing Generates a timestamp for every entry to the server log file. Binary XML log level Sets the binary XML log level. Your options are: Server log filename format ■ debug ■ none (the default) ■ api ■ info Defines the name and location of the server log file. The field must specify the full path name.
Daemon Security You can also change daemon settings using the Configuration Explorer, by selecting a computer and scrolling the list to the required daemon. Right-click the daemon and select Edit Daemon. Note: Changes made to the daemon configuration are not implemented. They are only implemented after the configuration is reloaded using the Reload Configuration option in the Runtime Manager. 7. Right-click the daemon and select End Unused Servers.
Workspaces Table 6–20 (Cont.) Daemon Security tab Components Field Description Selected users only Identifies the names of users (accounts) and groups that can be administrators.1 If a user is not specified, the account from which the daemon was started is considered the administrator. Note that the daemon does not require the user to log in to the account on the system, but to log in to the daemon using the account name and password. Machine access Manages access to the computer.
Workspaces 4. Expand the Daemons node to display the workspaces in the Runtime Explorer. 5. Right-click the workspace and select Edit Workspace Configuration. The WS Info. tab opens. 6. After making changes to the workspace, right-click the daemon and select Reload Configuration. You can also change daemon settings using the Configuration Explorer, by selecting a computer and scrolling the list to the required daemon. Right-click the daemon and select Edit Daemon.
Workspaces Table 6–21 (Cont.) WS Info tab Components Field Description Server type This field is not applicable for use with OracleAS Adapters for IMS/TM. Workspace binding name This field is not applicable for use with OracleAS Adapters for IMS/TM. Timeout parameters The time the client waits for the workspace server to start. If the workspace server does not start within this period, then the client is notified that the server did not respond.
Workspaces 8. Right-click the daemon and select End Unused Servers. Any servers in the connection pool are closed and new servers start with the new configuration.
Workspaces Table 6–22 WS Server tab Components Field Description Workspace server mode Specifies the type of new server processes that the daemon starts up. The daemon supports the following server modes: ■ singleClient: Each client receives a dedicated server process. The account in which a server process runs is determined either by the client login information or by the specific server workspace.
Workspaces Table 6–22 (Cont.) WS Server tab Components Field Description Server availability Specifies the number of servers in a pool of servers, available to be assigned to a client. The following options are available: ■ ■ ■ ■ Initial number of servers: The number of server processes that are prestarted for this workspace when the daemon starts up.
Workspaces Table 6–22 (Cont.) WS Server tab Components Field Description resource limitations Specifies the number of servers that can be in use at any one time. The more servers used, the greater the system resources that are used. The following options are available: ■ ■ Server Priority Number of subtasks: The number of subtasks for a server that are prestarted for this workspace when the daemon starts up.
Workspaces You can also change daemon settings using the Configuration Explorer, by selecting a computer and scrolling the list to the required daemon. Right-click the daemon and select Edit Daemon. Note: Changes made to the daemon configuration are not implemented. They are only implemented after the configuration is reloaded using the Reload Configuration option in the Runtime Manager. 8. Right-click the daemon and select End Unused Servers.
Workspaces Table 6–23 WS Logging tab Components Field Description Specific log file format Defines the name and location of the server log file if you want the data written to a file instead of SYSOUT for the server process. The parameter must specify the name and the high level qualifier.
Workspaces Table 6–23 (Cont.) WS Logging tab Components Field Description Server Specifies the server connection events to log. The following server events are available: ■ ■ Client Connect: The event log displays the server connection events. Disconnect: The event log displays the server disconnect events. Specifies the type of tracing performed. The following client events are available: ■ ■ Audit Connect: The event log displays the client connection events.
Workspaces 8. Right-click the daemon and select End Unused Servers. Any servers in the connection pool are closed and new servers start with the new configuration.
Workspaces Table 6–24 (Cont.) WS Security tab Components Field Description Workspace users Lists the users who are allowed to use the workspace. ■ ■ All users: Indicates that any user who has logged on to the daemon can use the workspace. Selected users only: Specifies users (accounts) and groups that can use the workspace. Note: If a user is not specified, any user who has logged on to the daemon can use the workspace.
D Globalization Settings OracleAS Adapters for IMS/TM provides the globalization support for the following languages: ■ Arabic ■ English (the default) ■ French ■ German ■ Greek ■ Hebrew ■ Italian ■ Japanese ■ Korean ■ Portuguses ■ Simple Chinese ■ Spanish ■ Traditional Chinese ■ Turkish This appendix describes how to define the language support.
Defining the Language and Codepage Table 6–25 (Cont.
Defining the Language and Codepage D-4 Oracle Application Server Adapter for IMS/TM User’s Guide
Index A acxTrace parameter, 5-6 analyzerQueryPlan parameter, 5-6 application language parameter, 5-7 B buffer size, comCacheBufferSize parameter, 5-6 C CD-ROM drive requirements IBM S/390, 6-2 PC, 6-2 codepage parameter, 5-7 comCacheBufferSize parameter, 5-6 comm parameters comCacheBufferSize, 5-6 comMaxSocketSize, 5-6 comMaxXmlSize, 5-6 comMaxSocketSize parameter, 5-6 comMaxXmlSize parameter, 5-6 cvtSeverityLevel parameter, 5-7 D daemon logging, C-3 security, C-5 server modes, 5-3 shutting down, 3-2 sta
IBM S/390 memory, 6-2 PC CD-ROM drive, 6-2 PC disk space, 6-2 PC memory, 6-2 PC processor, 6-2 UNIX, 6-2 I IBM S/390 installing, 6-5 postinstallation, 6-8 preinstallation, 6-4 installing IBM S/390, 6-5 Windows, 6-14 interactions, modeling, 6-19 L language parameter, 5-7 log files daemon options, C-3 logFile parameter, 5-6 logFile parameter, 5-6 logging daemon configuration, C-3 optimizer strategy, 5-6 trace information, 5-6 M maximum size, XML documents, 5-6 memory requirements IBM S/390, 6-2 PC, 6-2 met
trace information, logging, 5-6 traceDir parameter, 5-7 transactions environment parameters, tuning environment parameters, 5-9 5-8 W Windows, installing, 6-14 Workspace server mode, C-11 X XML documents, maximum size, 5-6 Y Y2K See year2000Policy parameter year2000Policy parameter, 5-8 Index-3
Index-4