Contact Center Anywhere Installation Guide Version 8.
Copyright © 2005, 2007, Oracle. All rights reserved. The Programs (which include both the software and documentation) contain proprietary information; they are provided under a license agreement containing restrictions on use and disclosure and are also protected by copyright, patent, and other intellectual and industrial property laws.
Contents Chapter 1: What’s New in This Release Chapter 2: CCA Overview and Requirements CCA Architecture Overview Tier Zero Tier One ....... ....... 5 6 7 . . . . . . . . . . . . . . . . . . . . . . . . . . . . . . . . . . . . . . . . . . . . . . .Tier Two . . . . . . . . . . . . . . . . . . . . . . . . . . . . . . . . . . . . . . . . . . . . .
Contents ■ Using the Network Manager to Manage CCA Resources Adding Shared and Dedicated Server Resources 26 Configuring Resources Using Network Manager 28 Starting and stopping TCPIPBus 34 Starting and Stopping CCA Resources 34 25 Chapter 5: Configuring the Web Server Deploying CCA Web Applications on Oracle 10g Application Server (OAS 10g) Creating JDBC Connection Pool on OAS 10g 36 Creating JDBC Data Source on OAS 10g 37 Deploying CCA Web Applications on OAS 10g 37 Deploying CCA Web Applications on W
1 What’s New in This Release What’s New in Contact Center Anywhere Installation Guide, Version 8.1 Table 1-1 lists changes of the documentation described in this version to support release 8.1 of the software. Table 1-1. New Product Features in Contact Center Anywhere Installation Guide, Version 8.1 Topic Description Deploying CCA Web Applications on Oracle 10g Application Server (OAS 10g) on page 35 CCA web applications now can be deployed on Oracle 10g Application Server.
What’s New in This Release ■ 4 Contact Center Anywhere Installation Guide Version 8.
2 CCA Overview and Requirements This chapter describes the architecture overview of the CCA application and the software requirements to run a CCA system. It also describes a brief overview of the CCA installation procedures described in later chapters.
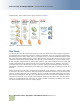
CCA Overview and Requirements ■ CCA Architecture Overview Architecturally, CCA is split into four tiers, as shown in Figure 1. Figure 1. CA Architecture Overview Tier Zero Tier Zero is also referred to as the Internet Zone or the User Zone. This is where agents, supervisors, and administrators reside along with their respective interfaces. There are several communication threads that connect CCA to these users.
CCA Overview and Requirements ■ CCA Architecture Overview Tier One In reality, this is an optional tier that can be collapsed together into the Tier Two/DMZ zone. It shows how CCA fits into an overall multi-tiered communications infrastructure used by many companies. For example, many companies with distributed users and multiple sites, use a set of HTTP servers as the user interface to their DMZ zone, where various Web-based session servers reside.
CCA Overview and Requirements ■ Software Requirements ■ A Web services library and interpretive layer. The Web Services interpretive layer acts as a standard interface to the CCA native Web container. In larger environments, such as overlay networks or service provider deployments, it is best to have separate physical servers set up as Report Servers. These serve all customers reports and extract data from secondary databases. The Tier Two/DMZ zone is also a typical zone to house corporate mail servers.
CCA Overview and Requirements ■ Software Requirements Table 2. Software Requirements Item Requirement Operating system One of the following operating system versions: Database server Web server Client Web browser Others Optional tools ■ Microsoft Windows 2000 Server ■ Microsoft Windows 2003 Server(32-bit) ■ Sun Solaris 9 (32-bit or 64-bit) ■ Sun Solaris 10 (5.
CCA Overview and Requirements ■ CCA Installation Overview CCA Installation Overview The CCA installation process consists of following phases: Installing Required Software Before installing CCA, make sure that all required software listed in “Software Requirements” on page 8 section are installed. Table 3 provides reference links to some softwares required by CCA. Table 3. Some Required Software Reference Links Software Reference Link Microsoft SQL Server 2000 http://support.microsoft.
3 Configuring the Database This chapter describes how to create a new database or upgrade an existing database previously used by Contact Center Anywhere.
Configuring the Database ■ Configuring an Oracle 9i Database for CCA To create a new Oracle 9i database 1 Copy the database\Oracle\Automated directory from the CCA installation package to the host you use to run database creation scripts. 2 Edit the UseMe.sql file to reflect the correct information necessary to create the database by using the following guidelines: NOTE: Keep the quotation marks (‘’) surrounding the parameters’ value. ■ Replace &1 with the password of the sys user.
Configuring the Database ■ Configuring an Oracle 9i Database for CCA -- &4 - PathTableSpace Path for the TAW Table Space -- &5 - TableSpaceSize 500M Initial size of the Table Space -- &6 - TWTableSpaceTemp TAW Temporary Table Space -- &7 - PathTableSpaceTemp Path for the TAW Temporary Table Space -- &8 - TableSpaceTempSize 50M Initial size of the Temporary Table Space -- &9 - TableSpaceTempGrowthSize 10M Temporary Table Space Growtrh Size -- &10 - TWRole TWRole -- &11 - ADMINCC81 (Admin
Configuring the Database ■ Configuring a MS SQL Server 2000 Database ■ Replace &3 with the name of the database user that the current CCA system uses to access the database. ■ Replace &4 with the password of the user used in parameter &3. ■ Replace &5 with the database TNS name of the database server. ■ Replace &6 with the host name of the database server. ■ Replace &7 with the database service name (SID). ■ Replace &8 with the listening port of the database server.
Configuring the Database ■ Configuring a MS SQL Server 2000 Database 2 The database creation procedure can be completed by running the useMe70LatinLanguage.bat file. Before running, edit the batch file to reflect the correct information that is necessary to create the database by using the following guidelines: NOTE: If you are installing the Chinese and Japanese languages, use the corresponding batch file. ■ Replace %1 with the host name of the database server. ■ Replace %2 with the sa username.
Configuring the Database ■ Configuring a MS SQL Server 2000 Database After editing the batch file, it returns to the following: echo off CHCP 437 rem %1 rem %2 rem %3 rem %4 rem %5 rem %6 rem %7 rem %8 rem %9
Configuring the Database ■ Configuring a MS SQL Server 2000 Database ■ Replace %3 with the password for the sa user. ■ Replace %4 with the name of the CCA database that you are upgrading. ■ Replace %5 with the name of the user who has access to the CCA database that you are upgrading. ■ Replace %6 with the password of the user declared in previous parameter. ■ Replace %7 with the port number used by Ms SQL Server to listen for new connections. By default, Ms SQL Server listens in on the port 1433.
Configuring the Database ■ Configuring a MS SQL Server 2000 Database 18 Contact Center Anywhere Installation Guide Version 8.
4 Installing CCA Server Components This chapter describes how to install server components for Contact Center Anywhere.
Installing CCA Server Components ■ Creating Database Connection to the Application Server Creating an ODBC Data Source for Oracle 9i Database To create an ODBC data source for Oracle 9i Database Server 1 From the Windows Start menu, navigate to Programs > Administrative Tools > Data Sources (ODBC). 2 From the ODBC System Administrator System DSN tab, click Add. 3 Select Oracle in OraHome92 from the list and click Finish. NOTE: If this option is not present, Oracle 9i Client Tools must be installed.
Installing CCA Server Components ■ Creating Database Connection to the Application Server (DESCRIPTION = (ADDRESS_LIST = (ADDRESS = (PROTOCOL = TCP)(HOST = support-db)(PORT = 1521)) ) (CONNECT_DATA = (SERVICE_NAME = ORACLE) ) ) Creating an ODBC Data Source for Ms SQL Server DB To create an ODBC data source for SQL Server 1 From the Windows Start menu, navigate to Programs > Administrative Tools > Data Sources (ODBC). 2 From the ODBC System Administrator System DSN tab, click Add.
Installing CCA Server Components ■ Installing CCA Application Files Table 5. ODBC Data Source Settings for SQL Server Field Description - Default database Comments Select The CCA database. For example: cc81 Client Configuration Confirm that the Client Configuration selection is set for TCP/IP and not for Named Pipes. 5 Click Next until you get to the last screen, and then click Finish. 6 Test the Data Source. The test must verify that the connection is correct before you continue.
Installing CCA Server Components ■ Installing the TCPIPBus c Select the variable PATH, click Edit, and then add CCA directory (for example, c:\ccanywhere\bin) to the path. TIP: Make sure you put a semicolon(;) before you make a new entry. For UNIX, you must put both the ccanywhere/bin and ccanywhere/lib path to system environment PATH and LD_LIBRARY_PATH. You can put them in startup script file such as .profile. The following is an example of a .
Installing CCA Server Components ■ Installing the TCPIPBus a Run: "tcpipbus -?" to show its usage: Usage: tcpipbus.
Installing CCA Server Components ■ Configuring CCA Resources Configuring CCA Resources This section describes how to add and run all resources required by CCA using the Network Manager. This section covers the following topics: ■ Starting Network Manager. See Using the Network Manager to Manage CCA Resources on page 25. ■ Adding Server Resources. See Adding Shared and Dedicated Server Resources on page 26. ■ Starting and stopping TCPIPBus. See Starting and stopping TCPIPBus on page 34.
Installing CCA Server Components ■ Configuring CCA Resources 4 From the System tab, which specifies values used for FTP connection, complete the fields and then click OK. Server Host: FTP server name or IP address. Server Root Path: path to the location on FTP server that CCA will use to put files. Use ‘/’ to use the root directory of FTP server. File size limit (kb): the maximum size of a file that CCA can put in the FTP server in kilobytes. Ftp Username: FTP username. Ftp Password: FTP user’s password.
Installing CCA Server Components ■ Configuring CCA Resources 5 6 From the Default Resources dialog box, Shared tab, select all shared resources you need according to your server and click Save. These resources can be added at a later time.
Installing CCA Server Components ■ Configuring CCA Resources To add a resource in Network Manager 1 Open View Hosts by clicking View by Host (Figure 2) to add shared resource. Figure 2. Network Manager - Host view To add dedicated resource, click View by Company. 2 From Resources menu, choose Add Resource. 3 In the Add New Server dialog box, complete the following fields: 4 ■ Host: Select the computer on which the resource is to be loaded.
Installing CCA Server Components ■ Configuring CCA Resources ■ Call Center. See Configuring the Call Center Resource on page 29. ■ Redirect Server. See Configuring the Redirect Server Resource on page 31. ■ MP3 Server. See Configuring the MP3 Server Resource on page 32. ■ MCU Server. See Configuring the MCU Server Resource on page 33. ■ CTI Server. See Configuring the CTI Server Resource on page 33.
Installing CCA Server Components ■ Configuring CCA Resources Table 6. Call Center Configuration Field Comments Local Patterns Can be set to route calls to a specific call centers to reduce long distance charges. Dial Plan Group Typically set up to route calls through specific call centers Description Text field to describe the call center’s setup. 6 Click Save, and then Configure. 7 From the VoIP dialog box, complete the fields. Table 7 describes some of the fields. Table 7.
Installing CCA Server Components ■ Configuring CCA Resources 9 From the VoIP Detail dialog box, complete the fields. Table 8 describes some of the fields. Table 8. VoIP Interface Configuration Field Comments Name Specify what you are installing. For example, gateway or agent channels. Interface Options are SipGateway, Sip, H323Gateway, and H323. Specify what you are installing, and what your gateway is passing to you.
Installing CCA Server Components ■ Configuring CCA Resources 4 From the Redirect Server dialog box (Figure 4), select the call center from the Call Centers Unused list, and move it to the Call Centers Used list. Specify the call center to which calls will be routed. Figure 4. Redirect Server Configuration 5 Enter the Server IP Address. (This is the IP address of the machine where the Redirect Server is installed.) 6 Click Save.
Installing CCA Server Components ■ Configuring CCA Resources 4 From the MP3 Server dialog box, complete the fields and then click Save. Table 9 describes the fields. Table 9. MP3 Server Configuration Field Comments Enable MP3 Encoding Selecting the check box that enables the MP3 conversion option. Command The location of the mp3 conversion executable file. FTP Path The path to the FTP server share folder. For example, D:\Storage.
Installing CCA Server Components ■ Configuring CCA Resources You only select a call center if you want the CTI server to use only that call center. To configure the CTI server 1 From Network Manager, choose CTI Server as the resource to modify. 2 From the Resources menu, choose Modify Resource. 3 From the Resource Information dialog box, click Advanced.
5 Configuring the Web Server This chapter describes how to configure and deploy CCA Web applications on WebLogic 8.1 SP5 and Oracle 10g Application Server. It includes the following topics: ■ ■ Deploying CCA Web Applications on Oracle 10g Application Server (OAS 10g) ■ Creating JDBC Connection Pool on OAS 10g ■ Creating JDBC Data Source on OAS 10g ■ Deploying CCA Web Applications on OAS 10g Deploying CCA Web Applications on WebLogic 8.
Configuring the Web Server ■ Deploying CCA Web Applications on Oracle 10g Application Server (OAS 10g) Creating JDBC Connection Pool on OAS 10g To create a JDBC Connection pool: 1 Login the administration console of OAS 10g. The default administrator username of OAS 10g is oc4jadmin. The typical URL is http://server_name:port/em with server_name is host name of OAS 10g server and port is you used when installing OAS 10g.
Configuring the Web Server ■ Deploying CCA Web Applications on Oracle 10g Application Server (OAS 10g) Table 11. OAS 10g JDBC Connection Pool Details Field Name Value JBDC URL jdbc:oracle:thin:@//dbservername:1521/SID dbservername: host name or IP address of the database server SID: the database service name Username Database user name. Refer to parameter &13 in Creating a New Oracle 9i Database on page 11. Password Password of database user declared in previous parameter.
Configuring the Web Server ■ Deploying CCA Web Applications on Oracle 10g Application Server (OAS 10g) Deploying the TAW Application Complete the steps in the following procedure to deploy the TAW application. To deploy TAW 1 Copy the TAW.war file in the CCA installation package to the OAS 10g server. For example, C:\CCA\TAW.war. 2 Edit the web.xml file in TAW.war\WEB-INF directory (you may need an unzip tool to access this file). Change values of context parameters listed in Table 12: Table 12.
Configuring the Web Server ■ Deploying CCA Web Applications on Oracle 10g Application Server (OAS 10g) ■ 6 Context Root: /TAW From the Deploy: Deployment settings page, verify all information is correct and click Deploy to deploy the TAW application. Wait until OAS 10g finishes deploying TAW application. Deploying the CCA Application Deploying CCA application is similar to deploying TAW application. Complete the following steps to deploy CCA application: 1 Copy the CCA.
Configuring the Web Server ■ Deploying CCA Web Applications on WebLogic 8.1 SP5 To update the system configuration key 1 Open the Key Configuration page in a web browser by URL: http://server_name/TAW/ configuration.jsp. 2 At the Configuration page, edit the following options: ■ Remote DB enabled - Disable this option by removing the checkmark. ■ Source - Select Sql Server if your are using Ms SQL Server or select Oracle if your database server is Oracle 9i.
Configuring the Web Server ■ Deploying CCA Web Applications on WebLogic 8.1 SP5 Creating a New Server Domain Before you can deploy web applications on a WebLogic web server, you must first create a WebLogic Server domain. Complete the steps in the following procedure to create a new server domain on WebLogic 8.1 SP5. NOTE: Make sure Sun JDK 1.4.2_13 is installed on the Web server. To create a new WebLogic server domain 1 Click Start > BEA WebLogic Platform 8.1 > Configuration Wizard.
Configuring the Web Server ■ Deploying CCA Web Applications on WebLogic 8.1 SP5 Installing WebLogic as a Windows Service When installing WebLogic 8.1 on a Windows platform, you can optionally install the WebLogic Server Node Manager as a Windows service. The WebLogic Server Node Manager is used to start and stop managed servers in a domain. After you install the Node Manager as a Windows service, the service is started the next time you reboot the system.
Configuring the Web Server ■ Deploying CCA Web Applications on WebLogic 8.1 SP5 To change listening port of domain server and create domain user 1 Open the BEA WebLogic Server Administration Console using a web browser, and log in. The WebLogic Console URL is: http://server_name:7001/console NOTE: 7001 is the default port when you create a new domain. If you use another port while creating the domain, use that port in the URL. 2 3 4 You can change the HTTP listening port of the domain server.
Configuring the Web Server ■ Deploying CCA Web Applications on WebLogic 8.1 SP5 2 From the Database Type drop-down list, select MS SQL Server. 3 From the Database Server drop-down list, select BEA's MS SQL Server Driver (Type 4). 4 Click Continue. 5 From the Define Connection Properties page, enter your database configuration information: a Name: Remove MyJDBC Connection Pool and enter the database name. b Connection Properties: ❏ Database Name: name of CCA database. For example, cc81.
Configuring the Web Server ■ Deploying CCA Web Applications on WebLogic 8.1 SP5 3 From the Connect to connection pool page, select the Pool Name created previously from the Pool Name drop-down list 4 Click Continue. 5 From the Target the Data Source page, click to choose the selection under Independent Servers, and then click Create. 6 Restart the WebLogic Service. Deploying the TAW Application Complete the steps in the following procedure to deploy the TAW application.
Configuring the Web Server ■ Deploying CCA Web Applications on WebLogic 8.1 SP5 5 Connect to the Web based WebLogic console (http://server_name/console). 6 Click the Deploy a new Web Application Module link in Deployments > Web Application Modules. 7 In the Deploy a Web Application Module page, select the Applications directory link. 8 From the Select an archive for this Web application module page, select CCA and then click Target Module.
6 Getting Started With CCA After you complete Chapters 3 through 5 to install the CCA application, launch the CCA to verify that it is working correctly. This chapter describes how to launch CCA and verify the CCA installation.
Getting Started With CCA ■ Enabling the Partition Feature 4 ■ Company Alias: alias of the company we are logging in. ■ Username: username of the agent. ■ Password: password of agent You should be able to log in. If you receive any error message, check the log files in CCA/WEBINFO/ccanywhere.log to find detail of any error during deployment. Enabling the Partition Feature Partition is a new feature in CCA version 8.1.
Getting Started With CCA ■ Making interactions 3 Login Integrated Client. 4 Make an inbound call to CCA system. Make sure that agent can accept the call. 5 Make an outbound call. Make sure that agent can connect to an outbound number. 6 Send an email interaction. Make sure that agent can receive the email. 7 Send an chat request to CCA system. Make sure that agent can chat with the customer. Contact Center Anywhere Installation Guide Version 8.
Getting Started With CCA ■ Making interactions 50 Contact Center Anywhere Installation Guide Version 8.
Index Symbols .
Index ■ M License Server 27 listening port of WebLogic Load balancer 7 Local Patterns 30 log 22 logPath 38 42 M MCU Server 27, 33 MCU server configuration 33 MEM_ARGS 42 MP3 Server 32 N Nation Prefix 29 Network Manager 25 Number of Channels 31 O OAS 10g Instance detail page 36 ODBC Data Source 20 ODBC System Administrator System 21 Oracle 9i Client Tools 20 ORACLE_HOME/network/admin 20 P Parent Application PATH 23 Payload 30 Pbx Prefix 29 Private Prefix 29 prompt 22 38 Q Quintum 31 R Redirect Serve