Point of Sale Terminal (Model: MICROS Workstation 6 Series 2) Basic Operation Guide Page 1
Table of Contents Overview of POS Terminal ............................................................................................................... 3 Getting to know your Point of Sale Terminal................................................................................ 3 MICROS Workstation 6 Series 2 – Hardware Specification ......................................................... 8 Using Your POS Terminal ..........................................................................................
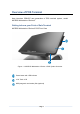
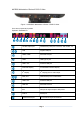
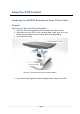
Overview of POS Terminal Here introduce ORACLE new generation of POS terminal system, model MICROS Workstation 6 Series 2. Getting to know your Point of Sale Terminal MICROS Workstation 6 Series 2 POS Front View Figure 1-1: MICROS Workstation 6 Series 2 POS System Overview Power button with LED indicator 15.
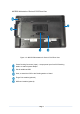
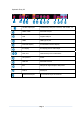
MICROS Workstation 6 Series 2 POS Rear View Figure 1-2: MICROS Workstation 6 Series 2 POS Rear View Power Docking Connector (Input) – accept power input from POS docking station or external power adaptor Slot for additional SSD Hook, to attach the POS to the Docking station or Stand Finger Print module (optional) MSR card module (optional) Page 4
MICROS Workstation 6 Series 2 POS I/O View Figure 1-3: MICROS Workstation 6 Series 2 POS I/O View There are two optional I/O panels: Optional1: Standard I/O 12V DC Output port standard DC power jack connector, with 12VDC, 1A LAN Gigabit LAN port USB3, USB4 Dual USB 2.
Optional2: Entry I/O 15 12V DC Output port standard DC power jack connector, with 12VDC, 1A USB3, USB4 Dual USB 2.0 port LAN Gigabit LAN port USB7 USB Type C port Customer Display For MICROS customer display 2nd Display 2nd Display port for video output CD2, CD1 Cashdrawer port for cashdrawers 15V power in Power USB 1&2 Dual USB 3.
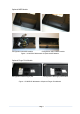
Optional MSR Module Configuration with MSR module Configuration without MSR module Figure 1-4: MICROS Workstation 6 Optional MSR Module Optional Finger Print Module Configuration without finger print Configuration with finger print module Figure 1-5: MICROS Workstation 6 Optional Finger Print Module Page 7
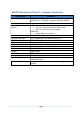
MICROS Workstation 6 Series 2 – Hardware Specification Specification Processor Memory Display with touch screen Parameter Two alternate CPU Intel® Core™ i5-8365UE, or Intel® Celeron® 5305UE, Installed memory (RAM) 8GB LCD display Type: TFT, supports transmissive display mode Size: 15.
Using Your POS Terminal Positioning Your MICROS Workstation 6 Series 2 Point of Sale Terminal Mounting your POS on the POS Docking Station 1. Place the POS docking station on a flat surface as a table or desk. 2. Align and insert the POS on the docking plate, make sure all of four hooks securely attach to the mounting holes of docking station. 3. The lock button firmly MICROS Workstation 6 Series 2 POS Docking Station Figure 2-1: Positioning the POS to docking station 4.
Adjust the view angle of Point of Sale Terminal Adjust the view angle of POS through turning the docking plate. Details will be demonstrated in POS Docking Station User Guide.
Working with Windows® 10 Starting for the first time When you start your MICROS Workstation 6 POS for the first time, a series of screens may appear to guide you configuring the basic setting of your Windows® 10 operating system. Follow the instructions to configure. Once you are done configuring the basic items, a Windows® 10 Start screen appears after successfully signing in to your user account. It helps organize all the programs and applications you need in just one place.
Appendix – Safety Caution TBD Page 12