INSTRUCTION MANUAL MicroXplore 5mp LCD Digital Microscope #51856 Copyright © 2018 Optronic Technologies, Inc. All Rights Reserved. No part of this product instruction or any of its contents may be reproduced, copied, modified or adapted, without the prior written consent of Optronic Technologies, Inc.
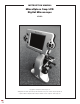
Welcome to a new world of adventure. Your new MicroXplore LCD microscope is capable of capturing detailed, high resolution, full-color images and movies of the microscopic world, both with your eyes and with the included CMOS chip and LCD screen. Examine details at high powers of 40x-640x with the included eyepieces, or 24x-960x with the LCD screen. View subjects on screen using the 3.5” Color LCD TFT display. Capture images and movies using the built in 5 MegaPixel CMOS camera.
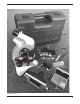
Eyepiece collar - remove before inserting LCD head Case USB Cable Tweezers Gum Sea salt Yeast Brine shrimp eggs 16x WF Eyepiece Hatchery container 10x WF Eyepiece Microscope 5 Blank Slides Figure 2.
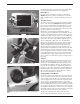
Transparent objects such as slides will use the bottom illuminator (transmitted light) at all powers of magnification. Power On/Off Snap Navigation arrows Menu Ok/accept button Mode SD card, USB, AV out (located on bottom edge of LCD head) Figure 3. The LCD screen, with power and navigation buttons shown Filter Wheel The 5mp features a manual six position color filter wheel (Figure 6). Choose from five colored filters (or clear).
transmit images to a separate monitor. You’ll need a mini-AV to RCA Video cable (sold separately and available at most electronic stores) in order to display the live image on another device. Capturing Images 1. Press the Mode button a few times until the microscope is in Camera mode, indicated by a small picture of a camera in the top left corner (Figure 8). 2. Filter Wheel Figure 6.
Troubleshooting If you do not get an image (or a good image) to view on your LCD screen, here are a few things to double check: 5. Make sure the AC Adapter is plugged in to an AC power source and attached to the microscope securely and correctly. 6. Make sure you have the illuminator turned on with maximum brightness adjustment (this is the normal position). 7. Make sure the objective lens you have chosen is set correctly and it has clicked into the right position. 8.
This page left blank intentionally.
One-Year Limited Warranty This product is warranted against defects in materials or workmanship for a period of one year from the date of purchase. This warranty is for the benefit of the original retail purchaser only. During this warranty period Optronic Technologies will repair or replace, at Optronic’s option, any warranted instrument that proves to be defective, provided it is returned postage paid. Proof of purchase (such as a copy of the original receipt) is required.