FO CU S Pico Pocket P ro ojector
IMPORTANT SAFETY INSTRUCTION CLASS 1 LED PRODUCT EYE SAFETY WARNINGS Avoid staring/facing directly into the projector beam at all times. Keep your back to the beam as much as possible. A stick or laser pointer is recommended to avoid the need for the user to enter the beam. When projector is used in a classroom, adequately supervise students when they are asked to point out something on the screen. In order to minimize power, use room blinds to reduce ambient light levels. 1.
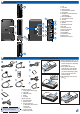
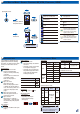
PRODUCT OVERVIEW micro SD 1. 2. 3. 4. 5. 6. Lens Focus Dial Battery Indicator Auto Search Source Button Enter Button Navigation / Volume Button (up/ down/left/right) 7. Menu / Back Button 8. Through-hole for straps 9. IR Cover 10. VGA Input Connector 11. Speaker 12. Mini HDMI Connector 13. DC Input 14. AV Input Connector 15. Audio Out Connector 16. Mirco USB port 17. Power Button 18. microSD Card Slot 19. Battery Cover 20.
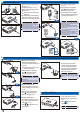
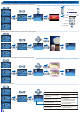
CHARGING THE BATTERY 1 2 SH PU 3 CONNECT VGA/COMPONET SOURCE - (VIDEO IN) 1. Remove protection cap and insert the plug. (1) 2. Connect the charger. (2~3) 3. During charging the LED indicator lights red. (4) Projector will not charge while operating. 4. The LED Charge Indicator will turn green when battery is fully charged. This process may take up to3 hours 1 2 or 1. For more LED indicator, see page 7. 2. Before using the first time, charge until battery indicator turns green. 3.
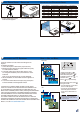
USING A TRIPOD STAND SWITCH ON ADJUSTING THE PROJECTED IMAGE Projection Distance (A) Screen Size - Width (B) Screen Size - Height (C) Screen Diagonal (D) Meter Feet (mm) (inch) (mm) (inch) (mm) 0.20 0.66 110 4.3 62.7 2.5 127 (inch) 5 0.40 1.64 221 8.7 125.4 4.9 254 10 0.60 3.28 331 13.0 188.1 7.4 381 15 0.80 4.92 448 17.4 250.8 9.9 508 20 2.40 6.56 1325 52.2 752.3 29.6 1524 60 4.80 8.20 2651 104.4 1504.5 59.2 3048 120 US FOC 1.
HOW TO USE THE MENU - SOURCE: INTERNAL MEMORY, MICRO SD CARD, AND USB FLASH DRIVE Playing Videos from the Internal Memory / Micro SD Card / USB Flash Drive Adjust Volume 16 or 00:05 Fast forward Rewind or Play /Pause Exit Video mode Displaying Photos from the Internal Memory / Micro SD Card / USB Flash Drive or or Presentation from the Internal Memory / Micro SD Card / USB Flash Drive Report or Finance Department or Navigating the Settings Menu or Photo Setup System Setup Slideshow: Select
HOW TO USE THE MENU - SOURCE: COMPOSITE AV, VGA, COMPONENT, HDMI Input signal source Bright mode: Full LED power. Auto aspect ratio. Movie mode: Enhanced Color, Mid-Brightness. Contrast: adjust contrast STD mode: Standard LED power. H. Position: adjust the horizontal position. ECO mode: Economy LED power. V. Position: adjust the vertical position. F Front Desktop. F F Rear Desktop. Phase: change the display data frequency to match the frequency of your computer’s graphic card.