Table of Contents Table of Contents ................................................................................... 1 Usage Notice .......................................................................................... 2 Safety Information .........................................................................................2 Precautions....................................................................................................3 Eye Safety Warnings .........................................
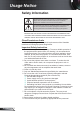
Usage Notice Safety Information 7KH OLJKWQLQJ À DVK ZLWK DUURZ KHDG ZLWKLQ DQ HTXLODWHUDO WULDQJOH LV intended to alert the user to the presence of uninsulated “dangerous YROWDJH´ ZLWKLQ WKH SURGXFW¶V HQFORVXUH WKDW PD\ EH RI VXI¿ FLHQW magnitude to constitute a risk of electric shock to persons. 7KH H[FODPDWLRQ SRLQW ZLWKLQ DQ HTXLODWHUDO WULDQJOH LV LQWHQGHG WR DOHUW the user to the presence of important operating and maintenance (servicing) instructions in the literature accompanying the appliance.
Usage Notice Precautions Please follow all warnings, precautions and maintenance as recommended in this user’s guide. ŮŶ Warning- Do not look into the projector’s lens when the lamp is on. The bright light may hurt your eyes. ŮŶ Warning- 7R UHGXFH WKH ULVN RI ¿ UH RU HOHFWULF VKRFN GR QRW expose this projector to rain or moisture. ŮŶ Warning- Please do not open or disassemble the projector as this may cause electric shock. ŮŶ Warning- When replacing the lamp, please allow the unit to cool down.
Usage Notice Do: Turn off and unplug the power plug from the AC outlet before cleaning the product. Use a soft dry cloth with mild detergent to clean the display housing. Disconnect the power plug from AC outlet if the product is not being used for a long period of time. Do not: Block the slots and openings on the unit provided for ventilation. Use abrasive cleaners, waxes or solvents to clean the unit.
Usage Notice Eye Safety Warnings ŮŶ Avoid staring/facing directly into the projector beam at all times. Keep your back to the beam as much as possible. ŮŶ :KHQ SURMHFWRU LV XVHG LQ D FODVVURRP DGHTXDWHO\ VXSHUYLVH students when they are asked to point out something on the screen. ŮŶ In order to minimize the lamp power, use room blinds to reduce ambient light levels.
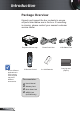
Introduction Package Overview Unpack and inspect the box contents to ensure all parts listed below are in the box. If something is missing, please contact your nearest customer service center. EN HA NC W ED I D E S C R E E N Projector with lens cap Power Cord 1.8m VGA Cable 1.8m HDMI Due to different applications in each country, some regions may have different accessories.
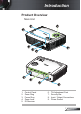
Introduction Product Overview Main Unit 1 2 3 EN HA NC W ED I D E S C R E E N 5 6 4 6 W EN H I D AN E S C R E E N CE D VG A-IN / SC ART / YP bPr VG A-O UT HD MI S-V IDE O VID EO RS-23 2 AUDIO -IN AUDIO -OU T 9 8 7 6 1. 2. 3. 4. 5. Control Panel Zoom Ring Focus Ring Zoom Lens IR Receiver 6. 7. 8. 9.
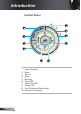
Introduction Control Panel 8 1 7 2 6 3 5 4 9 1. 2. 3. 4. 5. 6. 7. 8. 9. 10.
Introduction Input / Output Connections 1 VGA-IN / SCART / YPbPr 9 2 VGA-OUT 3 4 5 HDMI S-VIDEO VIDEO 6 RS-232 7 8 AUDIO-IN AUDIO-OUT 10 11 1. VGA-In/SCART/YPbPr Connector (PC Analog Signal/Component Video Input/HDTV/SCART/ YPbPr) 2. VGA-Out Connector (Monitor Loop-through Output) 3. HDMI Connector 4. S-Video Input Connector 5. Composite Video Input Connector 6. RS-232 Connector (3-pin) 7. Audio Input Connector (3.5mm Mini Jack) 8. Audio Output Connector (3.5mm Mini Jack) 9.
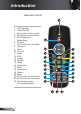
Introduction Remote Control 1 1. 2. 3. 4. 5. 6. 7. 8. 9. 10. 11. 12. 13. 14. 15. 16. 17. 18. 19. 20. 21. 22. 23.
Installation Connecting the Projector Connect to Computer/Notebook 5 3 2 4 6 Due to the difference in applications for each country, some regions may have different accessories. VGA-IN / SCART / YPbPr R (*) Optional accessory VGA-OUT HDMI S-VIDEO VIDEO RS-232 AUDIO-IN AUDIO-OUT PS50426E 7 1 1....................................................................................................Power Cord 2.....................................................................................
Installation Connect to Video Sources DVD Player, Set-top Box, HDTV receiver 5 3 6 4 7 2 VGA-IN / SCART / YPbPr Due to the difference in applications for each country, some regions may have different accessories. R 1 VGA-OUT HDMI S-VIDEO VIDEO RS-232 AUDIO-IN AUDIO-OUT PS50426E 8 9 (*) Optional accessory S-Video Output Composite Video Output 1....................................................................................................Power Cord 2.............................
Installation Powering the projector On/Off Powering On the Projector 1. Remove the lens cap. n 2. Securely connect the power cord and signal cable. When connected, the Power LED will turn red. 3. Turn on the lamp by pressing “POWER” button either on the top of the projector or on the remote. The Power LED will now turn Green. o The startup screen will display in approximately 10 seconds. 7KH ¿ UVW WLPH \RX XVH WKH SURMHFWRU \RX FDQ VHOHFW \RXU preferred language after the startup screen displays. 4.
Installation Powering Off the Projector 1. Press the “POWER” button to turn off the projector lamp. The following message will be displayed on the screen. 3UHVV WKH ³32:(5´ EXWWRQ DJDLQ WR FRQ¿UP RWKHUZLVH the message will disappear after 15 seconds. When you press the “POWER” button a second time, the system will show the countdown timer on the screen. 2. The cooling fans continue to operate for about 10 seconds for cooling cycle. When the Power LED turns Red, the projector has entered standby mode.
Installation Adjusting the Projected Image Adjusting the Projector’s Height The projector is equipped with elevator feet for adjusting the image height. 1. Locate the adjustable foot you wish to modify on the underside of the projector. 2. Rotate the adjustable ring counter clockwise to raise the projector or clockwise to lower it. Repeat with the remaining feet as needed.
Installation Adjusting the Projector’s Zoom / Focus You may turn the zoom ring to zoom in or out. To focus the image, rotate the focus ring until the image is clear. The projector will focus at distances from 3.9 to 39.4 feet (1.2 to 12.0 meters). Zoom Ring Focus Ring Adjusting Projection Image Size ag on al 302.9" (796.2cm) Height Di 227.1" (576.9cm) Width 75.7" (192.3cm) 30.3" (76.9cm) 27.5" (69.9cm) 68.8" (174.8cm) 126.2" (320.5cm) 114.7" (291.4cm) 176.7" (448.7cm) 160.6" (407.9cm) 206.
User Controls Control Panel & Remote Control There are two ways for you to control the functions: Control Panel and Remote Control. Control Panel Using the Control Panel POWER Refer to the “Power On/Off the Projector” section on pages 13-14. MENU Press “MENU” to launch the on-screen display (OSD) menu. To exit OSD, Press “MENU” again. &RQ¿ UP \RXU LWHP VHOHFWLRQ RE-SYNC Automatically synchronize the projector to the input source. SOURCE Press “SOURCE” to select an input signal.
User Controls Remote Control Using the Remote Control Power Refer to the “Power On/Off the Projector” section on pages 13-14. &RQ¿ UP \RXU LWHP VHOHFWLRQ HDMI English 18 Source Press “SOURCE” to select an input signal. Re-SYNC Automatically synchronizes the projector to the input source. Four Directional Select Keys Use to select items or make adjustments to your selection. Keystone +/- Adjust image distortion caused by tilting the projector.
User Controls Remote Control Using the Remote Control HDMI Press “HDMI” to choose HDMI source. Freeze Press “Freeze” to pause the screen image. Press this button again to unlock. AV mute Momentarily turns off/on the audio and video. S-Video Press “S-Video” to choose S-Video source. VGA Press “VGA” to choose VGA sources. Video Press “Video” to choose Composite video source.
User Controls On-screen Display Menus The Projector has multilingual On-screen Display menus that allow you to make image adjustments and change a variety of settings. The projector will automatically detect the source. How to operate 1. To open the OSD menu, press “MENU” on the Remote Control or Projector Keypad. 2 When OSD is displayed, use keys to select any item in the main menu. While making a selection on a particular page, press or “Enter” key to enter sub menu. 3.
User Controls Menu Tree # # (#) “Saturation” and “Tint” are only supported in Video mode. (##) “Signal” is only supported in Analog VGA (RGB) signal. (*) "3D" is supported at 1280x720 resolution maximum. (**) "3D Sync. Invert" is only available when 3D is enabled.
User Controls IMAGE Display Mode There are many factory presets optimized for various types of images. Presentation: Good color and brightness from PC input. Bright: Maximum brightness from PC input. Movie: For home theater. sRGB: Standardised accurate color. Blackboard: This mode should be selected to achieve optimum color settings when projecting onto a blackboard (green). Classroom: This mode is recommended for projecting in a classroom. User1: User’s settings.
User Controls IMAGE Contrast The contrast controls the degree of difference between the lightest and darkest parts of the picture. Adjusting the contrast changes the amount of black and white in the image. Press the Press the to decrease the contrast. to increase the contrast. Sharpness Adjust the sharpness of the image. Press the Press the to decrease the sharpness. to increase the sharpness. Saturation Adjust a video image from black and white to fully saturated color.
User Controls IMAGE | Advanced Degamma This allows you to choose a degamma table that has been ¿QH WXQHG WR EULQJ RXW WKH EHVW LPDJH TXDOLW\ IRU WKH LQSXW Film: for home theater. Video: for video or TV source. Graphics: for image source. PC: for PC or computer source. BrilliantColor™ This adjustable item utilizes a new color-processing algorithm and system level enhancements to enable higher brightness while providing true, more vibrant colors in picture. The range is from “0” to “10”.
User Controls Advanced | Color Settings Color Use these settings for advanced adjustment of the individual Red, Green, Blue, Cyan, Magenta and Yellow Colors. Reset Choose “Yes” to return the factory default settings for color adjustments. Advanced | Input Source Input Source Use this option to enable / disable input sources. Press to enter WKH VXE PHQX DQG VHOHFW ZKLFK VRXUFHV \RX UHTXLUH 3UHVV ³(QWHU´ to finalize the selection. The projector will not search for inputs that are not selected.
User Controls DISPLAY Format Use this function to choose your desired aspect ratio. 4:3: This format is for 4×3 input sources. 16:10: This format is for 16×10 input sources, like HDTV and DVD enhanced for Wide screen TV. LBX: This format is for non-16x9, letterbox source and for users who use external 16x9 lens to display 2.35:1 aspect ratio using full resolution. Native: This format displays the original image without any scaling. AUTO: Automatically selects the appropriate display format.
User Controls Display area Picture area Input Signal Display on Screen 4:3 format or 16:10 format LBX format Native format 27 English
User Controls DISPLAY Overscan Overscan function removes the noise in a video image. Overscan the image to remove video encoding noise on the edge of video source. Zoom Press the Press the to reduce the size of an image. to magnify an image on the projection screen. H Image Shift Shift the projected image position horizontally. V Image Shift Shift the projected image position vertically. V Keystone Press the or to adjust image distortion vertically and makes a rectangular image.
User Controls SETUP | Language Language Choose the multilingual OSD menu.
User Controls SETUP Projection Rear-Desktop and Rear-Ceiling are to be used with a translucent screen. Front-Desktop This is the default selection. The image is projected straight on the screen. Rear-Desktop When selected, the image will appear reversed. Front-Ceiling When selected, the image will turn upside down. Rear-Ceiling When selected, the image will appear reversed in upside down position.
User Controls SETUP Menu Location Choose the menu location on the display screen. Projector ID ,' GH¿ QLWLRQ FDQ EH VHW XS E\ PHQX UDQJH a DQG DOORZ user control an individual projector by RS232. Refer to page 48 for the complete list of RS232 commands. Mute Choose the “On” to turn mute on. Choose the “Off” to turn mute off. Volume Press the Press the to decrease the volume. to increase the volume.
User Controls SETUP | Signal “Signal” is only supported in Analog VGA (RGB) signal. Phase Synchronize the signal timing of the display with the graphic card. ,I WKH LPDJH DSSHDUV WR EH XQVWDEOH RU À LFNHUV XVH WKLV IXQFWLRQ WR correct it. )UHTXHQF\ &KDQJH WKH GLVSOD\ GDWD IUHTXHQF\ WR PDWFK WKH IUHTXHQF\ RI your computer’s graphic card. Use this function only if the image DSSHDUV WR À LFNHU YHUWLFDOO\ H. Position Press the Press the to move the image left. to move the image right. V.
User Controls SETUP | Security Security 2Q &KRRVH ³2Q´ WR XVH VHFXULW\ YHUL¿FDWLRQ ZKHQ WKH WXUQLQJ on the projector. Off: Choose “Off” to be able to switch on the projector without SDVVZRUG YHUL¿FDWLRQ Security Timer Use this function to set the how long (Month/Day/Hour) the projector can be used.
User Controls SETUP | Security Change Password First time: Password default value is “1234” ¿UVW WLPH 1. Press “ ” to set the password. 2. The password has to be 4 digits. 3. Use number button on the remote to enter your new password and then press “ ´ NH\ WR FRQ¿UP \RXU password. Change Password: 1. Press “ ” to input old password. 2. Use number button to enter current password and then press “ ´ WR FRQ¿UP 3.
User Controls SETUP | Advanced Logo Use this function to set the desired startup screen. If changes are made they will take effect the next time the projector is powered on. Optoma: The default startup screen. User: Use stored picture from “Logo Capture” function. Logo Capture Press “ ” to capture an image of the picture currently displayed on screen.
User Controls OPTIONS Source Lock On: 7KH SURMHFWRU ZLOO VHDUFK VSHFL¿HG FRQQHFWLRQ SRUW Off: The projector will search for other signals if the current input signal is lost. High Altitude When “On” is selected, the fans will spin faster. This feature is useful in high altitude areas where the air is thin. Information Hide On: Choose “On” to hide the “searching” message. Off: Choose “Off” to show the “searching” message.
User Controls OPTIONS | Advanced Direct Power On Choose “On” to activate Direct Power mode. The projector will automatically power on when AC power is supplied, without pressing the “Power” key on the projector control panel or “Power” key on the remote control. Auto Power Off (min) Sets the countdown timer interval. The countdown timer will start, when there is no signal being sent to the projector. The projector ZLOO DXWRPDWLFDOO\ SRZHU RII ZKHQ WKH FRXQWGRZQ KDV ¿QLVKHG LQ minutes).
User Controls OPTIONS | Lamp Settings Lamp Hours Display the projection time. Lamp Reminder Choose this function to show or hide the “change lamp” warning message. The message will appear 30 hours before suggested replacement of lamp. Brightness Mode STD: Choose “STD” to dim the projector lamp which will lower power consumption and extend the lamp life by up to 130%. BRIGHT: Choose “BRIGHT” to increase the brightness. Lamp Reset Reset the lamp hour counter after replacing the lamp.
Appendices Troubleshooting If you experience a problem with your projector, please refer to the following information. If a problem persists, please contact your local reseller or service center. Image Problems No image appears on-screen Ensure all the cables and power connections are correctly and securely connected as described in the “Installation” section. Ensure all the pins of connectors are not bent or broken. Check if the projection lamp has been securely installed.
Appendices 7. Click on “Show all devices”. Next, select “Standard monitor types” under the SP box; choose the resolution mode you need under the “Models” box. 8. Verify that the resolution setting of the monitor display is lower WKDQ RU HTXDO WR UXGA (1600 × 1200). If you are using a Notebook: 1. First, follow the steps above to adjust resolution of the computer. 2. Press the appropriate keys listed below for your notebook manufacturer to send signal out from notebook to projector.
Appendices Image is out of focus Make sure the lens cap is removed. Adjust the Focus Ring on the projector lens. 0DNH VXUH WKH SURMHFWLRQ VFUHHQ LV EHWZHHQ WKH UHTXLUHG GLVWDQFH 3.9 to 39.4 feet (1.2 to 12.0 meters) from the projector. See page 16. The image is stretched when displaying 16:9 DVD title When you play anamorphic DVD or 16:9 DVD, the projector will show the best image in 16:9 format on projector side.
Appendices Other Problems The projector stops responding to all controls If possible, turn off the projector, then unplug the power cord and wait at least 60 seconds before reconnecting power. Check that “Keypad Lock” is not activated by trying to control the projector with the remote control. Lamp burns out or makes a popping sound When the lamp reaches its end of life, it will burn out and may make a loud popping sound.
Appendices On Screen Messages Temperature warning: Fan failed: Lamp warning: Out of display range: Remote Control Problems If the remote control does not work Check the operating angle of the remote control is within ±15° both horizontally and vertically of one of the IR receivers on the projector. Make sure there are not any obstructions between the remote control and the projector. Move to within 7 m (±0°) of the projector. Make sure the batteries are inserted correctly.
Appendices Replacing the lamp The projector automatically detects the lamp life. When the lamp life is nearing the end of use, you will receive a warning message. When you see this message, please contact your local reseller or service center to change the lamp as soon as possible. Make sure the projector has been cooled down for at least 30 minutes before changing the lamp. Warning: If ceiling mounted, please use caution when opening the lamp access panel.
Appendices 1 2 The screws on the lamp cover and the lamp cannot be removed. 3 4 The projector cannot be turned on if the lamp cover has not been placed back on the projector. Do not touch the glass area of the lamp. Hand oil can cause the lamp to shatter. Use a dry cloth to clean the lamp module if it was accidentally touched. Lamp Replacement Procedure: 1. 2. 3. 4. 5. 6. 7. Switch off the power to the projector by pressing the “POWER” button.
Appendices Compatibility Modes Computer Compatibility For widescreen resolution (WXGA), the compatibility support is dependent on Notebook/PC models. English 46 Mode Resolution V-Sync (Hz) H-Sync (KHz) VGA 640 × 350 70 31.50 VGA 640 × 350 85 37.90 VGA 640 × 400 85 37.90 VGA 640 × 480 60 31.50 VGA 640 × 480 72 37.90 VGA 640 × 480 75 37.50 VGA 640 × 480 85 43.30 VGA 720 × 400 70 31.50 VGA 720 × 400 85 37.90 SVGA 800 × 600 56 35.20 SVGA 800 × 600 60 37.
Appendices Computer Compatibility Mode Resolution V-Sync (Hz) H-Sync (KHz) MAC LC 13” 640 × 480 66.66 34.98 MAC II 13” 640 × 480 66.68 35.00 MAC 16” 832 × 624 74.55 49.73 MAC 19” 1024 × 768 75 60.24 MAC 1152 × 870 75.06 68.68 MAC G4 640 × 480 60 31.35 i MAC DV 1024 × 768 75 60.00 i MAC DV 1152 × 870 75 68.49 i MAC DV 1280 × 960 75 75.00 Video Compatibility NTSC M (3.58MHz), 4.
Appendices RS232 Commands RS232 Pin Assignments 3 1 2 9 5 Pin no. Pin no. 1 English 48 8 4 7 3 6 2 Spec.
Appendices RS232 Protocol Function List RS232 Commands Baud Rate : 9600 Data Bits: 8 Parity: None Stop Bits: 1 Flow Control : None UART16550 FIFO: Disable Projector Return (Pass): P Projector Return (Fail): F XX=00-99, projector's ID, XX=00 is for all projectors 1. There is a after all ASCII commands. 2. 0D is the HEX code for in ASCII code.
Appendices --------------------------------------------------------------------------------------------------------------------------------------------------------------------------------------------------------------------------~XX71 1 7E 30 30 37 31 20 31 0D Projection Front-Desktop ~XX71 2 7E 30 30 37 31 20 32 0D Rear-Desktop ~XX71 3 7E 30 30 37 31 20 33 0D Front-Ceiling ~XX71 4 7E 30 30 37 31 20 34 0D Rear-Ceiling ------------------------------------------------------------------------------------------
Appendices Ceiling Mount Installation 1. To prevent damage to your projector, please use the Optoma ceiling mount. 2. If you wish to use a third party ceiling mount kit, please ensure the screws used to attach a mount to the projector meet the following specifications: Warning: 1. If you buy a ceiling mount from another company, please be sure to use the correct screw size. Screw size will vary depending on the thickness of the mounting plate. 2.
Appendices 2SWRPD *OREDO 2I¿FHV )RU VHUYLFH RU VXSSRUW SOHDVH FRQWDFW \RXU ORFDO RI¿FH USA 715 Sycamore Drive Milpitas, CA 95035, USA www.optomausa.com Tel : 408-383-3700 Fax: 408-383-3702 Service : services@optoma.com Canada 5630 Kennedy Road, Mississauga, Tel : 905-361-2582 ON, L4Z 2A9, Canada Fax: 905-361-2581 www.optoma.ca Service : canadacsragent@optoma.com Europe 42 Caxton Way, The Watford Business Park Watford, Hertfordshire, WD18 8QZ, UK Tel : +44 (0) 1923 691 800 www.optoma.
Appendices Korea WOOMI TECH.CO.,LTD. 4F,Minu Bldg.33-14, Kangnam-Ku, Tel : +82+2+34430004 seoul,135-815, KOREA Fax: +82+2+34430005 Japan 東京都足立区綾瀬3-25-18 株式会社オーエスエム サポートセンター:0120-46-5040 E-mail : info@osscreen.com www.os-worldwide.com Taiwan 5F., No. 108, Minchiuan Rd. Shindian City, Taipei Taiwan 231, R.O.C. www.optoma.com.tw Tel : +886-2-2218-2360 Fax: +886-2-2218-2313 Service : services@optoma.com.tw asia.optoma.
Appendices Regulation & Safety notices This appendix lists the general notices of your projector. FCC notice This device has been tested and found to comply with the limits for a Class B digital device pursuant to Part 15 of the FCC rules. These limits are designed to provide reasonable protection against harmful interference in a residential installation.
Appendices Operation conditions This device complies with Part 15 of the FCC Rules. Operation is subject to the following two conditions: 1. This device may not cause harmful interference and 2. This device must accept any interference received, including interference that may cause undesired operation. Notice: Canadian users This Class B digital apparatus complies with Canadian ICES-003.
Inhaltsverzeichnis Inhaltsverzeichnis ................................................................................... 1 Benutzungshinweise .............................................................................. 2 Sicherheitshinweise .......................................................................................2 Vorsichtsmaßnahmen ....................................................................................3 Warnhinweise für Augen ...................................................
Benutzungshinweise Sicherheitshinweise Das Blitzzeichen mit einem Pfeil am Ende in einem gleichseitigen Dreieck warnt vor nicht isolierter „gefährlicher Spannung“ innerhalb des Produkts. Diese Spannung kann elektrische Schläge verursachen. Das Ausrufezeichen in einem gleichseitigen Dreieck soll Sie darauf aufmerksam machen, dass Sie unbedingt die wichtigen Bedienungs- und Wartungsanweisungen in dem dem Gerät beigelegten Dokument durchlesen müssen.
Benutzungshinweise Vorsichtsmaßnahmen Befolgen Sie alle Warnhinweise, 9RUVLFKWVPDQDKPHQ XQG 3À HJHKLQZHLVH LQ diesem Handbuch. ɼʄ Warnung- Blicken Sie niemals direkt in das Objektiv des Projektors, wenn die Lampe eingeschaltet ist. Das helle Licht kann Ihren Augen schaden. ɼʄ Warnung- Der Projektor darf weder Regen noch Feuchtigkeit ausgesetzt werden, um einen Brand oder elektrischen Schlag zu vermeiden. ɼʄ Warnung- Versuchen Sie nicht den Projektor zu öffnen oder auseinander zu bauen.
Benutzungshinweise Was Sie tun sollten: Vor dem Reinigen des Gerätes immer den Netzstecker ziehen. Verwenden Sie zur Reinigung des Gehäuses ein weiches, trockenes Tuch mit einem milden Reinigungsmittel. Trennen Sie das Gerät vom Stromnetz, wenn es über einen längeren Zeitraum nicht benutzt wird. Was Sie nicht tun dürfen: Blockieren Sie niemals die Lüftungsöffnungen des Gerätes, da sie der Kühlung dienen. B enutzen Sie zur Reinigung keine Scheuermittel, Wachse oder Lösungsmittel.
Benutzungshinweise Warnhinweise für Augen ŮŶ Vermeiden Sie es, direkt in den Projektorstrahl zu blicken oder direkt vor dem Strahl zu stehen. Stehen Sie möglichst mit dem Rücken zu dem Strahl. ŮŶ Wird der Projektor in einem Klassenzimmer verwendet, geben Sie bitte den Schülern/Studenten, die am Projektionsbild auf etwas zeigen sollen, entsprechende Sicherheitsanweisungen.
Einführung Lieferumfang Bitte prüfen Sie die Vollständigkeit des Produkts. Falls etwas fehlen sollte, wenden Sie sich bitte an den Kundendienst in Ihrer Nähe. EN HA NC W ED I D E S C R E E N Projektor mit Objektivabdeckung Netzkabel 1,8 m VGA-Kabel 1,8 m HDMI W egen unterschiedlichen Vorgaben in einzelnen Ländern werden die Geräte in bestimmten Regionen eventuell mit unterschiedlichem Zubehör ausgeliefert.
Einführung Produktübersicht Projektor 1 2 3 EN HA NC W ED I D E S C R E E N 5 6 4 6 W EN H I D AN E S C R E E N CE D VG A-IN / SC ART / YP bPr VG A-O UT HD MI S-V IDE O VID EO RS-23 2 AUDIO -IN AUDIO -OU T 9 8 7 6 1. 2. 3. 4. 5. Bedienfeld Zoomring Fokusring Zoomobjektiv IR-Empfänger 6. 7. 8. 9.
Einführung Bedienfeld 8 1 7 2 6 3 5 4 9 1. 2. 3. 4. 5. 6. 7. 8. 9. 10.
Einführung Ein- und Ausgänge 1 VGA-IN / SCART / YPbPr 9 2 VGA-OUT 3 4 5 HDMI S-VIDEO VIDEO 6 RS-232 7 8 AUDIO-IN AUDIO-OUT 10 11 1. VGA-IN/SCART/YPbPr-Eingangsanschluss (PC Analogsignal-/Component Video-Eingang/HDTV/ SCART/YPbPr) 2. VGA-Ausgangsanschluss (Monitor-Schleifenausgang) 3. HDMI Eingangsanschluss 4. S-Videoeingangsanschluss 5. Composite-Videoeingangsanschluss 6. RS-232-Anschluss (3-polig) 7. Audioeingang (3,5 mm-Klinkenbuchse) 8. Audioausgang (3,5 mm-Klinkenbuchse) 9.
Einführung Fernbedienung 1 1. LED-Anzeige 2. Stromschalter 3. Bei diesem Modell ohne Funktion 4. Bei diesem Modell ohne Funktion 5. Vier Pfeiltasten 6. Re-Sync 7. Bei diesem Modell ohne Funktion 8. Lautstärke +/9. Zoom 10. AV Stumm 11. Video 12. VGA 13. Freeze 14. S-Video 15. HDMI 16. Helligkeit 17. Menü 18. Trapezkor. +/19. Quelle 20. Enter 21. Bei diesem Modell ohne Funktion 22. Bei diesem Modell ohne Funktion 23.
Installation Anschließen des Projektors Verbinden mit dem Computer/Notebook 5 3 2 4 6 Wegen unterschiedlichen Vorgaben in einzelnen Ländern werden die Geräte in bestimmten Regionen eventuell mit unterschiedlichem Zubehör ausgeliefert. VGA-IN / SCART / YPbPr R (*) Sonderzubehör VGA-OUT HDMI S-VIDEO VIDEO RS-232 AUDIO-IN AUDIO-OUT PS50426E 7 1 1.......................................................................................................Netzkabel 2...........................
Installation Verbinden mit Videoquellen DVD-Player, Digitalempfänger, HDTV-Receiver 5 3 6 4 7 2 VGA-IN / SCART / YPbPr Wegen unterschiedlichen Vorgaben in einzelnen Ländern werden die Geräte 1 in bestimmten Regionen eventuell mit unterschiedlichem Zubehör ausgeliefert. R VGA-OUT HDMI S-VIDEO VIDEO RS-232 AUDIO-IN AUDIO-OUT PS50426E 8 9 (*) Sonderzubehör S-Videoausgabe Composite-Videoausgang 1........................................................................................
Installation Ein-/Ausschalten des Projektors Einschalten des Projektors 1. Entfernen Sie die Objektivabdeckung. n 2. Stellen Sie sicher, dass Netzkabel und Signalkabel richtig angeschlossen sind. Die Betriebs-LED leuchtet rot, wenn das Gerät mit Strom versorgt wird. 3. Setzen Sie die Lampe durch Drücken der „Power“-Taste am Bedienfeld des Projektors oder an der Fernbedienung in Betrieb. Die Betriebs-LED leuchtet daraufhin grün. o Das Startbild wird in ca. 10 Sekunden angezeigt.
Installation Ausschalten des Projektors 1. Mit der „POWER(Stromschalter)“-Taste schalten Sie den Projektor ein. Die folgende Meldung wird auf dem Bildschirm des Projektors angezeigt. Drücken Sie zur Bestätigung erneut auf die Taste „POWER(Stromschalter)“. Ansonsten wird die Meldung nach 5 Sekunden ausgeblendet. Der Countdown wird auf dem Bildschirm angezeigt, wenn Sie noch einmal die „POWER(Stromschalter) “-Taste drücken. 2. Das Gebläse läuft etwa 10 Sekunden weiter, um den Projektor abzukühlen.
Installation Einstellen des Projektionsbildes Einstellen der Höhe des Projektionsbildes Der Projektor hat höhenverstellbare Füße, mit denen die Höhe des Projektionsbildes eingestellt werden kann. 1. Suchen Sie am Boden des Projektors den höhenverstellbaren Fuß, deren Höhe Sie ändern möchten. 2. Zum Anheben des Projektors drehen Sie den Einstellring gegen den Uhrzeigersinn; zum Absenken drehen Sie den Ring im Uhrzeigersinn. Gehen Sie gegebenenfalls mit den anderen Füßen genauso vor.
Installation Einstellen des Zoomfaktors/Fokuses Durch Drehen des Zoomrings können Sie das Projektionsbild ein- oder auszoomen. Um das Bild scharf einzustellen, drehen Sie bitte den Fokusring, bis das Bild klar erscheint. Der Projektor unterstützt Projektionsentfernungen von 1,2 m bis 12,0 m.
Bedienung Bedienfeld und Fernbedienung Der Projektor kann uber das Bedienfeld und die Fernbedienung gesteuert werden. Bedienfeld und die Fernbedienung gesteuert werden. Bedienfeld Verwenden des Bedienfelds POWER (STROMSCHALTER) Siehe „Ein-/Ausschalten des Projektors“ auf Seite 13-14. MENU (Menü) Drücken Sie „Menü“, um das Bildschirmmenü (OSD-Menü) zu öffnen. Zum Ausblenden des OSDs drücken Sie die „Menü“-Taste noch einmal. Mit dieser Taste bestätigen Sie Ihre Auswahl.
Bedienung Fernbedienung Verwenden der Fernbedienung POWER (STROMSCHALTER) Siehe „Ein-/Ausschalten des Projektors“ auf Seite 13-14. Mit dieser Taste bestätigen Sie Ihre Auswahl. HDMI Deutsch 18 Source (Quelle) Durch Drücken auf „QUELLE“ wird die Signalquelle umgeschaltet. Re-Sync (Neusynchronisation) Durch Drücken dieser Taste wird der Projektor automatisch mit der Eingabequelle synchronisiert. Vier Pfeiltasten Verwenden Sie , um Elemente auszuwählen oder Einstellungen zu ändern.
Bedienung Fernbedienung Verwenden der Fernbedienung HDMI Freeze (Bild stoppen) Wählen Sie die HDMI-Quelle mit „HDMI“ aus. Drücken Sie auf „Bild stoppen“, um das Bild auf dem Bildschirm anzuhalten. Drücken Sie noch einmal darauf, um die Funktion abzubrechen. AV mute (AV stumm) Mit dieser Taste schalten Sie vorübergehend das Audio und Video aus/ein. S-Video Drücken Sie auf „S-Video“, um eine SVideoquelle auszuwählen. VGA Drücken Sie auf „VGA“, um eine VGAQuelle auszuwählen.
Bedienung OSD-Menüs Der Projektor hat mehrsprachige OSD-Menüs, mit denen Sie Bildeinstellungen vornehmen und Parameter verändern können. Die Signalquelle wird automatisch erkannt. Bedienung 1. Drücken Sie auf „Menü“ auf der Fernbedienung oder am Bedienfeld des Projektors, um das OSD-Menü zu öffnen. 2 Im OSD-Hauptmenü wählen Sie mit Hilfe der Tasten ein Element aus. Wenn Sie eine Auswahl auf einer bestimmten Seite treffen, können Sie mit den Tasten oder der „Enter“-Taste in ein Untermenü wechseln. 3.
Bedienung Menüverzeichnisbaum # # (#) Die Funktionen „Sättigung“ und „Farbton“ werden nur im Videomodus unterstützt. (##) Die Funktion „Signal“ ist nur bei einer analogen VGA-Signalquelle (RGB) verfügbar. (*) Drei Dimensionen wird bis zu einer $XÀ|VXQJ YRQ maximal 1280 x 720 Bildpunkten unterstützt. * ** ## (**) Die „3D-Sync. umkehr.“ kann nur ausgewählt werden, wenn 3D aktiv ist.
Bedienung Bild Anzeigemodus +LHU ¿ QGHQ 6LH HLQLJH IU YHUVFKLHGHQH %LOGW\SHQ RSWLPDO angepasste Werkeinstellungen. Präsentation: Optimale Farbe und Helligkeit für PC-Eingaben. Hell: Maximale Helligkeit für PC-Eingaben. Film: Für Heimkino. sRGB: Standardisierte, genaue Farbe. Tafel: Wählen Sie diesen Modus für optimale Farbeinstellungen, wenn Bilder auf eine Tafel (grün) projiziert werden. Klassenraum: Verwenden Sie diesen Modus für die Projektion in einem Klassenzimmer.
Bedienung Bild Kontrast Mit der Funktion „Kontrast“ wird der Unterschied zwischen dem hellsten und dem dunkelsten Teil des Bildes festgelegt. Durch Einstellen des Kontrasts werden die Anteile von Schwarz und Weiß auf dem Projektionsbild verändert. Drücken Sie auf Drücken Sie auf , um den Kontrast zu verringern. , um den Kontrast zu erhöhen. Schärfe Hier stellen Sie die Bildschärfe ein. Drücken Sie auf Drücken Sie auf , um die Schärfe zu verringern. , um die Schärfe zu erhöhen.
Bedienung BILD | ERWEITERT Degamma Hier können Sie einen Degamma-Wert auswählen, um die beste Bildqualität von der Eingabe zu erhalten. Film: Für Heimkino. Video: Für Video- oder TV-Quellen. *UD¿NHQ )U %LOGTXHOOHQ PC: Für PC- bzw. Computer-Quellen. BrilliantColor™ Diese Funktion verwendet einen neuen Farbverarbeitungsalgorithmus und hat Verbesserungen auf der Systemebene, um eine höhere Helligkeit und getreue, lebhafte Farben auf dem Bild anzubieten. Der Wert kann „0“ bis „10“ sein.
Bedienung ERWEITERT | FARBE Farbe Mit diesen Einstellungen können Sie die Farbanteile von Rot, Grün, Blau, Zyan, Magenta und Gelb anpassen. Zurücksetzen Wählen Sie „Ja“, um die Farbeinstellungen auf die werkseitigen Standardwerte zurückzusetzen. ERWEITERT | EINGABEQUELLE Eingabequelle Mit dieser Option können Sie Eingangsquellen aktivieren/deaktivieren. Rufen Sie das Untermenü mit auf und wählen Sie die gewünschte Quelle. Drücken Sie auf „Enter“, um Ihre Auswahl zu bestätigen.
Bedienung ANZEIGE Format Hier wählen Sie ein bevorzugtes Seitenverhältnis aus. 4:3: Dieses Format ist für 4x3-Eingabequellen geeignet. 16:10: Dieses Format ist für 16x10-Eingabequellen wie z.B. HDTV und DVD, die für Breitbild-TVs vorgesehen sind, geeignet. LBX:Dieses Format eignet sich für Bildmaterial 16x9, das nicht im 16x9-Format dargestellt wird und zur Darstellung von %LOGPDWHULDO EHL YROOHU $XÀ|VXQJ Native: Dieses Format zeigt das Originalbild ohne jede Skalierung. AUTOM.
Bedienung $Q]HLJHÀ lFKH %LOGÀ lFKH Eingabesignal Anzeige auf der Leinwand 4:3-Format oder 16:10-Format LBX-Format Native-Format 27 Deutsch
Bedienung ANZEIGE Overscan Die Funktion „Overscan“ kann das Rauschen von einem Videobild entfernen. Bei der Funktion „Overscan“ handelt es sich um das Entfernen des Videokodierungsrauschens am Rand der Videoquelle. Zoom Drücken Sie auf Drücken Sie auf vergrößern. um das Bild zu verkleinern. um das Bild auf dem Bildschirm zu H. Bildverschiebung Damit verschieben Sie horizontal die Lage des Projektionsbildes. V. Bildverschiebung Damit verschieben Sie vertikal die Lage des Projektionsbildes. Ver.
Bedienung SETUP EINSTL. | SPRACHE Sprache Das OSD-Menü kann in verschiedenen Sprachen angezeigt werden. Drücken Sie auf oder , um das Untermenü zu öffnen. Verwenden Sie dann die Taste oder , um die bevorzugte Sprache auszuwählen. Drücken Sie auf „Enter“, um Ihre Auswahl zu bestätigen.
Bedienung SETUP Projektion „Hinten unten“ und „Hinten oben“ sind für die Verwendung einer durchsichtigen Leinwand geeignet. Front unten Dies ist die Standardeinstellung. Das Bild wird direkt auf die Leinwand projiziert. Hinten unten Wenn diese Option verwendet wird, wird das Bild gespiegelt. Front oben Wenn diese Option verwendet wird, wird das Bild auf den Kopf gestellt. Hinten oben Wenn diese Option verwendet wird, wird das Bild gespiegelt und auf den Kopf gestellt.
Bedienung SETUP Menüposition Hier stellen Sie die Position des Menüs auf dem Bildschirm ein. Projektor-ID Die ID können Sie im Menü auf einen Wert zwischen 0 und 99 einstellen; diese ID brauchen Sie, wenn Sie den Projektor über 56 VWHXHUQ P|FKWHQ $XI 6HLWH ¿ QGHQ 6LH HLQH YROOVWlQGLJH Liste mit RS232-Befehlen. Stumm Wählen Sie „Ein“, um die Audioausgabe verstummen zu lassen. Wählen Sie „Aus“, um die Lautstärke wiederherzustellen.
Bedienung EINSTL. | SIGNAL D ie Funktion „Signal“ ist nur bei einer analogen VGA-Signalquelle (RGB) verfügbar. Phase Die Funktion synchronisiert die Anzeigesignalfrequenz mit der *UD¿ NNDUWH :HQQ GDV %LOG ZDFNHOW RGHU À LPPHUW N|QQHQ 6LH PLW dieser Funktion das Problem lösen. Frequenz Hier können Sie die Anzeigedatenfrequenz an die Frequenz Ihrer &RPSXWHUJUD¿ NNDUWH DQSDVVHQ 6HW]HQ 6LH GLHVH )XQNWLRQ QXU GDQQ HLQ IDOOV GDV %LOG YHUWLNDO À DFNHUQ VROOWH H.
Bedienung EINSTL. | SICHERHEIT Sicherheit Ein: Wählen Sie „Ein“, um das Abfragen des Kennworts beim Einschalten des Projektors zu aktivieren. Aus: Wählen Sie „Aus“, um den Projektor ohne Kennwortabfrage einschalten zu können. Sicherheits-Timer Mit dieser Funktion legen Sie fest, wann und wie lange (Monat, Tag, Stunde) der Projektor genutzt werden kann. Nach dem Ablauf der Zeit wird die Eingabe des Kennworts verlangt.
Bedienung EINSTL. | SICHERHEIT Kennwort ändern Beim erstmaligen Verwenden: Das Kennwort ist auf „1234“ voreingestellt. 1. Mit „ “ legen Sie das Kennwort fest. 2. Das Kennwort muss aus vier Ziffern bestehen. 3. Stellen Sie das neue Kennwort mit den Zifferntasten an der Fernbedienung ein, bestätigen Sie das Kennwort anschließend mit der Taste „ “. Kennwort ändern: 1. Drücken Sie „ “, um das alte Kennwort einzugeben. 2.
Bedienung EINSTL. | ERWEITERT Logo Mit dieser Funktion legen Sie das gewünschte Standard-Startbild fest. Änderungen treten beim nächsten Einschalten des Projektors in Kraft. Optoma: Das Standard-Startbild. Neutral: Durch die „Logoerfassung“-Funktion gespeichertes Bild verwenden. Logoerfassung Mit “ ” erfassen Sie das gerade dargestellte Bild.
Bedienung OPTIONEN Source Lock Ein: Der Projektor sucht nur den festgelegten Anschluss. Aus: Der Projektor sucht nach anderen Signalen, wenn das momentane Eingabesignal verloren gegangen ist. Große Höhe Wenn „Ein“ ausgewählt ist, drehen die Lüfter schneller. Diese Funktion ist besonders beim Einsatz in großen Höhen (in denen die Luft recht dünn ist) sinnvoll. Info ausblenden Ein: Wählen Sie „Ein“, um die „Suchmeldung“ auszublenden. Aus: Wählen Sie „Aus“, um die Suchmeldung anzuzeigen.
Bedienung OPTIONEN | ERWEITERT Direkt einschalten Wählen Sie „Ein“, um den Modus „Direkt einschalten“ zu aktivieren. Ohne das Drücken der Taste „Ein/Standby“ am Bedienfeld des Projektors oder der Taste „Stromschalter“ auf der Fernbedienung wird der Projektor automatisch eingeschaltet, sobald der Projektor mit Strom vom Netz gespeist wird. Autom. aus (Min.) Hier stellen Sie den Countdown-Timer ein. Der Countdown-Timer fängt an zu zählen, wenn kein Signal in den Projektor eingegeben wird.
Bedienung OPTIONEN | LAMPENEINSTL. Lampenstd. Hier wird die Projektionsdauer angezeigt. Hinweis zur Lampe Mit dieser Funktion können Sie die „Leuchtmittel wechseln“Warnmeldung ein- und ausblenden. Diese Meldung wird angezeigt, wenn die verbleibende Lebensdauer der Lampe 30 Stunden erreicht. Hellmodus STD: Wählen Sie „STD“, um die Projektorlampe zu dämpfen und damit den Stromverbrauch zu reduzieren sowie die Lampenlebensdauer bis zu 130% zu verlängern.
Anhänge Fehlerbehebung Falls Probleme mit dem Projektor auftreten, beziehen Sie sich bitte auf folgende Information. Wenden Sie sich bitte an Ihren Händler oder das nächstgelegene Kundendienstzentrum, wenn ein Problem sich nicht beseitigen lässt. Bildprobleme Es wird kein Bild angezeigt. Überprüfen Sie, ob alle Kabel und Stromverbindungen, wie im Abschnitt „Installation“ beschrieben, richtig und fest angeschlossen wurden.
Anhänge 7. Klicken Sie auf „Alle Hardwarekomponenten dieser Geräteklasse“. Wählen Sie im Feld „Hersteller“ die Option Ä6WDQGDUGPRQLWRUW\SHQ³ XQG GDQQ GLH EHQ|WLJWH $XÀ|VXQJ DXV dem Feld „Modelle“ aus. 6WHOOHQ 6LH VLFKHU GDVV GLH $Q]HLJHDXÀ|VXQJVHLQVWHOOXQJ GHV Monitors 1600 x 1200 (UXGA) oder weniger beträgt. Bei Verwendung eines Notebooks: 1. Führen Sie zuerst die oben beschriebenen Schritte zur (LQVWHOOXQJ GHU $XÀ|VXQJ GHV &RPSXWHUV DXV 2.
Anhänge Das Bild ist nicht fokussiert Stellen Sie sicher, dass die Objektivabdeckung entfernt ist. Stellen Sie die Bildschärfe über den Fokusring des Projektors ein. $FKWHQ 6LH GDUDXI GDVV VLFK GLH 3URMHNWLRQVÀlFKH LQ HLQHU Entfernung zwischen 1,2 bis 12,0 m YRP 3URMHNWRU EH¿QGHW Siehe Seite 16. Das Bild ist bei einer 16:9 DVD-Wiedergabe zu langgestreckt. Wenn eine anamorph aufgezeichnete DVD oder 16:9 DVD wiedergegeben wird, zeigt der Projektor das beste Bild im 16:9Format an.
Anhänge Sonstige Probleme Der Projektor reagiert auf keine Steuerung Schalten Sie, wenn möglich, den Projektor aus, ziehen das Netzkabel heraus und warten für mindestens 60 Sekunden, bevor Sie das Netzkabel wieder anschließen. Vergewissern Sie sich, dass die „Tastenfeldsperre“ nicht aktiv ist, indem Sie probieren, den Projektor über die Fernbedienung zu steuern. Die Lampe erlischt oder macht einen Knall.
Anhänge Bildschirmmeldungen Warnung Temperatur: Gebläse versagt: Warnung Lampe: Außerhalb des darstellbaren Bereichs: Fernbedienungsprobleme Die Fernbedienung funktioniert nicht Achten Sie darauf, dass die Fernbedienung sowohl horizontal als auch vertikal mit einem Winkel von ±15 ° auf den IR-Empfänger am Gerät zeigt, wenn Sie die Fernbedienung verwenden. Achten Sie darauf, dass es keine Hindernisse zwischen der Fernbedienung und dem Projektor gibt.
Anhänge Auswechseln der Lampe Der Projektor erkennt automatisch die Lebensdauer der Lampe. Wenn das Ende der Lampenlebensdauer näher rückt, wird eine Warnmeldung angezeigt. Wenn Sie diese Meldung sehen, wenden Sie sich bitte baldmöglichst an Ihren Händler oder das nächste Kundendienstzentrum, um die Lampe auszuwechseln. Stellen Sie sicher, dass sich der Projektor mindestens 30 Minuten lang abgekühlt hat, bevor Sie die Lampe auswechseln.
Anhänge 1 2 Die Schrauben an der Lampenabdeckung und an der Lampe selbst können nicht gelöst werden. Der Projektor lässt sich nicht einschalten, solange die Lampenabdeckung nicht aufgesetzt wurde. Berühren Sie nicht das Glas der Lampe. Durch Fett, das sich von der Haut auf die Lampe überträgt, kann die Lampe zerstört werden. Reinigen Sie das Lampenmodul mit einem trockenen Tuch, falls Sie es aus Versehen berührt haben sollten. 3 4 So wechseln Sie die Lampe aus: 1. 2. 3. 4. 5. 6. 7.
Anhänge Kompatible Modi Computerkompatibilität %HL %UHLWELOGDXÀ|VXQJ (WXGA) hängt die Kompatibilität von den unterschiedlichen Notebook/PCModellen ab. Deutsch 46 Modus $XÀ|VXQJ V. Sync (Hz) H.
Anhänge Computerkompatibilität Modus $XÀ|VXQJ V. Sync (Hz) H.
Anhänge RS232-Befehle RS232-Polzuordnung 3 1 2 9 5 Pol-Nr. Pol-Nr.
Anhänge RS232-Protokollfunktionsliste RS232-Befehle Baudrate: 9600 Datenbit: 8 Parität: Kein Stoppbit: 1 Flusskontrolle: Kein UART16550 FIFO: Deaktivieren Projektorrückmeldung (Bestanden): P Projektorrückmeldung (Fehlgeschlagen): F XX=00 - 99, ID des Projektors, XX=00 bedeutet alle Projektoren 1. Es gibt ein nach allen ASCIIBefehlen. 2. 0D ist der HEX-Code für im ASCIICode.
Anhänge --------------------------------------------------------------------------------------------------------------------------------------------------------------------------------------------------------------------------~XX71 1 7E 30 30 37 31 20 31 0D Projection Front-Desktop ~XX71 2 7E 30 30 37 31 20 32 0D Rear-Desktop ~XX71 3 7E 30 30 37 31 20 33 0D Front-Ceiling ~XX71 4 7E 30 30 37 31 20 34 0D Rear-Ceiling ---------------------------------------------------------------------------------------------
Anhänge Deckenmontage 1. Bitte verwenden Sie unser Deckenmontageset zur Installation, um Schäden an dem Projektor zu vermeiden. 2. Möchten Sie ein Deckenmontageset von einem anderen Anbieter verwenden, dann achten Sie bitte darauf, dass die Befestigungsschrauben den folgenden Angaben entsprechen: 110,00 82,30 55,00 192,00 Warnung: 1. Wenn Sie Deckenmontagevorrichtungen von anderen Anbietern erwerben, stellen Sie bitte sicher, dass Sie die richtige Schraubengröße verwenden.
Anhänge Optoma weltweite Niederlassungen Wenden Sie sich bitte an die nächste Niederlassung für einen Kundendienst oder zur Unterstützung. USA 715 Sycamore Drive Milpitas, CA 95035, USA www.optomausa.com Tel : 408-383-3700 Fax: 408-383-3702 Service : services@optoma.com Kanada 5630 Kennedy Road, Mississauga, Tel : 905-361-2582 ON, L4Z 2A9, Canada Fax: 905-361-2581 www.optoma.ca Service : canadacsragent@optoma.
Anhänge Korea WOOMI TECH.CO.,LTD. 4F,Minu Bldg.33-14, Kangnam-Ku, Tel : +82+2+34430004 seoul,135-815, KOREA Fax: +82+2+34430005 Japan 東京都足立区綾瀬3-25-18 株式会社オーエスエム サポートセンター:0120-46-5040 E-mail : info@osscreen.com www.os-worldwide.com Taiwan 5F., No. 108, Minchiuan Rd. Shindian City, Taipei Taiwan 231, R.O.C. www.optoma.com.tw Tel : +886-2-2218-2360 Fax: +886-2-2218-2313 Service : services@optoma.com.tw asia.optoma.
Anhänge Bestimmungen und Sicherheitshinweise Dieser Anhang führt die allgemeinen Hinweise zu dem Projektor auf. FCC-Erklärung Dieses Gerät wurde geprüft und hat sich als mit den Grenzwerten für ein Digitalgerät der Klasse B gemäß Teil 15 der Bestimmungen der amerikanischen Bundesbehörde für das Fernmeldewesen FCC (Federal Communications Commission) konform erwiesen. Diese Grenzwerte geben einen angemessenen Schutz gegen schädliche Funkstörungen innerhalb von Wohngebäuden.
Anhänge Betriebsbedingungen Dieses Gerät erfüllt alle Anforderungen des Teils 15 der FCCBestimmungen. Der Betrieb unterliegt den folgenden zwei Bedingungen: 1. Das Gerät darf keine schädlichen Interferenzen verursachen. 2. Das Gerät muss störfest gegen aufgenommene Störungen sein. Das betrifft auch solche Störungen, die unerwünschte Betriebszustände verursachen könnten. Hinweis: Für Benutzer in Kanada Dieses Digitalgerät der Klasse B erfüllt alle Anforderungen der kanadischen Bestimmungen ICES-003.