Quick Guide Manual Before Operation, please read entire Manual thoroughly and retain for future reference. opticum_axodin_manual_rev08.
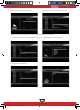
QUICK GUIDE MANUAL QUICK START 1. First time instalation using wizard 1.1. Please press OK if you can see this screen on your TV (if not – select a different input). 1.2. Video mode selection. 1.3. Language selection. 1.4 Set up basic features. 1.5 Set up tuner – simply choose the automatic option. opticum_axodin_manual_rev08.
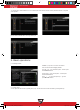
QUICK GUIDE MANUAL The tuner automatically finds the satellite itself. For example – there was found HB 13E and Astra 19,2E. Another way is to select manual settings - of course we need to know the name of the satellite. 1.6. Service searching. After a few minutes (depending on the amount of scanned satellites) should be completed. 1.7 We can now set a parental lock. opticum_axodin_manual_rev08.
QUICK GUIDE MANUAL 1.8. The last step – Network Wizard. You can use DHCP option. Some network we have to enter parameters manual – it depends on the operator. Now we finish the Wizard and we can enjoy watching TV. 2. Basic operations 2.1. Switching channels. CHANNEL +/- key Press to move to next channel. There are various channel zapping methods. Press / key – if you choose this option – will call up the Channel Selection Menu.
QUICK GUIDE MANUAL 2.3. Selecting Audio Track You can choose what audio tracks are available to choose by pressing AUDIO key. By using UP/DOWN key and COLOR key, you can select a different audio language or Stereo sound. NOTE: Available option in this menu will defer depending on the service. 2. 4. Subtitle You can see subtitle of the current program if the program provides the subtitle. Press SUBT key and Subtitle Selection menu appears as below. 2. 5.
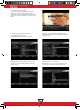
QUICK GUIDE MANUAL 2. 6. Program Information (Infobar) Whenever you change the channel, infobar is always displayed for 5 seconds (default setting). Infobar is designed to provide you comprehensive information of the channel that you currently watching. Press OK to call up infobar. 2. 7. Channel List (Channel Selection Menu) Press UP/DOWN or CH+/CH- key, this will active Channel Selection Menu as below. Four types of the channel lists are available to help you manage your channel selection.
QUICK GUIDE MANUAL 1. Call up the Channel Selection list by Pressing UP or DOWN key. 2. Go to All list by pressing RED key. 3. Select the channel that you want to add to the Favourites list. 4. Press MENU key on the selected channel and the following menu appears. 5. Choose ‘add service to bouquet’ and press OK. 6. Go to the Favourites list by pressing BLUE key to confirm that the selected channel is correctly included in the list. 7. Electronic Program Guide - (Eventview) Press EPG.
QUICK GUIDE MANUAL (A) Safety Instructions This product should not be disposed with other house hold wastes at the end of its working life. Please separate this from other types of wastes and recycle it responsibly to promote the sustainable reuse of material resources. This will help prevent harm to the environment or human health from uncontrolled waste disposal. ● This product operates only in the range of AC 100V~250V and 50Hz/60Hz. Please check first your power supply to see if it fits this range.
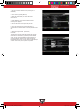
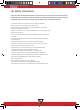
QUICK GUIDE MANUAL (B) Packing Contents Please check all package contents before using your product. ● Set Top Box ● Remote Control ● Batteries ● HDMI cable (Optional) ● D/C Power Adaptor ● User Manual (C) Product Descriptions Front Panel 1 2 3 4 1 Buttons: Standby 2 Navigation Keys: Press to navigate up/down and left/right 3 USB: Connects the USB memory stick or external HDD 4 Smartcard reader slot: One smartcard slots are provided. Insert smartcard with the IC chip pointing down.
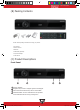
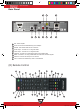
QUICK GUIDE MANUAL Rear Panel 1 2 3 4 5 4 6 8 7 9 1 ON : Powers On/Off 2 DC-IN: Connects the detachable D/C power adapter.
QUICK GUIDE MANUAL 1 Power : To switch the receiver in and out of stand-by mode. 2 Mute : Mutes the audio. 3 V/RADIO : Switches between TV and radio. 4 HD : Set the HDMI mode - optional. 5 V SIZE : Switches Display Format. 6 PORTAL : Press go to the Portal Menu – optional. 7 AUDIO : Press to select available audio language and audio type. 8 SUBT : Press to display the subtitle of the current channel if provided.
QUICK GUIDE MANUAL (E) Main Features ● 500MHz DMIPS Processor ● Linux Operating System ● Media Player ● Downloadable Plug-ins supported ● 1 x Smartcard Reader ● MPEG2/H.264 Hardware Decoding ● 1 x DVB-S2 Tuner ● Status Indicator ● 256MB NAND Flash/512MB DDR Memory ● 10/100MB Ethernet Interface ● 2 x USB 2.
QUICK GUIDE MANUAL 2. Connecting the TV Set Top Box provides a variety of audio/video connection methods. A. Connecting TV via HDMI Cable For the sake of the best picture quality, especially for digital TV, HDMI connection is recommended. Most HDTVs have HDMI connectors to ensure the highest picture quality. In the rear panel of Set Top Box one HDMI connector is available for this purpose. Connect your TV to Set Top Box using a HDMI cable as follows. B.
QUICK GUIDE MANUAL 3. Power ON/OFF [ : Press or Press ‘Standby/Reset’] There are several ways to turn your Set Top Box ON or OFF ● Complete Power Shutdown There is a Power Switch in the rear panel and once it is ON, you do not need to turn it on or off each time. It takes a longer time to boot the system if you turned it off by this switch. ● Standby Mode POWER key is normally used to turn the power of Set Top Box on or off. If you press POWER, it instantly switches your Set Top Box off or on.
Schnell Start Anleitung Vor Inbetriebnahme lesen Sie das Manuel bitte ganz durch und bewahren Sie es gut auf um zukünftig nachzuschlagen. opticum_axodin_manual_rev08.
QUICK GUIDE MANUAL Erstinstallation 1. Verwendung des Assistenden 1.1. Bitte drücken Sie OK, wenn Sie diesen Bildschirm auf Ihrem TV sehen können (wenn nicht - wählen Sie einen anderen Eingang). 1.2. Auswahl Videomodus. 1.3. Sprachauswahl. 1.4. Einrichten Basis Installation. 1.5. Tunereinstellungen – Wählen sie Automatisch. opticum_axodin_manual_rev08.
QUICK GUIDE MANUAL Der Tuner findet automatisch die Satelliten. Zum Beispiel – gefunden wurde HB 13E und Astra 19,2E Ein anderer Weg ist die manuelle Einstellung – Hier sollten sie den Namen des Satelliten wissen. 1.6. Satellitensuchlauf sollte nach ein paar Minuten abgeschlossen sein, abhängig von den gescannten Satelliten. 1.7 Einstellung Kindersicherung. opticum_axodin_manual_rev08.
QUICK GUIDE MANUAL 1.8. Letzter Schritt – Netzwerk Assistent. Wählen sie DHCP. In einigen Netzwerken muss dies manuell eingestellt werden, abhängig vom Netzwerk. Jetzt können sie den Assistenten beenden und ihr TV Programm ansehen. 2. Grundlegende Bedienung 2.1. Kanäle umschalten. Kanal +/- Taste drücken um zum nächsten Kanal zu schalten. Es gibt verschiedene Umschaltmethoden. Drücke / Taste – Wenn sie diese Option wählen – Rufen sie das Menü Kanal umschalten auf.
QUICK GUIDE MANUAL 2.3. Ändern der Audiosprache. Hier können sie festlegen, welche Audio Tonspur für sie passend ist. Durch Drücken der UP/Down Taste können sie verschiedene Sprachen oder Stereoton auswählen. Wichtig: Der Inhalt dieses Menüs ist abhängig vom gewählten Kanal. 2. 4. Untertitel Untertitel können sie abrufen, wenn das entsprechende Programm diese Daten zur Verfügung stellt. Drücken sie die SUBT Taste Und das Untertitelmenü öffnet sich. 2. 5.
QUICK GUIDE MANUAL 2. 6. Programm Information (Infobar) Die Infobar erscheint beim Programmwechsel und zeigt Ihnen die folgenden Informationen an. Durch Drücken der OK - Taste lässt sie sich jederzeit anzeigen. 2. 7. Kanal-Liste Drücken sie UP/DOWN oder CH+/CH- Taste, Um das Kanal Menü aufzurufen. Ihnen beim Managen der Kanäle hilft. Hier können sie vier Typen der Listen auswählen, die ihnen beim Managen der Liste hilft. Grün Zeigt die gescannten Satelliten. Rot zeigt die gescannten Sender an.
QUICK GUIDE MANUAL 1. Rufen Sie die Kanal Auswahlliste durch Drücken der Up - oder Down –Taste auf. 2. Gehen sie zu Alle mit der roten Taste. 3. Wählen sie den Kanal aus, den sie in die Favoritenliste hinzufügen wollen. 4. Drücken sie Menü für folgende Optionen. 5. Wählen Sie “Zu Bouquet hinzufügen” und drücken Sie OK. 6. Gehen sie zur Favoritenliste und drücken sie die blaue Taste um den ausgewählten Kanal hinzuzufügen. 7.
QUICK GUIDE MANUAL (A) Sicherheitshinweise Dieses Gerät soll nach Gebrauchsende nicht mit dem Hausmüll entsorgt werden. Bitte trennen Sie dieses entsprechend von anderen Abfällen, um eine Belastung der Umwelt zu vermeiden, eine Wiederverwendung von wertvollen Materialien sicherzustellen. ● Dieses Produkt funktioniert nur in den Bereichen AC100V-250V und 50Hz/60Hz. ● Das Gerät muss vom Netz getrennt werden, bevor eventuelle Wartungen oder Installationen vorgenommen werden.
QUICK GUIDE MANUAL (B) Packing Contents Bitte überprüfen Sie die Vollständigkeit des Lieferumfanges: ● Receiver ● Fernbedienung ● Batterien ● HDMI Kabel (Optional) ● A/C Adapter ● Schnell Start Anleitung (C) Produktbeschreibung Vorderseite 1 2 3 4 1 Taste: Power AN/Aus 2 Tasten: Zum Navigieren Hoch/Runter und links/rechts 3 USB: Verbindet USB Stick oder externe Festplatten 4 Smartcard Einschub: Ein Smartcard Slot ist vorhanden opticum_axodin_manual_rev08.
QUICK GUIDE MANUAL Rear Panel 1 2 3 4 5 4 6 8 7 9 1 ON : Netzschalter 2 DC-IN: Verbindet extern D/C Netzadapter.
QUICK GUIDE MANUAL 1 Power : Ein/Aus – Standy Modus 2 Mute : Stummschaltung 3 TV/RADIO : Schalten zwischen TV und Radio 4 HD. Taste :Einstellen des HDMI Bildmodus 5 V SIZE : Formatumschaltung. 6 PORTAL : Zeigt den Inhalt vom TV Portal Service an– optional. 7 AUDIO : Zeigt die auswählbare Audio Option an (z.B. AC3, Stereo) 8 SUBT :Zeigt, falls angeboten, Untertitel des aktuellen Programmes an. 9 Informationen des aktuellen Senders, wenn angeboten.
QUICK GUIDE MANUAL (E) Hauptfunktionen ● ● ● ● ● ● 500MHz MIPS Prozessor Linux Operating System Media Player Plug-ins herunterladbar 1 x Smartcard Reader MPEG2/H.264 Hardware Decoding ● ● ● ● ● ● ● ● ● ● ● ● ● ● ● ● ● 1 x DVB-S2 Tuner Status Indikator 128MB NAND Flash/512MB DDR Memory 10/100MB Ethernet Interface 2 x USB 2.
QUICK GUIDE MANUAL 2. Anschluss TV Der Receiver bietet unterschiedliche Anschlussmöglichkeiten für Audio/Video A. Anschluss TV über HDMI Kabel Um beste Bildqualität zu erreichen, besonders für Digital TV, wird ein HDMI Anschluss empfohlen. Die gängigen HDTVs haben HDMI Anschlüsse für hohe Bildansprüche. An der Rückseite des Receivers ist ein solcher Anschluss verfügbar. Verbinden Sie TV und Receiver mit einem HDMI Kabel wie folgt. B.
QUICK GUIDE MANUAL 3. Power ON/OFF [ : Drücken ‘Standby/Reset’] Dies ist der einfachste Weg, den AX Odin Ein oder Aus zu schalten ● Komplette Abschaltung Wenn der Netzschalter an der Rückseite eingeschaltet ist,, brauchen sie nicht den Schalter betätigen um das gerät ein oder aus zu schalten. Es braucht eine lange Zeit im zu Booten, wenn sie das Gerät am Netzschalter ausschalten. ● Standby Mode POWER-Taste wird normalerweise verwendet, um die Set-Top-Box ein-oder auszuschalten.
QUICK GUIDE MANUAL opticum_axodin_manual_rev08.
opticum_axodin_manual_rev08.