Electronic Shelf Label DEMO KIT The ESL demo kit is intended for demonstration and development purposes of the Opticon ESL solution.
Opticon ESL DEMO KIT User Manual All information subject to change without notice. Document History Model Number: ESL DEMO KIT Specification Number: Edition: 0.2 Original Spec Number: Date: 2011 Copyright 2011 Opticon. All rights reserved. This manual may not, in whole or in part, be copied, photocopied, reproduced, translated or converted to any electronic or machine readable form without prior written consent of Opticon.
Opticon ESL DEMO KIT User Manual Contents 1. Features and Specifications .................................................................................................... 6 1.1. Abstract ............................................................................................................................. 6 1.2. Contents ............................................................................................................................ 6 1.3. Physical Features .............................
Opticon ESL DEMO KIT User Manual 3.1. Setting up the hardware and software ............................................................................. 11 3.1.1. Installing the ESL Demo kit ...................................................................................................... 11 3.1.2. Installing the base station ........................................................................................................ 12 3.1.3. Installing the ESLs .......................................
Opticon ESL DEMO KIT User Manual 5.7. Setup of the ESL server application ................................................................................. 25 6. Middleware applications ........................................................................................................ 28 6.1. CSV-parser ..................................................................................................................... 28 6.2. Image generator ...........................................................
Opticon ESL DEMO KIT User Manual 1. Features and Specifications 1.1. Abstract This manual provides a preliminary description on how to set-up a customized Electronic Shelf Labels (ESL) demonstration and how to set-up a pilot project with e-Paper ESLs from Opticon Sensors Europe BV. 1.2. Contents The ESL demo kit consists of the following components: Ethernet ESL base station (EBS-10) 6 2” e-paper ESLs (EE200) including 6x2 CR2450 batteries UTP cable 6.
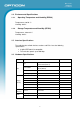
Opticon ESL DEMO KIT User Manual 1.4. Environmental Specifications 1.4.1. Operating Temperature and Humidity (EE200) Temperature: 0 to 50° C Humidity: 0-85% 1.4.2. Storage Temperature and Humidity (EE200) Temperature: -20 to 60° C Humidity: 0-85% 1.5. Interface Specifications The radio interface of both the base stations and ESLs have the following specifications: 2.4gHz IEEE 802.15.4 compatible Transmission speeds: up to 250 kbps 1.6.
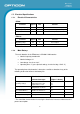
Opticon ESL DEMO KIT User Manual 1.7. Electrical Specifications 1.7.1. Electrical Characteristics EE200: Parameter Typical Unit Remarks Operating voltage 2.8–3.2 V 2 x CR2450 Lithium battery Operating current 7-33 mA During RF and image refresh only 1 uA EE200 in sleep state >99,9% Typical Unit Remarks Operating voltage 6.0 V Power adapter Operating current <200 mA Sleep current EBS-10: Parameter 1.7.2.
Opticon ESL DEMO KIT User Manual For example: Increasing the poll interval lowers the power consumption Turning off the base stations increases the power consumption A lower operating temperature increases the power consumption More display updates per day increase the power consumption 1.8. Serial Number 1.8.1. EBS-10 The serial number can be found on the back of the Base station.
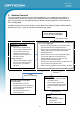
Opticon ESL DEMO KIT User Manual 2. Solution Overview The current solution operates by running the provided ESL server application that monitors an incoming folder in which any mutations in the product database are being placed by the back office system of the user. Any detected changes will be automatically processed and sent to the ESLs and displayed. A global overview of the current solution is shown below.
Opticon ESL DEMO KIT User Manual 3. Getting started 3.1.
Opticon ESL DEMO KIT User Manual Note that only the installer of XTAdminXXL will be copied to the „Tools‟-folder of your installation. To actually install the program this installer needs to be run manually. 3.1.2. Installing the base station The base station can be easily installed by powering it up, connecting it to the Ethernet and placing it within 10 meter (the actual maximum range is bigger) of your ESLs.
Opticon ESL DEMO KIT User Manual Since there are many types of mechanisms to mount shelf labels to shelves, the ESLs of the demo kit are supplied without mounting clips. Please contact Opticon for more information on the mounting possibilities of the ESLs to your shelves. For simple demonstration purposes with small amounts of ESLs one might also consider using double sided foam tape as a temporarily solution. 3.1.4.
Opticon ESL DEMO KIT User Manual closing the Setup window, delete any existing links from the barcode terminal as well by using “4 settings > 1 Delete Data” to prevent any links to be resend by the terminal. After deleting the necessary files and closing the Setup window, the system will automatically starts detecting any incoming CSV-files in the configured „Input folder‟ again. (See chapter 4) 3.4.
Opticon ESL DEMO KIT User Manual 4. Back office The back office triggers the ESL server application by placing a file containing either only product modifications or a complete product database in a predefined folder. Only one file may reside in this folder to enforce sequential handling. This means that the Back office may only store another file, when the current file has been processed and moved to a different folder.
Opticon ESL DEMO KIT User Manual It is recommended to add any fields that should be displayed on the ESL in the same formatting as they should be displayed on the ESL. This way the middleware application that generates the images, won‟t have to be modified and only the image template has to be customized. The ESL server application never directly uses the provided CSV-files, because the actual processing of these files is done by the middleware software.
Opticon ESL DEMO KIT User Manual 5.1. Handling of incoming CSV-files from the back office The placing and processing of incoming CSV-files is done as follows: The file is moved/copied to a configurable local folder, called the ‘Input folder’. When moving/copying the file from the Back office to the folder a temporary name is used, i.e. ‘productdata_1.tmp’, ‘productdata_2.tmp’, etc. After a check that the complete file has been moved/copied, the file will be renamed to its final name, i.
Opticon ESL DEMO KIT User Manual For example: * 10244;H;00124B00011B344D 12345;H;00124B00011B432F 197;H;00124B00011B432F The ESL server application will automatically pick up the new link file as soon as it detects this rename file event. * Note: The character 'H' is added to specify the hardware variant of the ESL. Currently only the 2" e-paper (‘H’) and 2.7" e-paper (‘K’) are supported. 5.3.
Opticon ESL DEMO KIT User Manual 5.4. Configuring of ESLs Besides sending images to the ESL, there are a number of configurations that can be made in the ESLs to control, customize and to regulate power consumption. To edit configurations of an ESL, go to the base station tab to which the ESL is currently linked and right click on the ESL. After doing so, a settings dialog should appear, showing the current status and settings of that ESL.
Opticon ESL DEMO KIT User Manual 5.4.1. Associate interval When an ESL is not connected to any base station it will automatically start looking for nearby base stations. Since searching for base station consumes a relative large amount of power it will not continuously search, but only once every couple of seconds. The associate interval determines the time (in seconds) between two associating attempts of an ESL. The default associate interval is currently 15 seconds.
Opticon ESL DEMO KIT User Manual 5.4.4. Poll timeout The poll timeout specifies the number of polls without acknowledge from the base station after which the ESL will time out its connection and start searching for another base station. The default poll time out is currently 30 polls, so by default the time out is 30x15 seconds = 450 seconds. 5.4.5. Scan channels Once an ESL has associated (connected) to a base station, it operates on a single RF channel.
Opticon ESL DEMO KIT User Manual does not operate on the same RF channel as any nearby WIFI network to minimize interference. To detect which RF-channels are least active, the base station can perform an energy scan on all 16 available channels and graphically show the energy levels in a real-time graph. To start an energy scan simply press the „scan‟ button in a base station-tab of the server application.
Opticon ESL DEMO KIT User Manual 5.6.2. Changing the name of a base station To make it easier to distinguish multiple base stations, it‟s possible to assign a name to base stations. This can be done by editing the text field besides the „Set Name‟ button and pressing this button afterwards to store the name inside the base station. 5.6.3.
Opticon ESL DEMO KIT User Manual When using Windows 7, telnet can be enabled as follows: Start > Control Panel Programs And Features Turn Windows features on or off Check Telnet Client Hit OK Default password „xt‟ then press „N‟ (Network menu) Only DHCP and IP need to be configured, all other options need to stay as is. If DHCP is not used please make sure all base stations have a unique IP address and the subnet mask is set correctly.
Opticon ESL DEMO KIT User Manual 5.7. Setup of the ESL server application By opening the setup window of the ESL server application, most settings of application can be configured. The image below shows a typical ESL pilot configuration and a matching file system tree. (a) Base stations After configuring the network settings of the base stations add them to this list. The only supported configuration at this moment is a TCP Client (TCPC).
Opticon ESL DEMO KIT User Manual (b) Input Folder The folder in which the back office uploads the new product data files. File mask: File name mask of the product data file. Currently the only supported mask is _#.csv where # is any number. (c) Output Output directory for the middleware applications. It will contain 3 CSV-files: dbase.csv (combined product database) linked.csv (ESL-products links) scan.
Opticon ESL DEMO KIT User Manual Note 2: When changing the field sequence of your database, make sure you delete the existing product database files. (See chapter 3.3 for more information) (h) Image generator Executable of the middleware application that parses the product database (dbase.csv) and the link database (linked.csv) into BMP- and XML-files for each linked ESL.
Opticon ESL DEMO KIT User Manual 6. Middleware applications The ESL server application uses middleware applications to process the information from the Back office into file formats that the ESL server application uses to update ESL‟s. The main tasks of the middleware are divided into 2 applications: the CSV-parser and the Image generator. These will be described in the following chapters. 6.1.
Opticon ESL DEMO KIT User Manual As long as there are no MAC addresses in the link database (linked.csv) the middleware won‟t generate any images for ESLs. Use the barcode terminal to create a link database (see chapter 7). The ESL server manager will call the Image generator with the following parameters as specified in the setup window of the ESL server application: .exe –O
Opticon ESL DEMO KIT User Manual 7.2. Loading the database files on the terminal Before any links can be created the reduced product database (scan.csv) first has to be loaded on the terminal to allow the reading of the barcodes on product. To be able to transfer files between the ESL server application and the barcode terminal the serial port of the PC is used. Make sure you‟ve enabled and configured the correct serial port in the setup windows of the server application (See chapter 5.7).
Opticon ESL DEMO KIT User Manual 7.4. Deleting existing links Press „2‟ (Unlink ESLs) to delete existing links from the link database. Deleting an existing link can be done by either entering the product ID or by scanning the product barcode or the MAC address of the ESL. 7.5. Verifying existing links It‟s possible to check whether a product has been correctly linked by pressing „3‟ (Product Info).
Opticon ESL DEMO KIT User Manual 8. Version history V0.1 V0.2 First preliminary release Added following features: - OPL9728 compatibility (LFD36931) - 2.
Opticon ESL DEMO KIT User Manual Appendix A: Editing the ESL template files The ESL template files are XML-based and can be manually edited to design your own label layout. The ESL server application uses two templates. An image template that specifies the actual image layout of the images that will be generated.
Opticon ESL DEMO KIT User Manual For example, if the CSV-file has the following field sequence: ;;;;;etc. etc. The lines should be changed to: %2%.bmp and A.2. %4% Editing the Image layout template The image layout template is also XML-based and can be manually edited to design your own label layout. The default location of the image template is "./Templates/Image.xml".
Opticon ESL DEMO KIT User Manual The image will be generated by parsing the template from top to bottom, so if one object needs to be drawn on top of another, then this can be done by changing the sequence of the objects in the image template. The ‘Variant’ field specifies the hardware variant of the ESL of each template. Multiple templates can be added if more than one hardware variant is used. The dynamic content of texts, barcodes and images can be inserted to your template from the CSV-database.
Opticon ESL DEMO KIT User Manual A.2.1.
Opticon ESL DEMO KIT User Manual A.2.2.
Opticon ESL DEMO KIT User Manual A.2.4. Images An image (fixed or dynamic) can be added to the template using the following format: (optional) Displaying conditions Image file path (absolute or relative to working directory) Coordinates of the upper-left corner of the image A.2.5.
Opticon ESL DEMO KIT User Manual 6. 7. 8. 9. 10. 11. 12. 13. 14. 15. 16. 17. 18. 19. 20. 21. 22. 23. 24. 25. 26. 27. 28. 29. 30. 31. 32. 33.
Opticon ESL DEMO KIT User Manual Make sure the Unique ID field is correctly set in the field of the information template. Make sure the field numbers in the image layout template are correct. Appendix B: Demo barcodes The quickest way to setup an ESL demonstration is to simply use the included sample database and example templates.