AdminTool User Manual For CRD-19-E4 Network and Charging Cradle
Publication Revision No. Control Table Rev. No. Date 1.0 07/18/08 Contents Created Copyright Copyright 2008 Opticon, Inc. All rights reserved. Information in this document is subject to change without notice.
Table of Contents Introduction----------------------------------------------------------------------------------------1 Login Screen --------------------------------------------------------------------------------------1 Home Page -----------------------------------------------------------------------------------------2 Identification---------------------------------------------------------------------------------------3 Network Settings - Device -------------------------------------------------------------
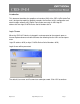
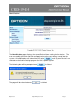
Introduction This document describes the graphic user interface (GUI) of the CRD-19-E4 AdminTool and is designed to explain by graphic examples the functions of this configuration and administration software utility. AdminTool can be accessed via URL http://IPaddress:9876 or http://C19E4:9876. Login Screen When the CRD-19-E4 device is plugged in and connected to the network, open an Internet Explorer browser window and enter the following into the URL area and press enter.
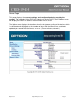
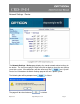
Home Page This page displays the current settings and configuration being used by the system. For example, if the CRD-19-E4 device is set for DHCP, the IP Address area will display the DHCP IP address received from DHCP server. The Uptime area displays the duration since the last power cycling of the device, which is calculated and displayed as the number of days with the format xxxx, and hours updated per second with the format xx:xx:xx (). Opticon, Inc. http://www.opticon.
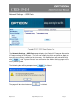
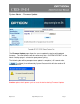
Identification The Identification page displays the stored Device Name setting for the device. The user can modify the fields and click on Apply to have the new settings saved into the system. All modifications will take effect only after and “System Restart” are selected on the Admin Settings page or the unit is power cycled. The following box will be prompted once The page will be refreshed once Opticon, Inc. is clicked. is clicked http://www.opticon.
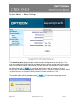
Network Settings - Device The Network Settings - Device page displays the stored network-related settings for the device. The user can modify the fields and click on Apply to have the new settings saved into system. All modifications will take effect only after and “System Restart” are selected on the Admin Settings page or the unit is power cycled. The following box will be prompted once The page will be refreshed once Opticon, Inc. is clicked. is clicked. http://www.opticon.
Network Settings – USB Ports The Network Settings – USB Ports page displays the Default IP Group or Alternative IP Group settings for USB ports. The user can modify the fields and click on Apply to have the new settings saved into flash memory. All modifications will take effect only after and “System Restart” are selected on the Admin Settings page or the unit is power cycled. is clicked. The following box will be prompted once The page will be refreshed once Opticon, Inc. is clicked. http://www.
System Admin. – Admin Settings The Administration page provides administration configuration for the device. The user can modify the fields and click on Apply to have settings saved into flash memory. New Password/Password Confirmation, System Restart, and Restore Factory Default will take effect after is selected, without the need of selecting “System Restart” on the Admin Settings page or power cycling.
System Admin. - Firmware Update The Firmware Update page allows the user to update the device with updated firmware. The new firmware will take effect only after “SYSTEM RESTART” on the Admin Settings page is selected or upon power cycling. The following box will be prompted once update is complete (~65 seconds after is clicked), then followed by System Restart which will take another 25 seconds to finish. Caution: please don’t power cycle or reset the device during Firmware Update. Opticon, Inc.
Reports & Stats The Reports & Stats page provides the user Event Logs with information about the device status. Selecting “Clear Event Log” will reset the Event Logs and take effect after clicking, without the need for selecting “SYSTEM RESTART” on Admin Settings page or power cycling. One hundred latest events will be kept. Event number will restart after power up, System Restart, and Restore Factory Default. The following box will be prompted once “Clear Event Log” is clicked.