
Writer Guide


This example uses one of the supplied styles, Numbering 1, however if
you intend to reuse this type of nested list you can also create a new
style as illustrated in Chapter 7 (Working with Styles).
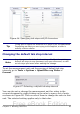
1) Open the Styles and Formatting
window and click the List
Styles icon at the top. Right-
click on the Numbering 1 style
and choose Modify from the
pop-up menu.
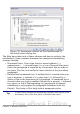
2) On the Numbering Style dialog
box, go to the Outline page,
where you will find that one
style matches our
requirements. Click once on
that style.
Figure 73: Choosing a predefined outline-numbering style
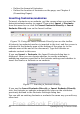
3) To modify the layout of the list, use the Options tab (Figures 74
and 75). Notice that the preview on the right shows the outline
selected. In the Level box on the left, select 1, then 2, 3, and 4
and see how the information in the Numbering and After boxes
changes.
Use the Options page to set different punctuation; for example, a
period (full stop) after “a” on level 4 instead of a parenthesis.
88 OpenOffice.org 3.x Writer Guide
Figure 72: Modifying a list style
Free eBook Edition