
Writer Guide


1 Bullets On/Off 6 Move Up (One Level) with
Sub-points
10 Move Down
2 Numbering On/Off 11 Move Up in Sub-points
3 Numbering Off 7 Move Down (One Level) with
Sub-points
12 Move Down in Sub-points
4 Up One Level 8 Insert Unnumbered Entry 13 Restart Numbering
5 Down One Level 9 Move Up 14 Bullets and Numbering
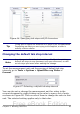
Figure 71: Bullets and Numbering toolbar
If you create a nested list using the predefined styles, all the levels of
the list (up to 10) apply the same numbering (or bullet), however in
many circumstances you will want to use a combination of numbering
formats and bullets when creating a nested lists. Such lists with a
mixture of numbering formats and bullets can be easily configured as
described in the following example. Additional information on lists and
in particular the technique to create your own list style is described in
Chapter 7 (Working with Styles).
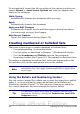
Tip
When creating nested lists, one option is to enter all the list
paragraphs first and apply the levels afterwards.
You can use keyboard shortcuts to move paragraphs up or
down the outline levels. Place the cursor at the beginning of
the numbered paragraph and press:
Tab Down a level
Shift+Tab Up a level
To insert a tab stop at the beginning of a numbered paragraph
(that is, after the number but before the text), press
Control+Tab.
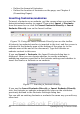
Example: configuring a nested list
We will use a numbering style to produce the following effect:
I. Level-1 list item
A. Level-2 list item
i. Level-3 list item
a) Level-4 list item
Chapter 3 Working with Text 87
Free eBook Edition