
Writer Guide


Creating a form for data entry
Whether you created a new database, or already had a data source, it
must be registered with OpenOffice.org (see above). Once it is
registered, linking your form to the data source is simple. Follow these
steps to create a new form and link it to a registered data source.
1) Create a new document in Writer (File > New > Text
Document).
2) Design your form, without putting in the actual fields (you can
always change it later).
3) Show the Form Controls toolbar (View > Toolbars > Form
Controls).
4) Click the Design Mode On/Off button to put the document
into design mode, if necessary. With design mode off, most of the
toolbar buttons are grayed out. If the Design Mode button is also
grayed out, click on the Select button to activate it.
5) Click the Text Box button . Click in the document and, holding
down the left mouse button, drag the mouse to create a text box
for the first form field (for example, Name, if you are linking to
the database created above).
6) Click the Text Box button again and drag the mouse to draw
another field. Additional fields, of any type, can be added in the
same way (click and drag).
So far you have followed the same steps you used before when you
created your first form. Now you link your form with the data source
you registered.
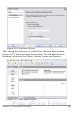
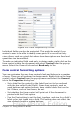
1) Click the Form button in the Form Controls toolbar, or right-
click on any of the fields you inserted and select Form, to open
the Form Properties dialog box.
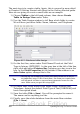
2) In the Form Properties dialog box, click on the Data tab.
• Set Data Source to be the data source you registered.
• Set Content Type to be Table.
• Set Content to be the name of the table you want to access.
• Close the dialog box.
494 OpenOffice.org 3.x Writer Guide
Free eBook Edition