
Writer Guide


Some of these items are picked up from the User Data page of the
Options dialog box (covered in Chapter 2, Setting up Writer), so make
sure the information on that page is correct.
Tip
Although these fields are often used to hold information that
changes, you can make the content unchangeable by selecting
the Fixed content option (visible in Figure 378, lower right)
when inserting the field. If necessary, you can come back to
this dialog box later and deselect this option to make the field
variable again.
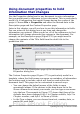
Using AutoText to insert often-used fields
If you use the same fields often, you will want a quick and easy way to
insert them. Use AutoText for this purpose. To define an AutoText entry
for a field:
1) Insert a field into your document, as described previously.
2) Select the field, and then choose Edit > AutoText (or press
Ctrl+F3).
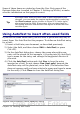
3) On the AutoText dialog box, choose the group where this new
entry will be stored (in this example, it is going into My AutoText),
type a name for the entry, and change the suggested shortcut if
you wish.
4) Click the AutoText button and click New to have the entry
inserted as a field. Do not choose New (text only) because the
AutoText entry will be plain text, not a field. (The selection New
does not appear until you have selected a group and typed a name
for the entry.) Click Close to close the AutoText dialog box.
Figure 380: Creating a new AutoText entry
Chapter 14 Working with Fields 449
Free eBook Edition