
Writer Guide


2) To evenly distribute the columns according to the page width,
check the AutoWidth box. If it is unchecked, you can manually
set each of the following:
• Width between each of the columns
• Spacing between each of the columns
3) You can choose to have a separator line between the columns:
• Line: The width (thickness) of the line.
• Height: The height of the line.
• Position: Position of the line relative to the columns (top,
middle, or bottom) if the height is less than 100%.
Maintaining an index
To modify the appearance of an index:
1) Click anywhere in the index and then right-click.
2) From the pop-up menu, choose Edit Index/Table. The Insert
Index/Table dialog box opens and you can edit and save the index
using the five tabs described in the previous section.
To update or delete an index, follow the process described in the
sections “Updating a table of contents” and “Deleting a table of
contents” on page 392.
Viewing and editing existing index entries
Once you have added the initial entries, you can make some
amendments or add some new ones. You can view and edit these using
the following steps:
1) Ensure that field shading is active (Tools > Options >
OpenOffice.org> Appearance > Text Document > Field
shadings), so you can locate index entries more easily.
2) Place the cursor immediately to the left of an existing index entry
in the body of your document and select Edit > Index Entry.
Alternatively, right-click on the word or phrase and from the pop-
up menu select Index Entry.
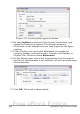
3) A dialog box similar to Figure 336 appears. You can move through
the various index entries using the forward and back arrow
buttons. If there is more than one entry for a single word or
phrase, then you can scroll through each of the entries.
4) Make the necessary modifications or additions to the index
entries and, when finished, click OK.
402 OpenOffice.org 3.x Writer Guide
Free eBook Edition