
Writer Guide


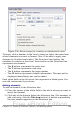


Figure 331: Inserting an index entry
See “Customizing index entries” on page 395 for an explanation of the
fields on this dialog box.
You can create multiple entries without closing the dialog box. For
each one:
1) Click at the location in the document that you want to index.
2) Click again on the dialog box.
3) Change the entry if needed, and click Insert.
4) Repeat steps 1–3 until you have finished with the entries, then
click Close.
Note
If field shading is active (see Tools > Options >
OpenOffice.org > Appearance > Text Document > Field
shadings), when a selected word or phrase has been added to
the index, it is shown in the text with a gray background. Index
entries whose text is different from the text in the document
are marked by a small gray rectangle.
Tip
You can also open the Insert Index Entry dialog box by clicking
the Entry icon on the Insert toolbar, as shown in Figure 332.
Figure 332: Entry icon on Insert toolbar
394 OpenOffice.org 3.x Writer Guide
Free eBook Edition