
Writer Guide


The document is now ready to be printed.
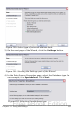
1) Choose File > Print and respond with Yes in the message box.
Figure 300: Confirmation message for merging
database fields
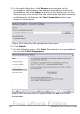
2) In the Mail Merge dialog box, you can choose to print all records
or selected records. To select records to be printed, use
Ctrl+click to select individual records. To select a block of
records, select the first record in the block, scroll to the last
record in the block, and Shift+click on the last record.
Figure 301: The Mail Merge dialog box
3) Click OK to send the letters directly to the printer.
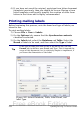
If you prefer to save the letters to a file, perhaps to allow
proofreading or some later formatting, select File in the output
section of the Mail Merge dialog box, instead of using the default
Printer selection. This changes the dialog box to display the Save
merged document section, where Save as single document is
pre-selected. You can choose to save each letter as a single,
individual document, if preferred.
In this case, clicking OK brings up the Save as dialog box. Enter a
file name for the saved letters. They will be saved consecutively in
the single document, or numbered consecutively in individual files
if saved as single documents.
Chapter 11 Using Mail Merge 357
Free eBook Edition