
Writer Guide


You can do this in two ways. In both cases, for best results the names
of styles should be the same in the existing document and the new
template. If they are not, you will need to use Search and Replace to
replace old styles with new ones. See Chapter 3 (Working with Text)
for more about replacing styles using Search and Replace.
Method 1
This method includes any graphics and wording (such as legal notices)
that exists in the new template, as well as including styles. If you don’t
want this material, you need to delete it.
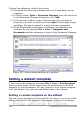
1) Use File > New > Templates and Documents. Choose the
template you want. A new file is created from the template. If the
template has unwanted text or graphics in it, delete them from
this new file.
2) Open the document you want to change. (It opens in a new
window.) Press Control+A to select everything in the document.
Paste into the blank document created in step 1.
3) Update the table of contents, if there is one. Save the file.
Method 2
This method does not include any graphics or text from the new
template, except material in headers and footers; it simply includes
styles from the new template and establishes an association between
the template and the document.
1) Download the Template Changer extension from
http://extensions.services.openoffice.org/ and install it as
described on page 341.
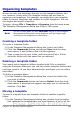
2) Close and reopen OpenOffice.org. Now the File > Templates
menu has two new choices: Assign Template (current document)
and Assign Template (folder).
3) Open the document whose template you want to change. Choose
File > Templates > Assign Template (current document).
4) In the Select Template window, find and select the required
template and click Open.
5) Save the document. If you now look in File > Properties, you will
see the new template listed at the bottom of the General page.
344 OpenOffice.org 3.x Writer Guide
Free eBook Edition