
Writer Guide


you can add the template to a folder as described in “Importing a
template” on page 346.
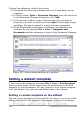
To set a custom template as the default:
1) From the main menu, choose File > Templates > Organize. The
Template Management dialog box (Figure 284) opens.
2) In the box on the left, select the folder that contains the template
that you want to set as the default, then select the template.
3) Click the Commands button and choose Set as Default
Template from the drop-down menu.
The next time that you create a document by choosing File > New >
Text Document, the document will be created from this template.
Although many important settings can be changed in the Options
dialog (see Chapter 2), for example default fonts and page size, more
advanced settings (such as page margins) can only be changed by
replacing the default template with a new one.
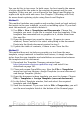
Resetting Writer’s Default template as the default
To re-enable Writer’s Default template as the default:
1) In the Template Management dialog box (Figure 284), select any
folder in the box on the left.
2) Click the Commands button and choose Reset Default
Template > Text Document from the drop-down menu.
The next time that you create a document by choosing File > New >
Text Document, the document will be created from Writer’s Default
template.
Associating a document with a different
template
At times you might want to associate a document with a different
template, or perhaps you’re working with a document that did not start
from a template.
One of the major advantages of using templates is the ease of updating
styles in more than one document, as described in Chapter 7 (Working
with Styles). If you update styles by loading a new set of styles from a
different template (as described in Chapter 7), the document has no
association with the template from which the styles were loaded—so
you cannot use this method. What you need to do is associate the
document with the different template.
Chapter 10 Working with Templates 343
Free eBook Edition