
Writer Guide


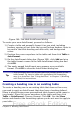

Figure 280: The table AutoFormat dialog
To create your own AutoFormat, proceed as follows:
1) Create a table and manually format it as you wish, including
borders, spacing of text from the top and bottom borders, fonts to
be used in the table heading and data cells, and background
colors.
2) Position the cursor anywhere in the table and then click Table >
AutoFormat.
3) On the AutoFormat dialog box (Figure 280), click Add and give
the table format a name in the Add AutoFormat dialog box and
click OK.
4) The newly named AutoFormat now appears as an available
format. Click OK to close the AutoFormat dialog box.
Tip
This technique does not include table and column widths in the
table format. To insert a table with predefined full formatting,
save it as AutoText. See “Using AutoText” in Chapter 3 (Working
with Text) for instructions.
Creating a heading row in an existing table
To create a heading row in an existing table that does not have one,
you need to apply an AutoFormat that does have a heading defined.
(Here is where having some personalized table formats could come in
very handy.) Place the cursor anywhere in the table and then click
Table > AutoFormat. Choose a format. Click OK. Use the More
button and deselect the formatting options you do not want to apply to
your table.
Chapter 9 Working with Tables 329
Free eBook Edition