
Writer Guide


You can also quickly insert a row or a column using only the keyboard:
1) Place the cursor in the row or column next to the row or column
you want to insert.
2) Press Alt+Insert to activate keyboard handling.
3) Use the arrow keys as desired to add a row or column:
Left to insert a new column to the left of the cell where the cursor
is located.
Right to insert a new column to the right of the cell where the
cursor is.
Down to insert a new row below the cell where the cursor is.
Up to insert a new row above the cell where the cursor is.
The above keyboard technique can also be used to delete rows or
columns by substituting the Alt+Insert keystroke combination in Step
2 with Alt+Delete.
Merging and splitting cells
To merge a group of cells into one cell:
1) Select the cells to merge.
2) Right-click and choose Cell > Merge on the pop-up menu, or
choose Table > Merge Cells from the menu bar.
To split a cell into multiple cells:
1) Position the cursor inside the cell.
2) Right-click and choose Cell > Split on the pop-up menu, or
choose Table > Split Cells from the menu bar.
3) Select how to split the cell. A cell can be split either horizontally
(create more rows) or vertically (create more columns), and you
can specify the total number of cells to create.
It is generally a good rule to merge and split cells after completing
other layout formatting. This is because some operations such as
deleting a column or a row may produce a result difficult to predict
when applied to a table with merged or split cells.
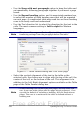
Specifying table borders
On the Table Format dialog box, select the Borders tab (Figure 274).
Here you can set borders for a whole table or groups of cells within a
table. In addition, a shadow can be set for the whole table.
314 OpenOffice.org 3.x Writer Guide
Free eBook Edition