
Writer Guide


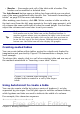


In this case, the separator between elements is a semicolon. By
selecting the text and applying the conversion, we obtain the following
result.
Row 1 Column 1 Row 1 Column 2 Row 1 Column 3
Row 2 Column 1 Row 2 Column 2 Row 2 Column 3
Note that, unlike when creating a table with other mechanisms, the
conversion from text to table preserves the paragraph style applied to
the original text.
You can also use the Convert menu to perform the opposite operation;
that is, to transform a table into plain text. This may be useful when
you want to export the table contents into a different program.
To transform a table into text, place the cursor anywhere in the table,
choose Table > Convert > Table to Text in the main menu, pick the
preferred row separator, and click OK to finish.
Formatting the table layout
Formatting a table is, generally speaking, a two-step process:
formatting of the table layout (the subject of this section) and
formatting of the table text (the subject of the next section).
Formatting the layout normally involves one or more of the following
operations: adjusting the size of the table and its position on the page,
adding or removing rows or columns, merging and splitting individual
cells, changing borders and background.
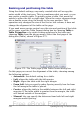
Default parameters
If you create a table using the Insert Table dialog box or the Table icon
on the Standard toolbar and activate the Heading option, the
following defaults are set:
• The cells in the heading row (or rows) use the Table Heading
paragraph style. In the default template, the text is centered and
set with a bold and italic font.
• The remaining cells use the Table Contents paragraph style,
which, in the default template, is identical to the Default
paragraph style.
• The default table occupies all the space from margin to margin
(text area).
• The default table has thin black borders around each cell (grid).
Chapter 9 Working with Tables 309
Free eBook Edition