
Writer Guide


The settings can be accessed in a number of ways, depending on the
nature of the graphics:
1) From the Format menu, where you can find Alignment,
Arrange, Wrap, and Anchor (both for images and drawing
objects).
2) From the pop-up menu displayed when you right-click on the
graphic.
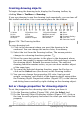
3) From the Object toolbar shown in Figure 258.
4) For images, from the Type and Wrapping pages of the Picture
dialog box. Note that you cannot control the arrangement using
the dialog box. To open the Picture dialog box, click on the image
to select it and then choose Format > Picture or right-click on
the graphic and choose Picture on the pop-up menu.
5) For drawing objects, from the Position and Size page of the
Position and Size dialog box. To open the Position and Size dialog
box, click on the drawing object to select it and then choose
Format > Object > Position and Size or right-click on the
graphic and choose Position and Size on the pop-up menu. Note
that you can only control the alignment and anchoring.
1 Apply Style 6 Center Horizontal 11 Borders 16 Bring to Front
2 Wrap Off 7 Align Right 12 Line Style 17 Send to Back
3 Page Wrap 8 Top 13 Line Color (of the
border)
18 Change Anchor
4 Wrap Through 9 Center 14 Background Color 19 Link Frames
5 Align Left 10 Bottom 15 Frame Properties 20 Unlink Frames
Figure 258. Object toolbar (graphical control of positioning for images)
Arranging graphics
Arranging a graphic object means to determine its vertical position
relative to other graphic objects or text. Arranging is only relevant
when objects are overlapping. You can choose between four settings,
plus a special setting for drawing objects:
Bring to Front
Places the graphic on top of any other graphics or text.
Chapter 8 Working with Graphics 287
Free eBook Edition