
Writer Guide


3) For more control, or to define new attributes, you can click on the
Area or Line icons on the toolbar to display detailed dialog boxes.
The default you set applies to the current document and session. It is
not retained when you close the document or close Writer, and it does
not apply to any other document you open. The defaults apply to all the
drawing objects except text objects.
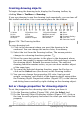
1 Line 5 Line Color 9 To Foreground 13 Alignment
2 Arrow Style 6 Area 10 To Background 14 Change Anchor
3 Line Style 7 Area Style / Filling 11 Bring to Front 15 Ungroup
4 Line Width 8 Rotate 12 Send to Back 16 Group
Figure 257. Drawing Object Properties toolbar
To change the properties for an existing drawing object:
1) Select the object.
2) Continue as described above.
You can also specify the position and size, rotation, and slant and
corner radius properties of the drawing object:
1) Right-click on the drawing object and then click Position and Size
from the pop-up menu. The Position and Size dialog box is
displayed.
2) Choose any properties, as required.
Resizing a drawing object
The same considerations for resizing an image apply also to resizing an
object. Select the object, click on one of the eight handles around it
and drag it to its new position. For a scaled resizing, select one of the
corner handles and keep the Shift key pressed while dragging the
handle to its new position.
For more sophisticated control of the size of the object, select Format
> Object > Position and Size from the menu bar. Use the Position
and Size dialog box to set the width and height independently. If the
Keep ratio option is selected, then the two dimensions change so that
the proportion is maintained, allowing for a scaled resizing.
Chapter 8 Working with Graphics 285
Free eBook Edition