
Writer Guide


Creating drawing objects
To begin using the drawing tools, display the Drawing toolbar, by
clicking View > Toolbars > Drawing.
If you are planning to use the drawing tools repeatedly, you can tear off
this toolbar and move it to a convenient place on the window.
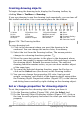
1
Select 5 Freeform Line
9
Symbol Shapes 13 Stars
2 Line 6 Text 10 Block arrows 14 Points
3 Rectangle 7 Callouts 11 Flowcharts 15 Fontwork Gallery
4 Ellipse 8 Basic Shapes 12 Callouts 16 From File
17 Extrusion On/Off
Figure 256. The Drawing toolbar
To use a drawing tool:
1) Click in the document where you want the drawing to be
anchored. You can change the anchor later, if necessary.
2) Select the tool from the Drawing toolbar. The mouse pointer
changes to a drawing-functions pointer .
3) Move the cross-hair pointer to the place in the document where
you want the graphic to appear and then click-and-drag to create
the drawing object. Release the mouse button. The selected
drawing function remains active, so you can draw another object
of the same type.
4) To cancel the selected drawing function, press the Esc key or
click on the Select icon (the arrow) on the Drawing toolbar.
5) You can now change the properties (fill color, line type and
weight, anchoring, and others) of the drawing object using either
the Drawing Object Properties toolbar (Figure 257) or the choices
and dialog boxes reached by right-clicking on the drawing object.
Set or change properties for drawing objects
To set the properties for a drawing object before you draw it:
1) On the Drawing toolbar (Figure 256), click the Select tool.
2) On the Drawing Object Properties toolbar (Figure 257), click on
the icon for each property and select the value you want for that
property.
284 OpenOffice.org 3.x Writer Guide
Free eBook Edition