
Writer Guide


Left, Right, Top, and Bottom
The image is cropped by the amount entered in these boxes. For
example, a value of 3cm in the Left box cuts 3 cm from the left side
of the picture.
• When Keep scale is selected, the size of the image also changes,
so in this example the width will be reduced by 3 cm.
• When Keep image size is selected, the remaining part of the
image is enlarged (when you enter positive values for cropping)
or shrunk (when you enter negative values for cropping) so that
the width and height of the image remains unchanged.
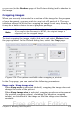
Width and Height
The Width and Height fields under either Scale or Image size
change as you enter values in the Left, Right, Top, and Bottom
fields. Use the thumbnail next to these fields to determine the
correct amount by which to crop.
Resizing an image
The inserted image might not fit perfectly into the document if it is too
big or too small. In these cases you can use Writer to resize the image.
1) Click the picture, if necessary, to show the green resizing handles.
2) Position the pointer over one of the green resizing handles. The
pointer changes shape giving a graphical representation of the
direction of the resizing.
3) Click and drag to resize the picture.
4) Release the mouse button when satisfied with the new size.
The corner handles resize both the width and the height of the graphic
object simultaneously, while the other four handles only resize one
dimension at a time.
Tip
To retain the original proportions of the graphic, Shift+click
one of the corner handles, then drag. Be sure to release the
mouse button before releasing the Shift key.
Be aware that re-sizing a bit-mapped (raster) image will adversely
affect the resolution, causing some degree of blurring. It is better to
externally size your picture correctly before insertion into your
presentation, if possible.
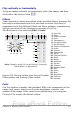
Figure 255 shows three examples of an image inserted into a
document and resized.
280 OpenOffice.org 3.x Writer Guide
Free eBook Edition