
Writer Guide


If the document will be available in black-and-white print only, a better
result can often be obtained by choosing grayscale fills, not color fills—
and you don’t have to guess and test to see if you’ve made good
choices.
Adding images to a document
Images can be added to a document in several ways: by inserting an
image file, directly from a graphics program or a scanner, or from the
OOo Gallery.
Inserting an image file
When the image is in a file stored on the computer, you can insert it
into an OOo document using either of the following methods.
Drag and drop
1) Open a file browser window and locate the image you want to
insert.
2) Drag the image into the Writer document and drop it where you
want it to appear. A faint vertical line marks where the image will
be dropped.
This method embeds (saves a copy of) the image file in the Writer
document. To link the file instead of embedding it, hold down the
Control+Shift keys while dragging the image.
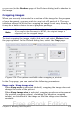
Insert Picture dialog
1) Click in the OOo document where you want the image to appear.
2) Choose Insert > Picture > From File from the menu bar.
3) On the Insert Picture dialog, navigate to the file to be inserted,
select it, and click Open.
At the bottom of the dialog are two options, Preview and Link. Select
Preview to view a thumbnail of the selected image on the right, so you
can verify that you have the correct file. See below for the use of Link.
Chapter 8 Working with Graphics 271
Free eBook Edition