
Writer Guide
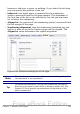


The options available on this page depend on the type of marker
selected for the list. First, on the left side, select the level you want to
modify. To modify all ten levels at once, select 1 – 10 as the level. If
you started from a predefined outline, some of the levels will already
have settings.
Depending on the numbering style selected in the Numbering box
(bullet, graphic, numbering), some of the following options become
available on the page:
• Before: any text to appear before the number (for example,
Step).
• After: any text to appear after the number (for example, a
punctuation mark).
• Color: the color for the list marker (number or bullet character).
• Relative size: the size of the number relative to the size of the
characters in the paragraph of the list.
• Start at: the first value of the list (for example, you might want
the list to start at 4 instead of 1).
• Character Style: the style to be used for the number or bullet.
• Character button: click to select the character for the bullet.
• Graphics selection button: opens a list of available graphics
(Gallery) or allows the selection of a file on the hard disk to be
used as the list marker.
• Width and Height: the dimensions of the graphic marker.
• Alignment: the alignment of the graphic object.
• Keep ratio option: fixes the ratio between the width and the
height of the graphic marker.
The right-hand side of the dialog box shows a preview of the
modifications made.
To revert to the default values, click the Reset button in the bottom
right corner. Finally, if you wish to use consecutive numbers regardless
of the outline level, check the Consecutive numbering box at the
bottom of the page.
Combining list and paragraph styles
When applying a list style, the underlying paragraph style remains
unchanged. If your list must also have a certain font size, indentations,
and so on, you might expect to first apply a paragraph style and then a
list style (or vice versa). However, you can embed a list style in a
264 OpenOffice.org 3.x Writer Guide
Free eBook Edition