
Writer Guide


• Next Style: only available for paragraph and page styles. Use it
to specify which style will be applied to the next element. It is
customary, for example, to have a left page style followed by a
right page, a first page followed by a left page, a heading followed
by body text, and so on. You will see in the example later how this
property is used. Predefined paragraph styles for lists or bullets
also make large use of the Next Style property.
• Linked with: available for paragraph, character, and frame
styles; it determines the position of the style in the hierarchy.
When creating a new style and linking it to an existing style, all
the starting properties of the style are copied from the linked style.
Refer to “Understanding linked styles” for further information on
how linked styles work.
• Category: available for all styles; use it to associate the new style
with one of the categories. Note that you cannot change the
category of the predefined styles. Setting this field is useful when
filtering the contents of the Styles and Formatting window.
• Contains section: the lower part of the Organizer page shows a
summary of the properties of the style.
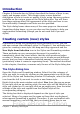
Understanding linked styles
When creating a new paragraph or a new
character style, you may use an existing style as
a starting point for its settings. In this sense,
OOo links the styles together.
When styles are linked, a change in the parent
style affects every style linked to it. You can
easily visualize the connections between styles
by switching to the Hierarchical view in the
Styles and Formatting window filter.
For example, every Heading style (such as
Heading 1, Heading 2) is linked with a style
called Heading. This relationship is illustrated
in Figure 218.
Chapter 7 Working with Styles 227
Figure 218:
Hierarchical view of
linked styles
Free eBook Edition