
Writer Guide


Numbering portrait and landscape pages
To create page numbers on portrait and landscape pages in the same
place and orientation:
1) Refer to “Portrait headers on landscape pages” on page 147 to
create a landscape page style and landscape header or footer
styles. When creating the page style, select the Use dynamic
spacing option in the Spacing area in the Header or Footer pages
of the Page Style dialog box.
2) Insert the page break and choose the landscape page style; do not
change the page numbering.
3) In the relevant header or footer, insert the page number field
(Insert > Fields > Page Number).
Defining borders and backgrounds
You can apply borders and backgrounds to many elements in Writer.
Paragraphs, pages, frames, sections, page styles, paragraph styles, and
frame styles can include both borders and backgrounds; character
styles, tables of contents, and indexes can include backgrounds only.
The dialog box pages for borders and backgrounds are similar in each
case. To illustrate their use, we will define a border and background
for a text frame.
Tip
Page backgrounds fill only the area within the margins,
including the header or footer (if any). To extend the background
color or graphic into the margins, you need to define a frame of
appropriate size and position, anchor it to the page or a
paragraph, and send it to the background. For more about
anchoring frames, see Chapter 8 (Working with Graphics).
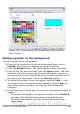
Adding a border
To begin, select the frame, right-click, and choose Frame from the pop-
up menu. Choose the Borders tab.
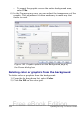
Borders have three components: where they go, what they look like,
and how much space is left around them.
• Line arrangement specifies where the borders go. Writer provides
five default arrangements but you can just as easily click on the
line you want to customize in the User-defined area to get exactly
what you want. Each line can be individually formatted.
Chapter 4 Formatting Pages 161
Free eBook Edition