
Writer Guide


• Select text or a graphic, choose Insert > Frame, and click OK to
create a frame containing the selection. The selected text is
automatically deleted from the normal text flow and inserted into
the frame, and the Frame dialog box appears.
• Insert a picture or other object by selecting Insert > Picture >
From file or Insert > Object to start the process to insert a
picture or object. The item inserted automatically appears in a
frame, but the Frame dialog box does not appear.
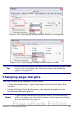
• Use the Insert Frame Manually button on the Insert
toolbar (go to View > Toolbars > Insert to display it), select the
number of frames in the drop-down menu, and drag the mouse to
draw the frame.
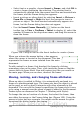
Figure 108: Using an icon on the Insert toolbar to create a frame
When you release the mouse button, a box appears
where the cursor is located in the document. This box
represents the frame: an area isolated from the main
document.
To add content to a frame, first deselect the frame by clicking
somewhere else on the page. Then, click inside the frame so that the
cursor shifts its focus there. Now add content just like you would on
the main page. When you are done, deselect the frame.
Moving, resizing, and changing frame attributes
When an object is added to Writer, it is automatically enclosed in a
frame of a predetermined type. The frame sets how the object is placed
on the page, as well as how it interacts with other elements in the
document. You can edit the frame by modifying the frame style it uses
or by using a manual override when a frame is added to the document.
Frame styles are discussed in Chapter 7 (Working with Styles).
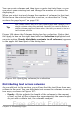
To change the size or location of a frame, first select the frame, then
use either the mouse or the Frame dialog box (Figure 109). Using the
mouse is faster but less accurate. You might use the mouse for gross
layout and the dialog box for fine-tuning.
128 OpenOffice.org 3.x Writer Guide
Free eBook Edition