
Getting Started Guide
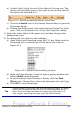
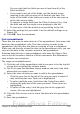

• Click another row and then click this icon again. The data in
the sentence changes to this selected row of data.
• Save the document if you want to use it as an example later.
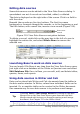
Figure 221: Selected row in data source window
Adding data in table format is a little easier and takes perhaps fewer
steps. Some of the steps will be quite similar.
1) Navigate to the place you want to place the table and click the
location.
2) Control+Click the gray box to the left of each row of the data
source that you want to be a row in your table when the rows are
not consecutive. To select consecutive rows, click the gray box to
the left of the top desired row and Shift+click the bottom desired
row.
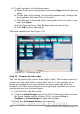
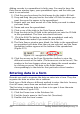
3) Click the Data to text icon to open the Insert Database Columns
dialog (Figure 222). (The Data to text icon is to the left of the
Data to Fields icon in Figure 221.)
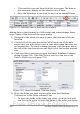
Figure 222: Insert Database Columns dialog
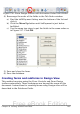
4) Move the fields you want in your table from the Database
Columns list to the Table column(s) list.
• To place the fields in the order you select, click the field and
use the single arrow to move the fields in the order you desire.
288 Getting Started with OpenOffice.org 3.x
Free eBook Edition