
Getting Started Guide


1) Provide a dropdown capability for the Date field in the main form,
and lengthen the field to show the day of the week, month, day,
and year.
2) Shorten the length of the payment fields (all fields containing the
word Payment).
3) Move the controls into groups: food, fuel subform, and
miscellaneous.
4) Change the wording of some of the labels. Some single words
should be two words. Some abbreviations should be used if
possible (Misc. for miscellaneous).
5) Change the lengths of several fields and labels. Only Lunch,
Supper, Motel, and Tolls have acceptable lengths. But for a better
appearance, changes will be made to these as well.
6) Replace all the fields whose label ends in Payment with a list box
containing the entries from the Payment Type table.
7) Lengthen the Note field vertically, add a scroll bar, and move it.
8) Make changes in the Date and PaymentType columns of the
subform that are similar to the changes in the main form.
9) Add headings for each group in the main form.
10) Change the background to a picture, then modify some of the
labels so that they can be read clearly. Change the font color of
the headings.
Here are some methods that we will be using in these steps. The
controls in the main form consists of a label and its field. Sometimes
we want to work with the entire control, other times we want to work
with only the label or the field, and there are times when we want to
work with a group of controls.
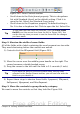
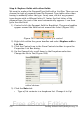
• Clicking a label or field selects the entire control. A border
appears around the control with eight green handles (Figure
199). You can then drag and drop it where you want.
Figure 199: A selected control
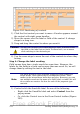
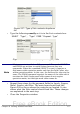
• Control+click a label or field selects only the label or the field
(Figure 200). You can press the Tab key to change the selection
from the field to the label or the label to the field.
Chapter 8 Getting Started with Base 271
Free eBook Edition