
Getting Started Guide


You can also select the icons that you wish to appear on the
corresponding toolbar. On the View > Toolbars menu, choose
Customize, click on the Toolbars tab, select the toolbar you want to
change, and then select the desired icons for that toolbar.
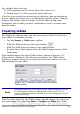
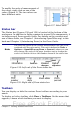
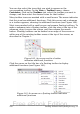
Many toolbar icons are marked with a small arrow. The arrow indicates
that this icon has additional functions. Click this arrow and a submenu
or a toolbar appears, showing its additional functions (see Figure 160).
Most icons marked with a small arrow can become floating toolbars. To
make a submenu into a floating toolbar, click the area at the top of the
submenu, drag it across the screen, and then release the mouse
button. Floating toolbars can be docked on an edge of the screen or
within one of the existing toolbar areas at the top of the screen, as
described in Chapter 1.
Figure 160. An arrow next to a button
indicates additional functions
Click the arrow on the title bar of a floating toolbar to display
additional functions (see Figure 161).
Figure 161. An arrow on a floating toolbar indicates
additional functions
220 Getting Started with OpenOffice.org 3.x
Free eBook Edition