
Calc Guide


3) In the target document, press F5 to open the Navigator.
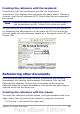
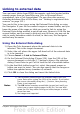
4) At the bottom of the Navigator, select the source document. (In
Figure 256, the source is named actives.)
The Navigator now shows the range names or the tables
contained in the source document (the example contains range
names; other documents have a list of tables). Click on the + next
to Range names to display the list.
Figure 256: Selecting a data range in a
source document, to be inserted as a link
5) In the Navigator, select the Insert as Link drag mode, as shown
in Figure 256.
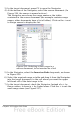
6) Select the required range or table and drag it from the Navigator
into the target document, to the cell where you want the upper
left-hand cell of the data range to be.
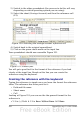
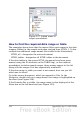
7) In the target document, check the Navigator. Instead of a + by
Range names, it shows a + by Linked areas. Click the + to see the
same range name (see Figure 257).
Chapter 10 Linking Calc Data 309